
Welcome back. For those who have been following along, let's pick up where we left off. In Level 6 we put together our first attempt at the test function and deployed it to dev (i.e. our local machine). We then ran some tests and encountered a few problems. In this Level we will start fixing those problems. The primary focus will be on Security and Automation.
For those who are just now coming into this, the Development topic is spread across 3 Levels, where each article requires any preceding articles in this set of 3. This is not to say that you cannot learn something by reading only this particular article, but that the examples won't work and might not make sense if you don't start with the first article in this set of three Levels – 6, 7, and 8.
Part 2: Refactor to Fix Initial Issues
As we should expect, especially when doing Agile development, testing our testing function exposed some issues that need to be fixed. We will address them in the order in which they were found (and subsequently numbered). Switch back to Visual Studio, open the Project if you had closed it (go to the "File" menu, select "Recent Projects and Solutions ->", and select "C:\...\ StairwayToSQLCLR-06_ConnectionTypeTest.sln").
Make the Changes
We will start by fixing the first two issues, then test the changes, then continue with additional fixes.
Issue #1: Assembly Version Number is Missing
- Go to the "StairwayToSQLCLR-06_ConnectionTypeTest" tab if it is open, else go to the "Project" menu and select "StairwayToSQLCLR-06_ConnectionTypeTest Properties..." (bottom option).
- Go to the "SQLCLR" tab.
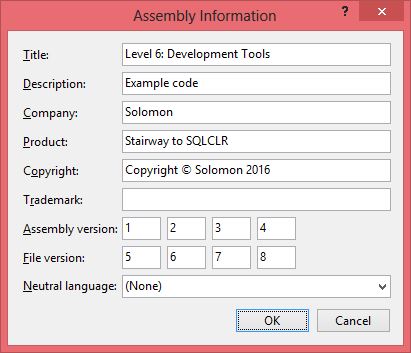
- Click on the "Assembly Information..." button.
- Fill out the four "File version" fields with the numbers 5, 6, 7, and 8 each in a separate box. Using different numbers from the ones used for "Assembly version" will help differentiate the source of the values if different methods of accessing that info display those values differently.

- Click the "OK" button.
- Hit <Control-S> to save the change (which is stored in the "AssemblyInfo.cs" file)
Issue #2: "System.Security.SecurityException" Error
- Go to the "SQLCLR" tab in "Project Properties"
- Set the "Permission level" drop-down to "EXTERNAL_ACCESS"
- Hit <Control-S> to save the change.
- That was easy, right? Perhaps a little too easy? We shall see.
Publish the Changes
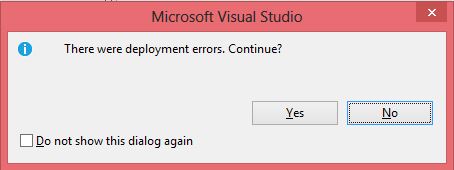
- Hit <Control-F5> to Build and Publish the project to the dev / test LocalDB instance
- You should get the following error dialog:
- Click the "No" button.
- Left-click once in the "Output" window, or even on the title bar of the "Output" window, to make it the active window.
- Hit <Control-F> to display the search box in the upper-right-hand corner of the "Output" window.
- Type in "altering" into the search box (without the quotes)
- The window should be set to the one occurrence of that string. Just below that line, you should see the following error (emphasis added):
C:\TEMP\StairwayToSQLCLR\Level-06\StairwayToSQLCLR-06_ConnectionTypeTest\StairwayToSQLCLR-06_ConnectionTypeTest\bin\Debug\StairwayToSQLCLR-06_ConnectionTypeTest2.sql(52,1): Error: SQL72014: .Net SqlClient Data Provider: Msg 10327, Level 14, State 1, Line 1 ALTER ASSEMBLY for assembly 'StairwayToSQLCLR-06_ConnectionTypeTest1' failed because assembly 'StairwayToSQLCLR-06_ConnectionTypeTest1' is not authorized for PERMISSION_SET = EXTERNAL_ACCESS. The assembly is authorized when either of the following is true: the database owner (DBO) has EXTERNAL ACCESS ASSEMBLY permission and the database has the TRUSTWORTHY database property on; or the assembly is signed with a certificate or an asymmetric key that has a corresponding login with EXTERNAL ACCESS ASSEMBLY permission.
In order to proceed, we have two choices:
- Set the database property of "TRUSTWORTHY" to "ON", or
- Use signature-based permissions, which involves:
- Sign the assembly
- Create an Asymmetric Key in [master] based on the signature used to sign the Assembly
- Create a Login (also in [master]) from that Asymmetric Key
- Grant that Login the "EXTERNAL ACCESS ASSEMBLY" permission
Choosing the "TRUSTWORTHY" option is clearly easier, which is probably why it is (unfortunately) the more commonly recommended method. But it presents an unnecessary security risk, so it is best to go with the signature-based permission option. However, and quite unfortunately, Visual Studio / SSDT does not provide an easy means of handling this. Thus, we need to get a bit creative in order to handle this properly.
Signing the Assembly (Step 1) is rather easy, and we will get to that in a moment. Creating the Login and granting it the appropriate permission (Steps 3 and 4) are also very easy. But creating the Asymmetric Key (Step 2) is a bit tricky. It would be easy enough if the target SQL Server instance was on the same machine that Visual Studio is on since the easier method of creating an Asymmetric Key is to provide the file path to the generated DLL of the Assembly. But that leaves your deployment script with an external dependency (the DLL itself) that is not guaranteed to exist, or to be the correct version of the DLL. The deployment script should be self-contained, just like it is currently, given that the DLL is converted to a hex bytes string that represents a VARBINARY value used in the "CREATE ASSEMBLY" to specify "FROM 0x09DFxxxx....".
Slight Detour
The easiest way that I have found to accomplish this is to create a new Project in the same Solution. When we created our Project initially, it set up a Solution (hence the "Solution Explorer" window that we looked at towards the beginning of the article). Now we can add any number of Projects to the Solution, each Project being its own Assembly / DLL. We won't add any .NET code to the new Project except for a simple dummy / placeholder function that exists only to get SSDT to generate the CREATE ASSEMBLY statement; it will mainly serve as a container for the Key info that will be used to both sign the Assembly in our current Project and create the Asymmetric Key in SQL Server. What? An empty Assembly / DLL? Am I crazy? Almost certainly. But this is the third (or possibly 4th) time that it will prove useful. And to be fair, there are a couple of SQL scripts, but they won't be deployed, at least not directly from this Project. Anywho, it will all make sense soon enough.
- In the "Solution Explorer" window (right-hand side of the Visual Studio IDE), right-click on the top item "Solution ‘StairwayToSQLCLR-06_ConnectionTypeTest'", go to "Add >", and select "New Project..."
- The "Add New Project" dialog window should be preset to "SQL Server Database Project"
- In the "Name" field, replace "Database1" with "KeyInfo"
- Click the "OK" button
- In the "Solution Explorer" window, right-click on "KeyInfo" (just below the top-level Solution item), and go to "Add >", then select "New Item..."
- The "Add New Item - KeyInfo" modal dialog will pop up
- In the left-side tree-view, select the "SQL CLR C#" group within "SQL Server"
- In the middle area, select "SQL CLR C# User Defined Function"
- In the "Name" field, replace "SqlFunction1.cs" with "OnlyNeededToGenerateCreateAssembly.cs" (without the quotes)
- Click the "Add" button
- Close the "OnlyNeededToGenerateCreateAssembly.cs" tab (no need to make any changes as this code won't even have a T-SQL wrapper object generated for it; it just needs to exist)
- In the "Solution Explorer" window, right-click on "KeyInfo" (just below the top-level Solution item), and go to "Add >", then select "New Item..."
- The "Add New Item - KeyInfo" modal dialog will pop up
- In the left-side tree-view, select the "User Scripts" group within "SQL Server"
- In the middle area, select "Script (Not in build)"
- In the "Name" field, replace "Script1.sql" with "AssemblySecuritySetup-Part1of2.sql" (without the quotes)
- Click the "Add" button
- Paste the following code into the Visual Studio editor (code also available in the C:\TEMP\StairwayToSQLCLR\Level-06\Scripts\AssemblySecuritySetup-Part1of2.sql script):
/**********************************************
 * Script:  AssemblySecuritySetup.sql
 * Date:    2016-01-20
 * By:      Solomon Rutzky
 * Of:      Sql Quantum Leap ( http://SqlQuantumLeap.com )
 *
 * Stairway to SQLCLR - Level 6: Development Tools
 *
 * Stairway to SQLCLR series:
 * http://www.sqlservercentral.com/stairway/105855/
 *
 **********************************************/
USE [master];
SET ANSI_NULLS ON;
SET QUOTED_IDENTIFIER ON;
SET NOCOUNT ON;
GO
--------------------------------------------------------------------------------
DECLARE @ErrorMessage NVARCHAR(4000);

-- We first need to create the Assembly containing just
-- the Key info so that we can get the "thumbprint" /
-- "publickeytoken" value from it. That value is used to
-- determine if the Asymmetric Key and Login already exist.
--
-- We only need this Assembly temporarily, so create within
-- a transaction to guarantee cleanup if something fails.
DECLARE@AssemblyName sysname, -- keep lower-case for servers with case-sensitive / binary collations
@AsymmetricKeyName sysname, -- keep lower-case for servers with case-sensitive / binary collations
@LoginName sysname, -- keep lower-case for servers with case-sensitive / binary collations
@PublicKeyToken VARBINARY(32),
@SQL NVARCHAR(MAX);
SET @AssemblyName = N'$StairwayToSQLCLR-TEMPORARY-KeyInfo$';
SET @AsymmetricKeyName = N'StairwayToSQLCLR-06_PermissionKey';
SET @LoginName = N'StairwayToSQLCLR-06_PermissionLogin';
BEGIN TRY
BEGIN TRAN;
IF (NOT EXISTS(
SELECT*
FROM[sys].[assemblies] sa
WHERE[sa].[name] = @AssemblyName
)
)
BEGIN
SET @SQL = N'
CREATE ASSEMBLY [' + @AssemblyName + N']
AUTHORIZATION [dbo]
-- Insert the result of the following command, found in _TempAssembly.sql, here:
-- FINDSTR /I /C:"FROM 0x" KeyInfo_Create.sql > _TempAssembly.sql
- Go to the "File" menu, and select "Advanced Save Options..."
- The "Advanced Save Options" modal dialog should pop up, and the "Encoding" drop-down is probably set to "Unicode (UTF-8 with signature) - Codepage 65001"
- Set the "Encoding" drop-down to "Western European (Windows) - Codepage 1252" (it might be the top option):
- Click the "OK" button
- Hit <Control-S> to save
- Close the "AssemblySecuritySetup-Part1of2.sql" tab
- Repeat the previous section of steps (#12 - #23), with the following two exceptions:
- For "Name", use: "AssemblySecuritySetup-Part2of2.sql"
- For the code, paste in the following (code also available in the C:\TEMP\StairwayToSQLCLR\Level-06\Scripts\AssemblySecuritySetup-Part2of2.sql script):
';
EXEC (@SQL);
END;

SET @PublicKeyToken = CONVERT(VARBINARY(32), ASSEMBLYPROPERTY(@AssemblyName, 'PublicKey'));
IF (NOT EXISTS(
SELECT*
FROM[sys].[asymmetric_keys] sak
WHEREsak.[thumbprint] = @PublicKeyToken
)
)
BEGIN
SET @SQL = N'
CREATE ASYMMETRIC KEY [' + @AsymmetricKeyName + N']
AUTHORIZATION [dbo]
FROM ASSEMBLY [' + @AssemblyName + N'];';
EXEC (@SQL);
END;
SET @SQL = N'DROP ASSEMBLY [' + @AssemblyName + N'];';
EXEC (@SQL);
COMMIT TRAN;
END TRY
BEGIN CATCH
IF (@@TRANCOUNT > 0)
BEGIN
ROLLBACK TRAN;
END;
SET @ErrorMessage = ERROR_MESSAGE();
RAISERROR(@ErrorMessage, 16, 1);
RETURN; -- exit the script
END CATCH;

-- If the Asymmetric Key exists but the Login does not exist, we need to:
-- 1) Create the Login
-- 2) Grant the appropriate permission
IF (EXISTS(
SELECT*
FROM[sys].[asymmetric_keys] sak
WHEREsak.[thumbprint] = @PublicKeyToken
)
) AND
(NOT EXISTS(
SELECT*
FROM[sys].[server_principals] sp
INNER JOIN[sys].[asymmetric_keys] sak
ONsak.[sid] = sp.[sid]
WHEREsak.[thumbprint] = @PublicKeyToken
)
)
BEGIN
BEGIN TRY
BEGIN TRAN;
SET @SQL = N'
CREATE LOGIN [' + @LoginName + N']
FROM ASYMMETRIC KEY [' + @AsymmetricKeyName + N'];';
EXEC (@SQL);
SET @SQL = N'
GRANT EXTERNAL ACCESS ASSEMBLY TO [' + @LoginName + N'];
-- OR, comment out the GRANT statement above, and uncomment the following:
-- GRANT UNSAFE ASSEMBLY TO [' + @LoginName + N'];
';
EXEC (@SQL);
COMMIT TRAN;
END TRY
BEGIN CATCH
IF (@@TRANCOUNT > 0)
BEGIN
ROLLBACK TRAN;
END;
SET @ErrorMessage = ERROR_MESSAGE();
RAISERROR(@ErrorMessage, 16, 1);
RETURN; -- exit the script
END CATCH;
END;
--------------------------------------------------------------------------------
- Close the "AssemblySecuritySetup-Part2of2.sql" tab
- In the "Solution Explorer" window, make sure that the "StairwayToSQLCLR-06_ConnectionTypeTest" item is expanded, and that the "Properties" item within there is expanded. There should be a single item listed for "AssemblyInfo.cs"
- Right-click on "AssemblyInfo.cs" and select "Copy"
- Left-click on the (empty) "Properties" item underneath "KeyInfo" to select it
- Hit <Control-V> to paste a copy of the "AssemblyInfo.cs" file under "Properties"
- Double-click on the new "AssemblyInfo.cs" file
- Edit the "AssemblyDescription" line (should be line # 7) to replace "Example code" with "Key Info"
- Hit <Control-S> to save
- Close the "AssemblyInfo.cs" tab
- In the "Solution Explorer" window, right-click on "KeyInfo", and go to "Properties" (bottom option).
Please note that you could also go to the "Project" menu to get to "Project Properties" (as we have done previously), but the "Project" menu is context-sensitive, and the options in that menu will relate to whichever project is highlighted in the "Solution Explorer", and the highlighted project will change if you switch to a tab that relates to a project that is not currently highlighted.
- In the "Project Settings" tab, check the option for "Create script (.sql file)"
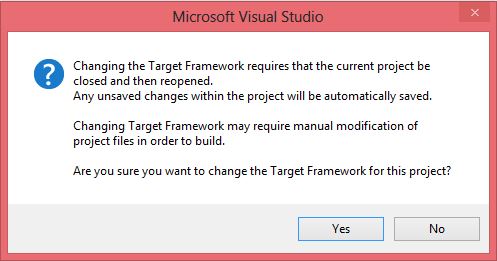
- Go to the "SQLCLR" tab
- Set the "Target framework" drop-down to ".NET Framework 2.0". This is just to ensure that the Assembly will work across all versions of SQL Server that support SQLCLR (introduced in SQL Server 2005) as we might want to use the same Key across multiple projects. You should get the following warning dialog:
- Click the "Yes" button
- Give it a moment and the IDE will save the changes and refresh.
- In the "Assembly owner" field, enter in: "dbo" (but without the quotes)
- Uncheck the option for "Generate DDL"
- Uncheck the option for "Include Symbols"
- Click the button for "Signing..." at the bottom. A modal dialog will pop up titled "Signing".
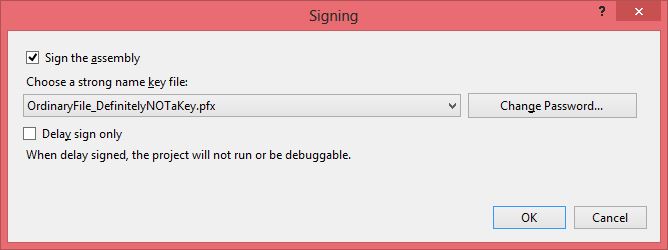
- Check the option for "Sign the assembly"
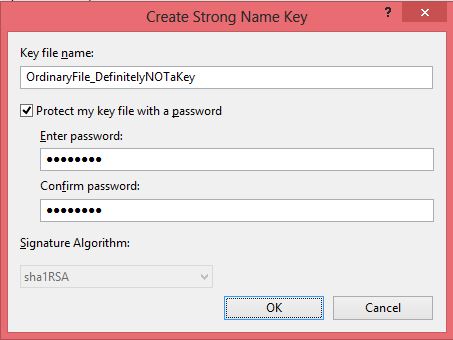
- In the "Choose a strong name key file" drop-down, select "<New...>". Another modal dialog will pop up titled "Create Strong Name Key"
- In the "Key file name" field, enter in: "OrdinaryFile_DefinitelyNOTaKey" (but without the quotes). PLEASE NOTE: the name of the key file is tongue-in-cheek humor / Jedi-mind-trick. This file is certainly the key data.
- The "Protect my key file with a password" option should already be checked. If not checked, then please check it.
- In the "Enter password" and "Confirm password" fields, enter in a password (the same password, obviously). Pick something you will remember, and definitely don't use something as simple as "password" (which is what I am using ;-).
- The "Create Strong Name Key" dialog should now look like:
- Click the "OK" button
- And now the "Signing" dialog should look like:
- Click the "OK" button
- If you look over to the right, in the "Solution Explorer" window you should now see an item for "OrdinaryFile_DefinitelyNOTaKey.pfx" under the "KeyInfo" Project.
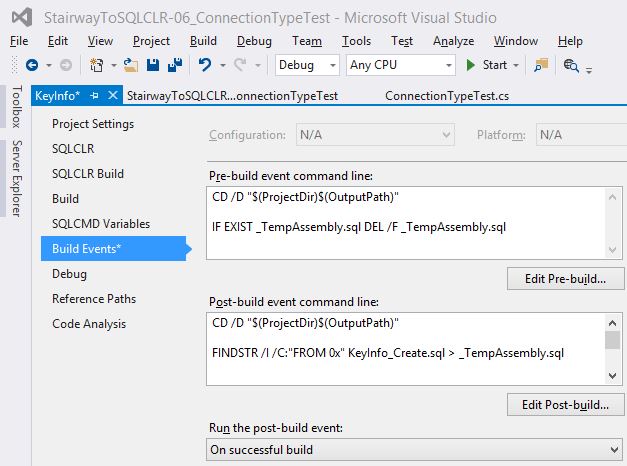
- Go to the "Build Events" tab
- Copy the following code and paste it into the "Pre-build event command line" text area (code also available in the C:\TEMP\StairwayToSQLCLR\Level-06\Scripts\KeyInfo-PreBuildEvent.txt file):
CD /D "$(ProjectDir)$(OutputPath)"
IF EXIST _TempAssembly.sql DEL /F _TempAssembly.sql
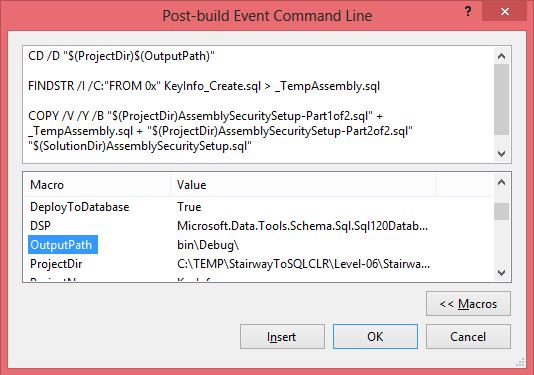
- Copy the following code and paste it into the "Post-build event command line" text area (code also available in the C:\TEMP\StairwayToSQLCLR\Level-06\Scripts\KeyInfo-PostBuildEvent.txt file):
CD /D "$(ProjectDir)$(OutputPath)"
FINDSTR /I /C:"FROM 0x" KeyInfo_Create.sql > _TempAssembly.sql
COPY /V /Y /B "$(ProjectDir)AssemblySecuritySetup-Part1of2.sql" +  _TempAssembly.sql + "$(ProjectDir)AssemblySecuritySetup-Part2of2.sql" "$(SolutionDir)AssemblySecuritySetup.sql"
This same operation could be handled more natively in the build process by using T4 text templates (mentioned towards the end of the next Level in the "Automation / Continuous Integration" section), but that is a little more complicated to set up the first time, so we will come back to explore that option in the Level focusing on Publishing and Automation.
- You can only see 4 lines of text in either of the two text areas, so in order to see more, click on the "Edit Post-build..." button. The "Post-build Event Command Line" modal dialog will pop up.
- Click on the "Macros >>" button. A "Macro | Value" list will appear below the text area with the 3 commands. These macros are replacement tags that will be evaluated during the Build process. Inserting them (via the "Insert" button or double-clicking) will add "$(_Macro_)" to the text area. This is how I got "$(ProjectDir) " and "$(OutputPath)".
- Click the "Cancel" button.
- The "Build Events" tab should now look similar to:
- Go to the "Debug" tab
- Uncheck the option for "Deploy database properties"
- Hit <Control-S> to save
- Close the "KeyInfo" (i.e. Project Properties) tab

Ok. So what did all of that actually get us? Well, a Build will generate the DLL and a "KeyInfo_Create.sql" script. In the "Post-build event command line", the "FINDSTR" DOS command extracts the "FROM 0x...." hex byte string that we need. Then, the "COPY" DOS command concatenates the two parts of the Security Setup template around that extracted hex bytes string, and places the resulting SQL script into the main Solution folder. The idea is that we will next modify the original Project to incorporate that final output SQL script. But let's see if it works by doing just a Build of the KeyInfo project. In the "Solution Explorer" window, right-click on the "KeyInfo" item, and select "Build". Then open the following file: "C:\TEMP\StairwayToSQLCLR\Level-06\StairwayToSQLCLR-06_ConnectionTypeTest\AssemblySecuritySetup.sql". Sweet, eh? Right, so now close that file.
While we have done most of the work in this security setup piece, we don't yet have it linked to the original project. We need to sign that Assembly with the same key info, and we need to get the Build process for the original Project to somehow include the SQL script we just generated in the new Project. We should be able to do that in a lot fewer than 65 steps 😉
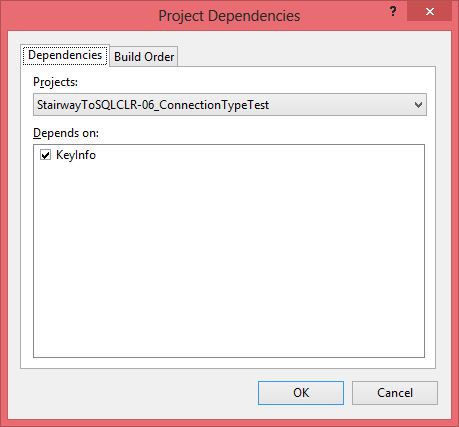
We created a dependency in that if we want the "StairwayToSQLCLR-06_ConnectionTypeTest" Build process to include the "AssemblySecuritySetup.sql" script, then Visual Studio needs to know that it has to build the "KeyInfo" project first. Visual Studio allows us to define which Projects depend on which other Projects, and from there it can determine what order to build the Projects in:
- Go to the "Project" menu and select "Project Dependencies...". The "Project Dependencies" modal dialog should pop up.
- In the "Projects" drop-down, select "StairwayToSQLCLR-06_ConnectionTypeTest"
- In the "Depends on" list, check the option for "KeyInfo"
- Click on the "Build Order" tab.
- You should see "KeyInfo" listed first (i.e. on top)
- Click the "OK" button
Even though we need to build the "KeyInfo" Project, we don't want it being deployed when we do a Publish, so we need to disable that:
- Go to the "Build" menu and select "Configuration Manager"
- On the right side, uncheck the option for "Deploy" for the "KeyInfo" Project only
- Set the "Active solution configuration" drop-down (top left) to "Release"
- Again, on the right side, uncheck the option for "Deploy" for the "KeyInfo" Project only
- Click the "Close" button

Fixing Issue #2 relies entirely on signing the "StairwayToSQLCLR-06_ConnectionTypeTest" Assembly, so we should probably do that. But we need to make sure to use the same signature that we created in the KeyInfo Project, else this won't work:
- In the "Solution Explorer" window, right-click on the "StairwayToSQLCLR-06_ConnectionTypeTest" Project, go to "Add >", and select "Existing Item...". An "Add Existing Item - StairwayToSQLCLR-06_ConnectionTypeTest" modal dialog will pop up.
- Go to the "KeyInfo" folder
- Select the "OrdinaryFile_DefinitelyNOTaKey.pfx" file (do not double-click)
- On the right side of the "Add" button there is a down-arrow. Click that down arrow and select "Add as Link"
- If "Project Properties" is already open for the "StairwayToSQLCLR-06_ConnectionTypeTest" Project then go to that tab, else right-click on the "StairwayToSQLCLR-06_ConnectionTypeTest" Project in the "Solution Explorer" window and select "Properties"
- Go to the "SQLCLR" tab
- Uncheck the option for "Include Symbols" (might as well since we are already here)
- Click on the "Signing..." button (bottom of the middle area). The "Signing" modal dialog will pop up.
- Check the option for "Sign the assembly"
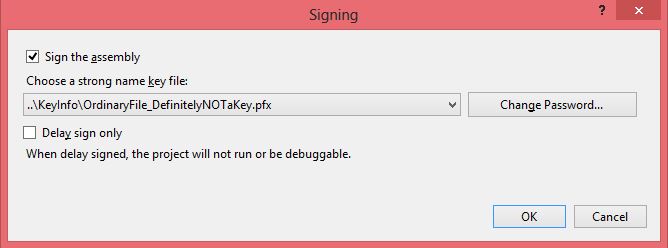
- In the "Choose a strong name key file" drop-down, select "..\KeyInfo\OrdinaryFile_DefinitelyNOTaKey.pfx". The "Enter password to open file" modal dialog will pop up.
- Type in the password you used in the "KeyInfo" Project. The "Signing" dialog should now look like:
- Click the "OK" button.
- Hit <Control-S> to save.
The last step to fixing Issue #2 is getting the Build process to pull in that security setup file:
- In the "Solution Explorer" window, right-click on the "StairwayToSQLCLR-06_ConnectionTypeTest" Project, go to "Add >", and select "Script..." (bottom option). The "Add New Item - StairwayToSQLCLR-06_ConnectionTypeTest" modal dialog will pop up.
- Select "Pre-Deployment Script" in the middle area.
- In the "Name" field, replace "Script.PreDeployment1.sql" with "PreDeploy-GrabSecuritySetup.sql".
- Click the "Add" button.
- Copy the following and paste it into the IDE (code also available in the C:\TEMP\StairwayToSQLCLR\Level-06\Scripts\PreDeploy-GrabSecuritySetup.sql script):
-- Make sure "CLR Integration" feature is enabled.
IF (EXISTS(
           SELECT   sc.*
           FROM     sys.configurations sc
           WHERE    sc.[name] = N'clr enabled'
           AND      sc.[value_in_use] = 0
          )
   )
BEGIN
    EXEC sp_configure 'clr enabled', 1;
    RECONFIGURE;
END;
GO
:r "C:\TEMP\StairwayToSQLCLR\Level-06\StairwayToSQLCLR-06_ConnectionTypeTest\AssemblySecuritySetup.sql"
GO
USE [$(DatabaseName)];
GO
Even though :r is a SQLCMD command that dynamically reads in the specified file each time the script runs in SSMS or SQLCMD, the SSDT Build process will import the specified file and embed it into the deployment script (and into the "_Create.sql" script if that option is checked).
- Hit <Control-S> to save
- Close the "PreDeploy-GrabSecuritySetup.sql" (i.e. Project Properties) tab
So, that teeny tiny bit of work should be all that is required so that we can finally deploy those two minor changes that we made several days ago (or so it might feel).
Publish Attempt Numero B
Let's try this again:
- Hit <Control-F5> to Build and Publish the project to the dev / test LocalDB instance
- Woo hoo!! It worked!!
While that seems like a lot of steps to get this working, they are all fairly quick and simple. The next time you need to do a project it will be much faster to do those same steps. Plus, consider the following benefits:
- If you need to add another Project (i.e. DLL) to this Solution, you only need to repeat the 20 steps of the final two sections directly above (start at the paragraph beginning with "Fixing Issue #2 ...").
- You can use the same .pfx file (in the KeyInfo project) on other projects, in which case they would all share the same signature, in which case you technically wouldn't need to include a "KeyInfo" (or whatever you want to call it) Project since the Asymmetric Key and Login are already installed into SQL Server. Not doing the "KeyInfo" Project each time only means that your deployment script for the new Assembly won't be 100% self-contained as it will rely upon security already being in place. But that could be acceptable if you (or your company) have several projects.
- The final "AssemblySecuritySetup.sql" script that was generated is completely self-contained. It can be run on its own and only needs to be run once. Or it can be run each time as it is re-runnable. In either case, it can be moved to another location if it makes sense for your overall deployment process. It can be saved into your source code versioning system and you only really need to generate a new one if you create a new .pfx file with new private/public key info.
- While it is possible, at least in this case, to have simply signed the main project (and not created the KeyInfo project), and loaded the Assembly into [master] in order to create the Asymmetric Key, and then delete the Assembly from [master], that does not work in all cases. If you have code that a) requires PERMISSION_SET = UNSAFE, and b) the code requiring UNSAFE is verifiable during the processing of the CREATE ASSEMBLY statement (as shown in a prior article in this series, some code can be verified at this point, and some can only be verified upon attempted usage), then loading such an Assembly into [master] would require first running "ALTER DATABASE [master] SET TRUSTWORTHY ON;", and that is not acceptable.
Test the Changes
Switch back to SSMS and connect to the LocalDB instance. Run the following statements:
USE [StairwayToSQLCLR-06_ConnectionTypeTest];
SELECT assembly_id, name, clr_name FROM sys.assemblies WHERE assembly_id <> 1;
SELECT * FROM sys.assembly_files WHERE assembly_id <> 1;
The first query should return the following:

This time we have values for both "version" and "publickeytoken" within the "clr_name" string. But please pay close attention to the value of "version": it is the original value (in "Assembly version"), not the new value (in "File version"). Now this is precisely why we test with different values for different fields: if we had set "File version" to the same value as "Assembly version", then we might have mistakenly assumed that the issue was of not knowing which version to fill in. But now that we see the value comes from the field that was already set t this value, then we can look elsewhere (it is actually a bug in the sys.assemblies catalog view).
The second query should return the following:

The only difference from before is that we do not have the .pdb file. And that is due to unchecking the "Include Symbols" option on the "SQLCLR" tab of "Project Properties".
Paste the following into the SSMS editor and then run (code also available in the C:\TEMP\StairwayToSQLCLR\Level-06\Scripts\StairwayToSQLCLR-06-TestQueries-Set02.sql script):
------------------------------------------------
-- Try some operations that we might not be sure of
SELECT dbo.StairwayToSQLCLR_ConnectionTest(N'SELECT GETDATE();', 0);
-- Still works as expected.
SELECT dbo.StairwayToSQLCLR_ConnectionTest(N'SELECT GETDATE();', 1);
/*
Msg 6522, Level 16, State 1, Line 1
A .NET Framework error occurred during execution of user-defined routine or aggregate "StairwayToSQLCLR_ConnectionTest":
System.InvalidOperationException: Data access is not allowed in an impersonated context.
*/-- The in-process Context Connection does not allow for Impersonation. It would be nice to confirm
-- that Impersonation does work, but that requires and external / regular connection. We can go
-- back and add an input parameter for ConnectionString to allow us to test that and other things.
SELECT dbo.StairwayToSQLCLR_ConnectionTest(N'SELECT ORIGINAL_LOGIN() + N'' : '' +SESSION_USER;', 0);
END OF DAY 2
Be sure to tune in tomorrow for the exciting conclusion. We will finish fixing the issues we found today in testing. We will use another automation-related feature to overcome certain deficiencies in SSDT.
( To be Continued... )
About the Author
Solomon Rutzky has been working with databases for YEAR(GETDATE()) - 1996 years, focusing on SQL Server since 2002. He has written several articles for SQL Server Central, including the Stairway to SQLCLR series, and SimpleTalk. Solomon is owner / founder of Sql Quantum Leap, and is the creator of the popular SQLCLR library of functions: SQL#. He does what he can to help others by answering questions on a couple of StackExchange sites and Ask.SqlServerCentral.com.