Migrating SQL Server instances can be a challenging task. Typically you will want to migrate all objects including user databases, security, Agent jobs and much more. Two of the most challenging databases to migrate are the ReportServer and ReportServerTempdb databases. This guide will walk you through migrating SQL Server Reporting Services from a SQL Server 2014 instance to a SQL Server 2016 instance. Although it is not tested, this guide should also work for SQL Server 2012 and SQL Server 2017.
Here is the basic setup. We have two instances. One running SQL Server 2014 and the other running SQL Server 2016. The 2014 instances contains a database called MyBusiness which contains one table called Customers. This same instance is running SSRS and has one report that shows all of the data from the Customers table. The instance running SQL Server 2016 and will have the same security and user databases. It has SSRS installed but it is not configured.
In the image below, you can see that the instance on the left has SSRS and my database, but the instance on the right has no user databases.
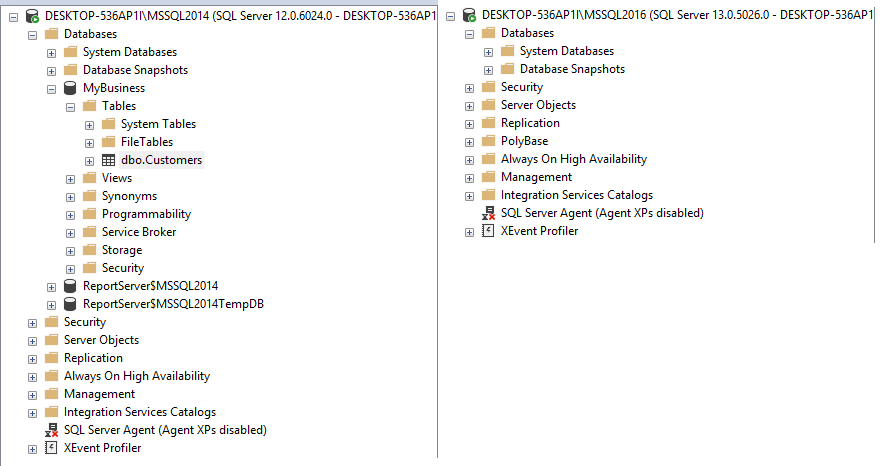
SQL 2014 and SQL 2016 Instances
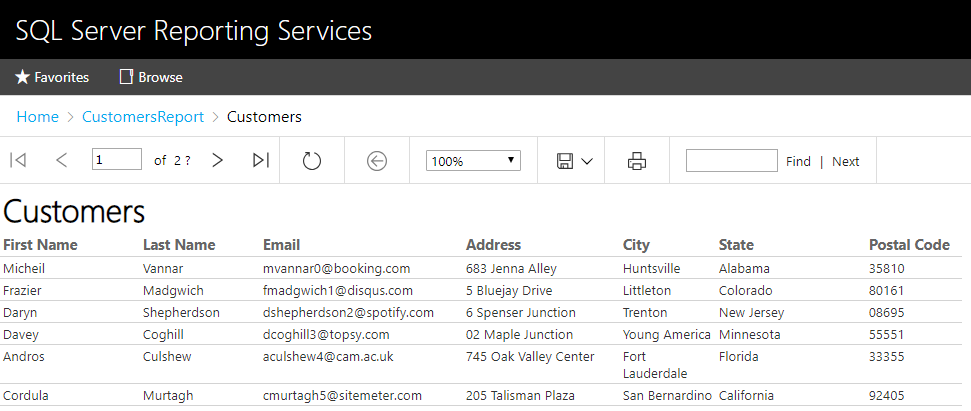
Here is an example report in SSRS 2014.
Before we begin migrating the SSRS databases, we will assume that all of the necessary security, user databases, and other objects have been migrated from the 2014 instance to the 2016 instance. We can now begin to migrate the SSRS databases.
Backup the encryption keys on the source instance
- Open the Reporting Services Configuration Manager on the source instance
- Select Encryption Keys in the left panel
- Click the Backup button in the main panel
- In the new window, enter a path to save the file and enter an easy to remember password
- Click OK

Backup the ReportServer and ReportServerTempDB databases on the source instance
Microsoft recommends changing both databases to Full recovery mode and perform a full and log backup on both databases using T-SQL. I have had success with using the backup wizard and leaving the databases in Simple recovery mode. You can also detach and attach the database if you can afford to take an outage.
If you are having issues, reference this article from Microsoft: https://docs.microsoft.com/en-us/sql/reporting-services/report-server/moving-the-report-server-databases-to-another-computer-ssrs-native-mode?view=sql-server-2017
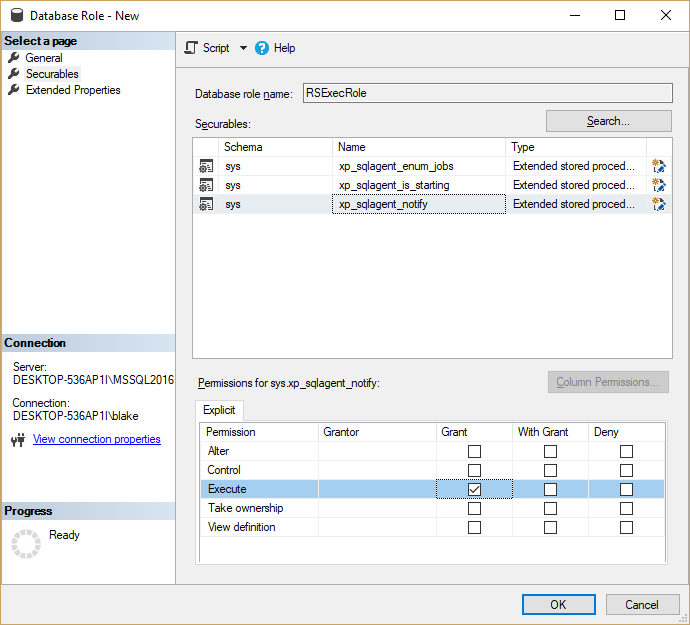
Create the RSExecRole on the new instance
If this role exists, you can skip this step. More details can be found here: https://docs.microsoft.com/en-us/sql/reporting-services/security/create-the-rsexecrole?view=sql-server-2017
- Create the role in the master database. In SSMS on the new instance, navigate to Databases -> System Databases -> master -> Security -> Roles
- Right click on Database Roles and select New Database Role…
- For the Role name, enter RSExecRole
- For the Owner, enter DBO
- Click Securables in the left panel
- Click Search…
- Make sure Specific objects… is selected then click OK
- Click Object Types
- Check the box next to Extended stored procedures then click OK
- Click Browse…
- Select the following objects then click OK:
- xp_sqlagent_enum_jobs
- xp_sqlagent_is_starting
- xp_sqlagent_notify]
- Click OK
- For each stored procedure, click the checkbox in the Grant column for the Execute permission
- Click OK
Your system should look like this:
Create the Role in msdb
For both of those tables, select the checkbox in the Grant column for the Select permission
- In SSMS on the new instance, navigate to Databases -> System Databases -> msdb -> Security -> Roles
- Right click on Database Roles and select New Database Role…
- For the Role name, enter RSExecRole
- For the Owner, enter DBO
- Click Securables in the left panel
- Click Search…
- Make sure Specific objects… is selected then click OK
- Click Object Types
- Check the box next to Stored procedures then click OK
- Click Browse…
- Select the following objects, then click OK:
- sp_add_category
- sp_add_job
- sp_add_jobschedule
- sp_add_jobserver
- sp_add_jobstep
- sp_delete_job
- sp_help_category
- sp_help_job
- sp_help_jobschedule
- Sp_verify_job_identifiers
- Click OK
- For each stored procedure, click the checkbox in the Grant column for the Execute permission
- Click Search… again
- Make sure the specific objects… are selected then, click OK
- Click Object Types
- Check the box next to Tables then click OK
- Click Browse…
- Select the following objects then click OK
- syscategories
- sysjobs
- Click OK
- Click OK
Restore the Databases
Restore both databases to the new instance using normal T-SQL methods.
IMPORTANT NOTE - the database names must stay the same. Changing the names can cause the migration to fail.
Configure SSRS
Configure SSRS on the new instance. This is similar to any SSRS configuration so this information may be redundant to you.
- Open Reporting Services Configuration Manager and connect to the new instance
- Select Service Account in the left panel. Select an option that works for your environment. Click Apply if you made any changes
- Select Web Service URL in the left panel. Make any changes that you need or leave the defaults and click Apply.
- Select Database in the left panel and click the Change Database button.
- Select "Choose an existing report server database", then click Next.
- Enter the name of the new instance if it’s not already there, then click Next. You can test the connection just to verify you can connect by clicking the Test Connection button.
- In the Report Server Database dropdown, select the ReportServer database, then click Next
- Select the credentials you want to use to connect to the database then click Next
- Verify all the information is correct, then click Next
- Once the wizard finishes click the Finish button
- Select Web Portal URL in the left panel. Make any changes that you need or leave the defaults and click Apply.
- Select E-mail Settings in the left panel. Fill out the information if you would like to use email for SSRS. Click Apply.
- Select Execution Account in the left panel. Specify an account if you would like to enable this feature. Click Apply.
- Select Encryption Keys. Then click the Restore button. Click the ellipsis button and find the encryption key file you save in step 1. Enter the password, then click OK
- Select Subscription Settings in the left panel. Specify an account if you would like to enable this feature. Click Apply.
Final Steps
Scale-out Deployment and Power BI Integration are beyond the scope of this document but can be configured now if desired.
The last step is to verify records in the dbo.Key table in the ReportServer database. Run this query:
SELECT *
 FROM dbo.Keys
There should only be two records in this table; the record for the current instance and a NULL record. If the old instance is listed, delete that record.
Lastly, restart the SSRS services
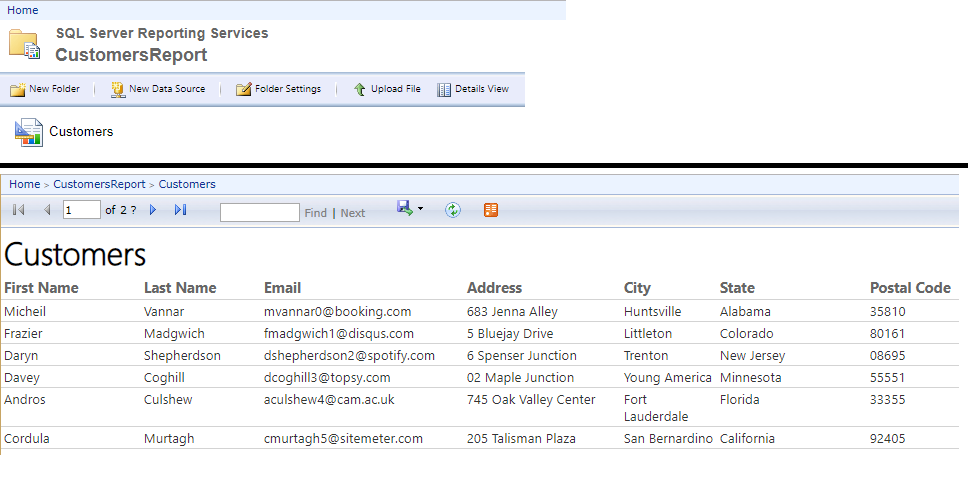
That is all you should need to to for a simple SSRS migration. All of the reports and their schedules and permissions should be there. The service will handle upgrading anything to the current version. You may want to verify there are no errors in the logs and that all the reports are working. Here is my report from SSRS 2014 running in SSRS 2016.