

Introduction
PolyBase is used to access to non-relational data using T-SQL, such as a SQL table in Azure SQL Database or Azure SQL Data Warehouse (ASDW). In this tutorial, we will learn how to access to a CSV file stored in Azure using ASDW.
Requirements
- SQL Server Management Studio 2017 or Visual Studio.
- An Azure Account
- A CSV file (you can get it at the bottom of the article in the resources section).
Getting Started
If you do not have experience with Azure, it can be a little hard to work with PolyBase. Here we present a brief description of the steps to follow.
- Create a storage account. The storage account will be used to upload the csv file that will be accessed as a table at the end of the article.
- Create a container in the storage account. It is like a folder.
- Upload the csv file in the container.
- Create a master key to encrypt the information with a password.
- Create a credential (in this section we provide an access key to the storage account).
- Create an external data source (here we associate the credential to the container URL).
- Create an external file format (this step is to define the type of file, which is a CSV file in this example).
- Create an external table (this is the table that extracts the information from the CSV and is treated like any SQL table)
- Finally, we will check the functionality of the external table running some T-SQL select sentences with where, join clauses.
Each of these steps is detailed below.
1. In the Azure Portal, go to more services > Storage accounts
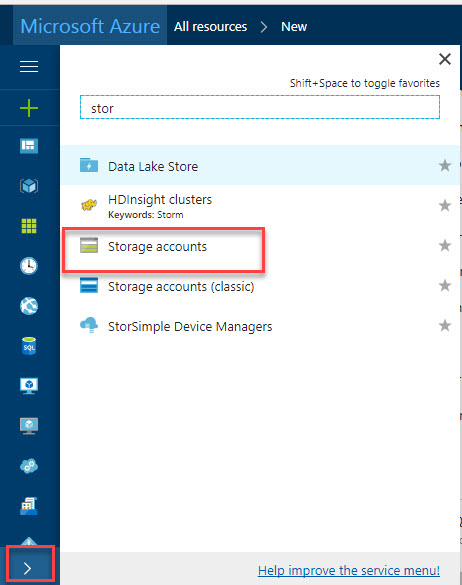
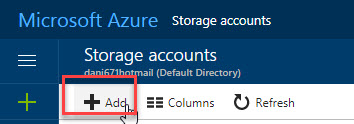
Add a new storage account:
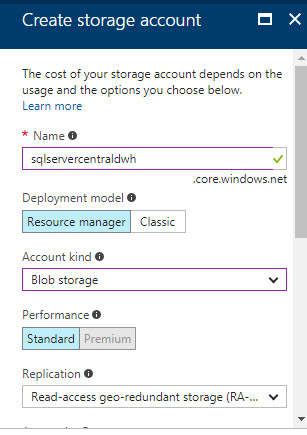
Add a name for the storage account. In Deployment model dialog, use the Resource Manager. The Classic is an old version and not recommended. In Account kind, we will use the Blob storage because we want to store information in the Azure Blob. In performance, the cheapest option is Standard. In this scenario, it is a test, so we do not require the Premium account. In replication, you have options to replicate locally, in different data center, in the same datacenter, but multiple copies. You can have 3 to 6 copies and the most expensive option is to have a secondary read-only copy:
The Access Tier allows you to select between Cool storage (infrequent accessed data) and Hot (frequently accessed data). The Storage encryption and secure transfer are used for security. You can also select your subscription, group and location. Once selected the options, press the create icon:

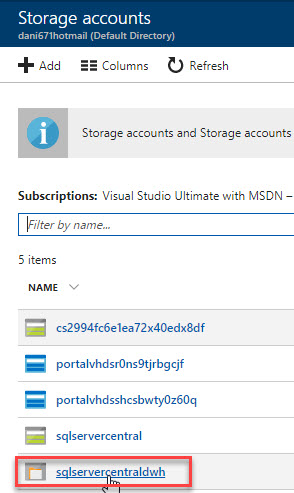
Once created the Azure Storage, click there:
Click the +Container option to create a new container in the new Storage Account. Specify the name and access type and press OK:

Click on the container just created:

Press the Upload button:

Upload the csv file mentioned in the requirements:

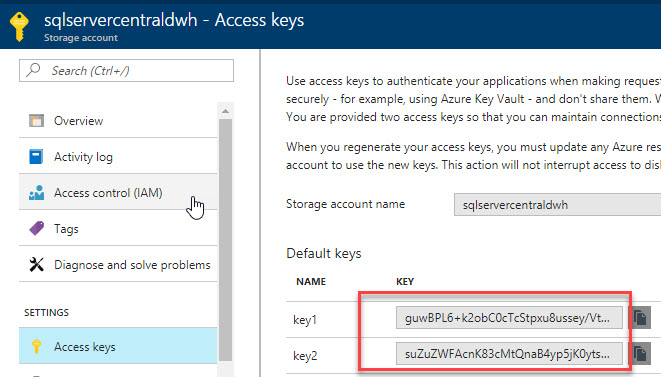
In the storage account, go to Access keys. Copy the key1 or key2:
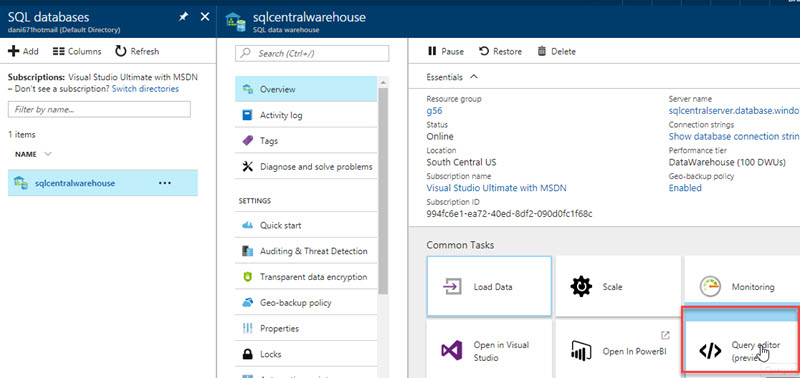
With the Query Editor, you can run most queries except those that create an external table. This may change in the future. When we created this article, this feature was in preview version. That is why it is recommended to use SSMS from a local machine:
Connect to the ADWH using SSMS and add a master key:
CREATE MASTER KEY ENCRYPTION BY PASSWORD='MySqlCentralPwd@$w0rd';
CREATE DATABASE SCOPED CREDENTIAL mysqlservercredential
 WITH IDENTITY = 'credential', Secret = 'guwBPL6+k2obC0cTcStpxu8ussey'

We will create an external data source named prices. It can be any name. In location, we use the following format:
wasbs://container_name@Blob_Service_Endpoint/
Where container_name is the container1 created previously inside the storage account. The Blob_Service_Endpoint can be extracted from the previous image:
CREATE EXTERNAL DATA SOURCE prices
WITH (
    TYPE = HADOOP,
    LOCATION = 'wasbs://container1@sqlservercentraldwh.blob.core.windows.net/',
    CREDENTIAL = mysqlservercredential
);
Create an external file format is used to define the format of the file. In this example, it is a Comma Separated Value format (CSV). The field terminator will be a comma:
CREATE EXTERNAL FILE FORMAT sqlservercentralformat
WITH (
    FORMAT_TYPE = DELIMITEDTEXT,
    FORMAT_OPTIONS (
        FIELD_TERMINATOR = ','
    )
);
Finally, we will create an external table based on the data of the csv file mentioned in the requirements section. We will specify the file format created and the data source created:
CREATE EXTERNAL TABLE prices
(
Id int,
product VARCHAR(64),
price int
)
WITH
(
LOCATION = '/',
DATA_SOURCE = prices,
FILE_FORMAT = sqlservercentralformat
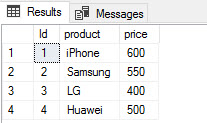
)If everything is OK, you will be able to run a query to show the data in the external table:
select * from dbo.prices
You will be able to see the information from the CSV file in the Azure Storage Account using T-SQL now:
There are two common error messages that you may have when you run queries on external tables. Here you have 2 typical errors.
Error 1:
Msg 107090, Level 16, State 1, Line 15Query aborted-- the maximum reject threshold (0 rows) was reached while reading from an external source: 1 rows rejected out of total 1 rows processed.(/prices.csv)Column ordinal: 2, Expected data type: VARCHAR(4) collate SQL_Latin1_General_CP1_CI_AS, Offending value: price (Column Conversion Error), Error: String or binary data would be truncated.Msg 107090, Level 16, State 1, Line 16Query aborted-- the maximum reject threshold (0 rows) was reached while reading from an external source: 1 rows rejected out of total 1 rows processed.(/prices.csv)Column ordinal: 0, Expected data type: INT, Offending value: Id (Column Conversion Error), Error: Error converting data type NVARCHAR to INT.Some Tests On the External Table
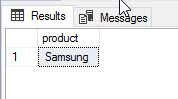
select product
 from dbo.prices
 where price =550
We will now check if we can run inner joins with this external table. To do that, we will create a SQL table:
CREATE TABLE productdesc
(
  id int,
  [product details] varchar(60)
)
We will then add some data:
insert into productdesc values (1, 'iphone 7')
insert into productdesc values (2, 'Samsung Galaxy S7')
We will now run a query between with an inner join to get common information from the external table and the SQL table:
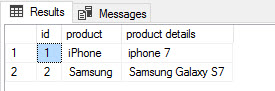
select
  p.id,
  p.product,
  pd.[product details]
 from prices p
 inner join productdesc pd
  on p.id=pd.id
As you can see, you can run queries with inner joins, or other joins, to the external table:
Conclusion
In this article, we learned how to create an external table from an Azure Storage Account with a CSV file. We learned how to create T-SQL queries to the CSV file.