
Introduction
This is the second in a series of articles that I am writing about concepts and administration of Azure Databases. In the last article we created a database in Azure. If you missed it you can go here, because we will be using it. I will also assume you can navigate to your database inside the Azure Portal, which is also something we went over in the first article. In this article we are going look at two different ways you can backup/copy your database in Azure.
Azure has a fully functioning automatic backup architecture. All the databases you create have "Point in Time" restore included by default. You need to do nothing to set this up, it is just there for you to leverage; and simple to use when its time to restore. But that is for the next article. Here we are going to make basic copies that you could use to deploy to your test/dev systems or just to have as backups.
Options for Backing up a DB in Azure
You have two options if you want to make some kind of backup of your database in Azure.
- You can make a copy. With a copy, however, you are going to incur the cost of keeping that DB up and running. you can't take a SQL server off line in Azure so you will have to pay for it.
- We can export the database into a .BACPAC file into Azure Storage. More on this below.
Maken' Copies
First, lets make a copy of our Database and delete it. Seeing as how I am trying to do this series on my $25/mth free Developer subscription, I don't want to have database lying around doing nothing other than taking up resources. That, in a nutshell, should be on your mind at all times in Azure.
Note: The numbers in each step refer to the numbers in the images to help guide you along.
To make a copy of an Azure database in the following way. First, go to the database using the side bar menu and clicking on SQL Databases (1).
In the SQL databases blade, click on the database (2) that you are interested in making a copy of. In our case the one we created in the first article.
At the top of the database blade that opens click on Copy (3) to open the copy blade.

Fill tn the Copy blade as follows:
- Database name (4): Enter a name for the copy. I will take the default, which is the original name, and append "_Copy" to the end.
- Target server(5): Select the same server that the current database is on. You could create a new server if you like, or use any other server available. Note that a full list of your servers will be here, not just those associated to the same subscription.
- Elastic database pool (6): Leave set to None.
- Pricing tier (7): Leave set to the default. Note you could always change the pricing tier.
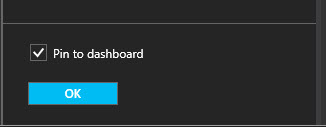
At the bottom of the blade select "Pin to dashboard" if you want it to appear on your dashboard and click OK to create the copy.
Once you click OK, the copy process will start. Obviously, depending on the size of your database it could take more or less time. If you are following with the sample database expect it to take about 1-3 minutes.
Once the copy is complete, you will have the database blade open up. Before we delete it, let's note a few things:
- This is a static copy meaning it is a snapshot in time.
- It is a fully functional online copy: You can connect and query just like any other live database. So it is costing you to keep it around.
Now, to delete this database, we select the Delete option at the top of the database blade and then are asked if we are sure and we should select Yes.
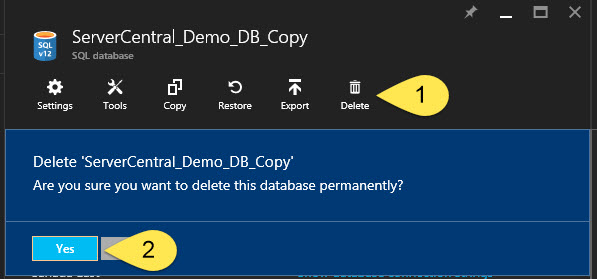
The delete process should not take long, and you will be notified from the alters area of the window in the top right of the Portal Window.

Azure Exports vs On Premise Backups
Those of you familiar with a SQL Server backups know the .BAK file. With SQL Server 2008 R2 came the ability to export your DB in an open file format. The major difference is the .BAK file contained the transaction log information and would be considered consistent on its own. The new .BACPAC file contains the database schema information (tables, views, procedures,etc...) along with the data in a JSON format.
Note you can also create a .DACPAC that only contains the schema information. You can read more about the Data Tier Application (DAC) here. This format makes it easier to deploy schema changes across environments as well as move databases from an on premise structure to a cloud based one.
As noted above this would also be the method you use to move an on premise database into Azure. You can create the file from SSMS or Visual Studio, run a compatibility test against it, and create it in Azure. However, that is a topic for another article.
Exporting a Database
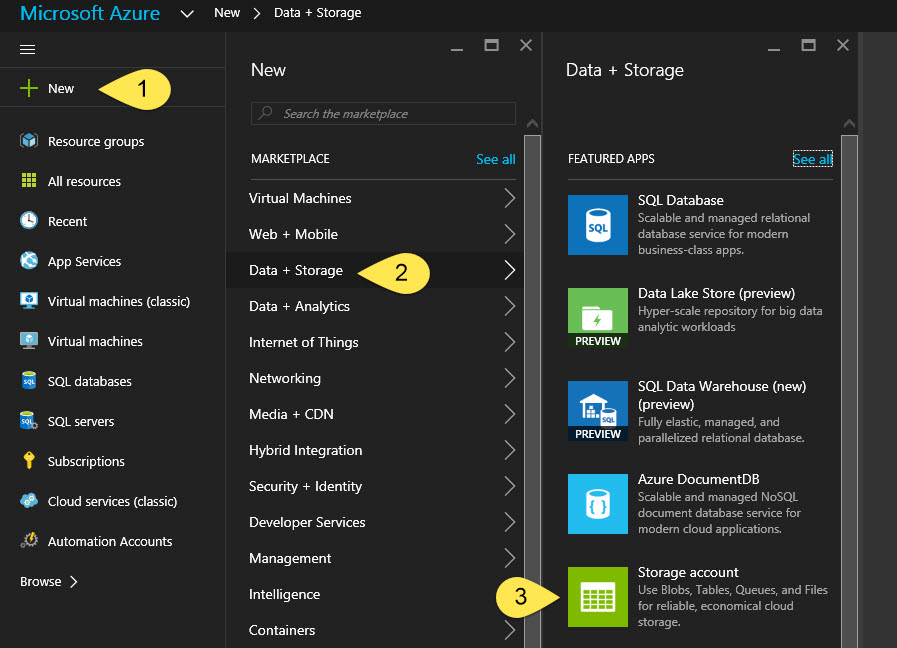
The process of exporting a database is a lot like making a copy. The added step is creating and selecting an Azure storage account that will hold the .BACPAC file. Here is how you create the storage account.
First, in the Left hand menu select Add (1) >> Data + Storage (2) >> Storage account (3) as shown below.
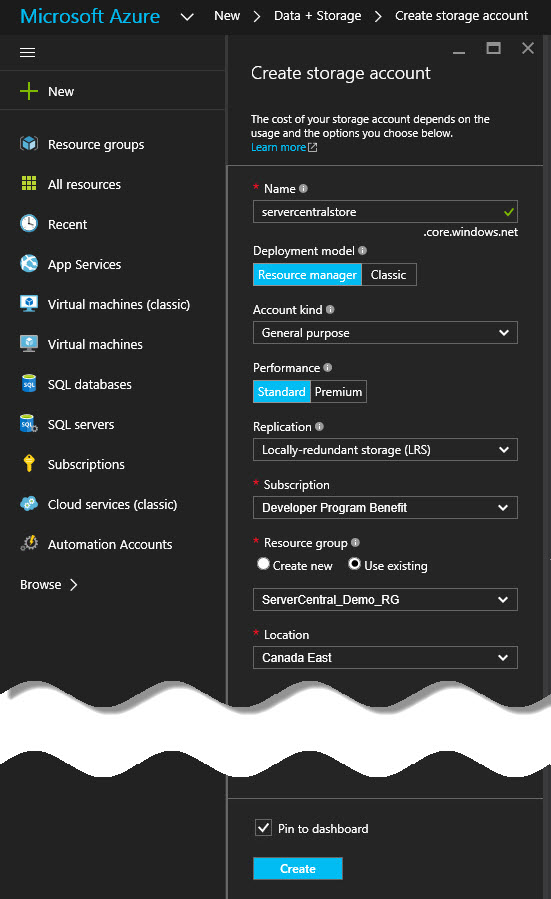
In the Create storage account blade that opens enter the required information; select "Pin to Dashboard" and click Create. Here are some guidelines for the information to be entered:
- Name: The name of your storage account.
- Deployment Model: Resource Manager or Classic. Choose Resource Manager. As explained in the first article we are using the new Portal and Grouping our resources so we can keep track of them. Classic does not have the ability.
- Account kind: Choose General Purpose.
- General Purpose: Can store files, blob data (images, video, etc...), tables, queues and azure machine disks for your VMs. It comes in 2 performance ties: standard and premium. At the time of writing this premium on supports Azure machine disks.
- Blob: Blob storage is strictly for your unstructured data like documents, video and images. It comes in 2 access tires: Hot and Cool. Hot is for data that will be accessed a lot and Cool is for data that will not.
- You can read more about Azure storage here.
- Performance: We will choose Standard because Premium is only available for Azure machine disks.
- Replication: We will select Locally Redundant Storage (LRS)
- LRS - Locally Redundant Storage: The storage is replicated 3 times within the same Region (datacenter), but across 3 different Fault Domains (FD) and Upgrade Domains (UD).
- Fault Domain: Is a node that belongs to the same physical rack.
- Upgrade Domain: Is a set of nodes that are upgraded together.
- GRS – Globally Redundant Storage: You select the primary storage at creation and data is replicated to a "Partner" (+ 250 miles away) that is pre-determined and cannot be changed. (https://azure.microsoft.com/en-us/documentation/articles/storage-redundancy/#geo-redundant-storage)
- RA-GRS - Read Access Globally Redundant Storage: Same as GRS but you have read-only access to the replicated data.
- ZRS – Zone Redundant Storage: Replicated across 2 to 3 regions in the same geographic area. Only available for a subset of storage options (block blobs).
- LRS - Locally Redundant Storage: The storage is replicated 3 times within the same Region (datacenter), but across 3 different Fault Domains (FD) and Upgrade Domains (UD).
- Subscription: Choose the subscription you want to create the storage under.
- Resource Group: Select Use existing and then select the same Resource Group that you created your Database in from the first article.
- Location: Choose which datacenter the the disk will be created in.
Now wait to be alerted that the storage account has been created.
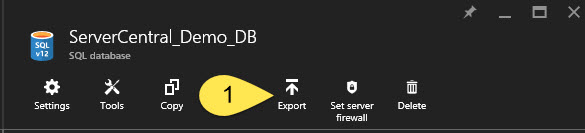
Once we have a storage account, go to your database and select the Export option at the top of the blade.
In the Export Database blade that opens enter the following:
- File Name: By default you will get the DB name with the Date/Time appended to the end. I will leave mine like that, feel free to change yours.
- Subscription: Select the subscription where we created our storage account above.
- Storage: Select the Storage account we created above.
- In the new Blade that opens we will need to create a container for our backup. Select the Add (+ Container) button at the top.
- In the blade that opens enter a name for the container and select Private.
- Private: This creates a container that can only be accessed by the account owner.
- Blob: This creates a public container that grants public read access to blob data.
- Container: This creates a container that grants public read and list access to the entire container.
- Click the Create button at the bottom of the blade and wait for the the success message.
- Select the newly created container and click the Select button at the bottom of the Containers Blade.
- Authentication Type: Leave as SQL Server since there is no other option.
- Server Admin Login: Enter the Admin Login you created in Lesson 1.
- Password: Enter the Password for the Admin Login you just entered.
Click OK at the bottom of the the Export Database blade.
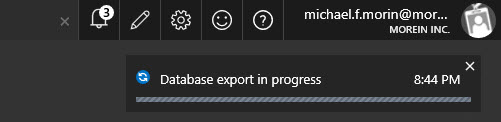
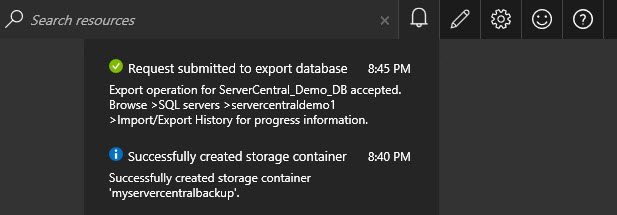
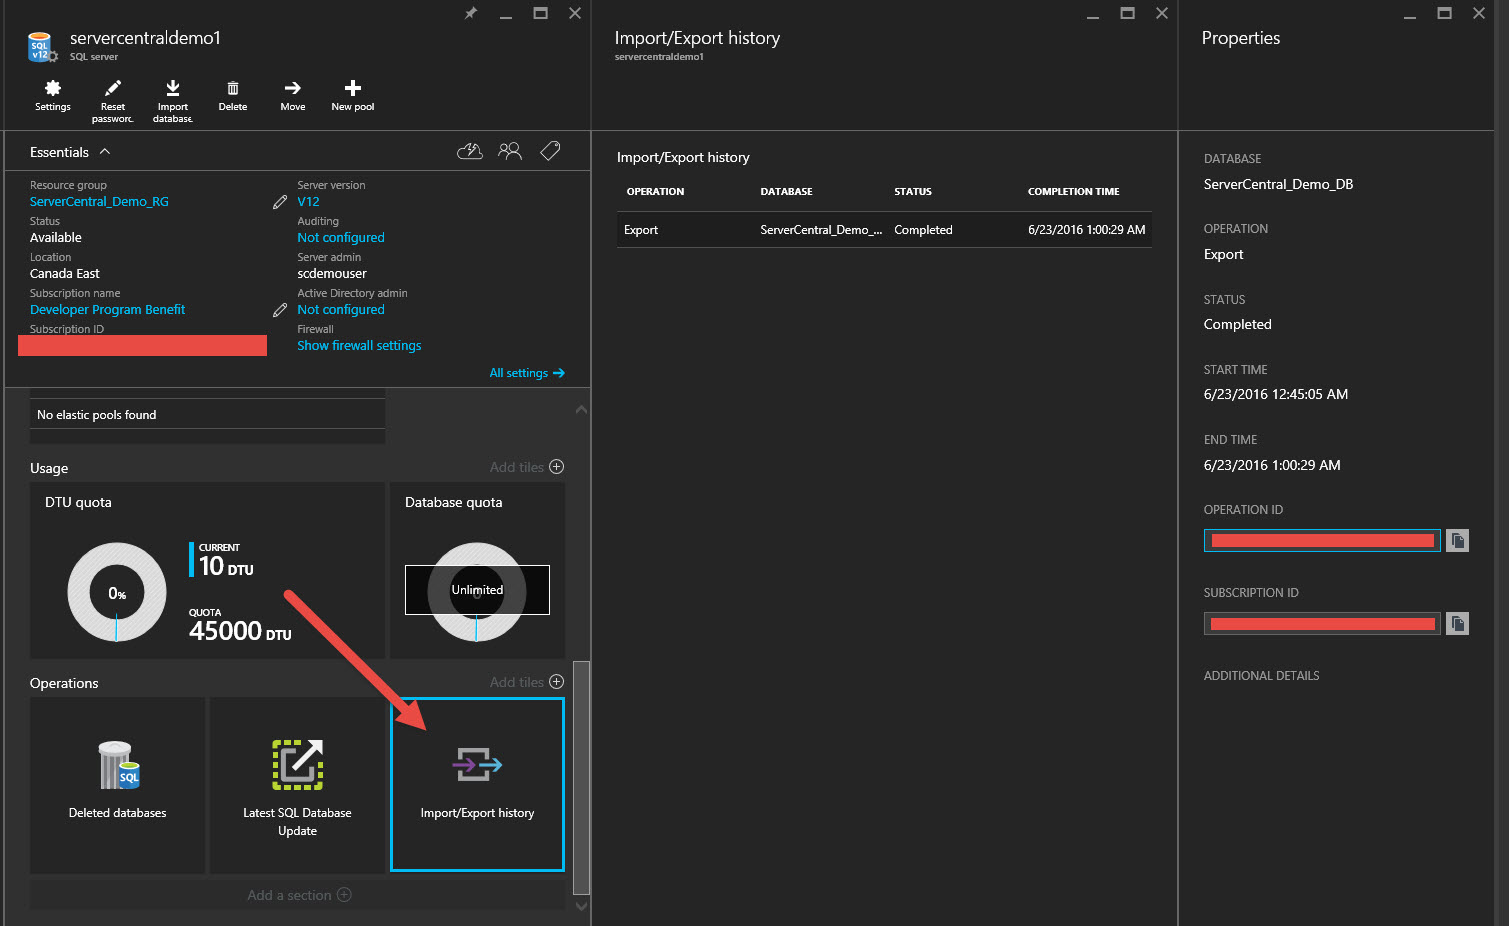
You will see an alert the say export in progress and shortly after that the alter will tell you that the request has been submitted. You can click on that alert to be taken to the Import/Export history for the server. Here you will see if the export was successful or if there were any errors.
In order to get to the Import/export history blade if you close this alert you will need to go the the SQL Server (not the Database) then look in the middle pane and scroll down to find the tile that reads Import/Export history. (I mention this because I didn't find it immediately obvious and spent about 10-15 minutes looking for the link only to realize it was a tile at the bottom of the Blade... ugh).
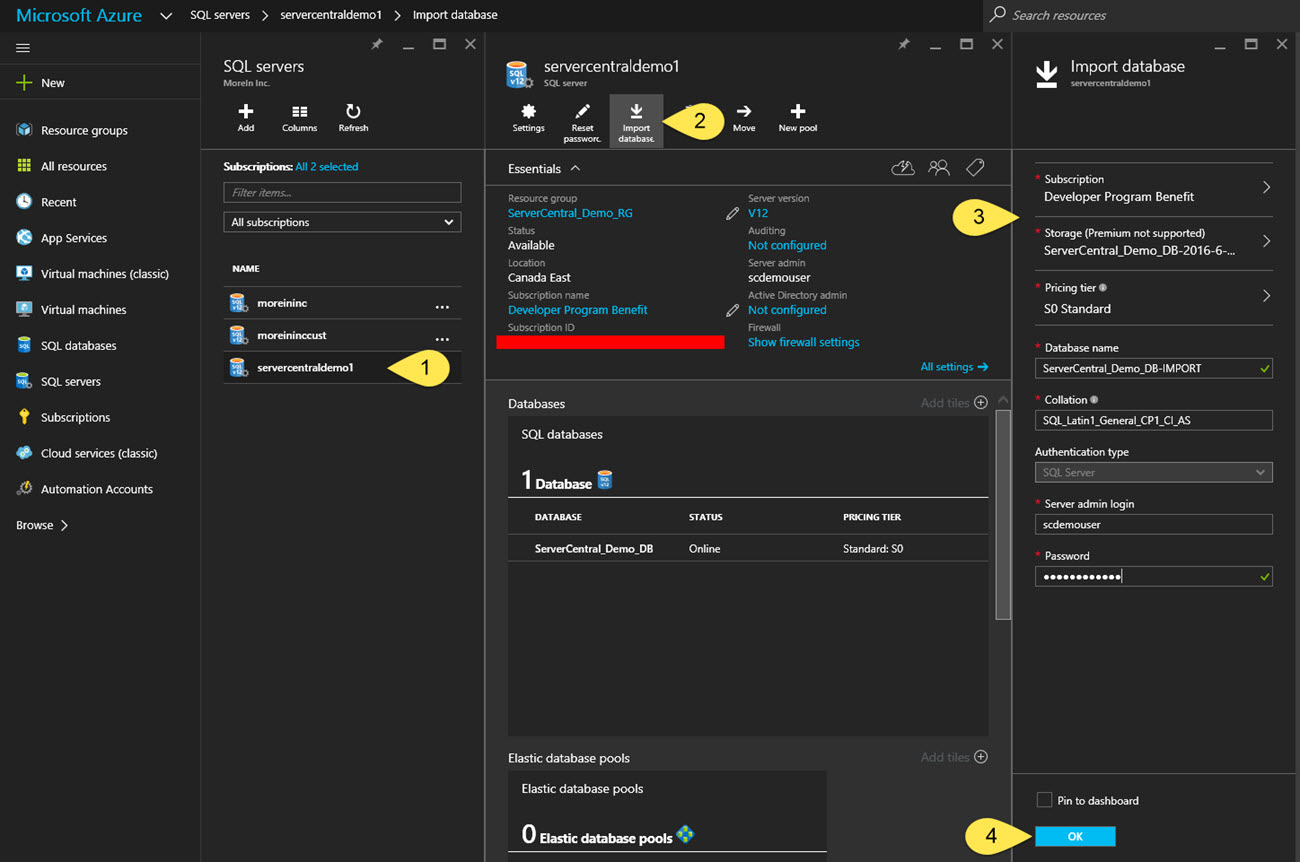
Importing a Database
Open the server (1) that you want to restore the database on. On the Server blade click the Import Database button (2) at the top of the blade.
Next, in the Import Database blade (3) enter the following information:
- Subscription: The subscript that has has the export that we did in the previous section.
- Storage: Select the Storage account >> Container >> *.bacpac file that we created in the previous section.
- Database Name: Enter a name for the new database that will be created. By default you will see the name of the back file.
- Authentication Type: Leave as SQL Server. It cannot be changed
- Server Admin Login: Enter the Admin Login you created in Lesson 1.
- Password: Enter the Password for the Admin Login you just entered.
Click OK at the bottom of the blade.
Once the restore is complete the blade for the new Database will open. Like in the earlier section Maken' Copies this is a copy of the original.
Conclusion
We have seen two different ways you can get a copy of your Azure database up and running in Azure. If we think about what we did, it was pretty intuitive. The concepts that might be new to some are Azure Storage and the Data Tier Application (DAC).
The more time you spend in Azure the more comfortable you will get with these new technologies.
I hope that now you are starting to get the feel for the Azure Portal interface and the idea that databases do not live in a bubble. Azure Storage is an important concept to understand and you should take some time to read more about it. The same is true for the Data Tier Application (DAC).
I hope you enjoyed this next installment and are starting to get more adventurous in Azure. Looking forward to writing the next.