
You are likely reading this series to learn how to be a more productive SQL Server Integration Services developer. I applaud your desire and decision, and I sincerely hope the information contained herein has provided ideas and information to help you be more productive. I am always on the lookout for ways to become a better data integration developer. Specifically, I seek out ways to improve code quality and reduce the amount of time required to build solutions. Those goals motivated me to begin practicing patterns-based development in the first place, which eventually led to the idea for the SQL Server 2012 Integration Services Design Patterns book.
This article is adapted from a chapter in the SQL Server 2012 Integration Services Design Patterns book – the chapter entitled Business Intelligence Markup Language. If you are interested in learning patterns of data integration using SSIS, I encourage you to obtain a copy of the book. Although the book focuses on SSIS 2012, most of the material applies to earlier versions of SSIS. In this article we will build a basic Incremental Load SSIS 2012 package.
The SSIS sample in this article is based on an article at SQL Server Central – Anatomy of an Incremental Load and a blog post at SqlBlog.com: SSIS Design Patterns – Incremental Load. In those writings, I demonstrated how to load data incrementally first using Transact-SQL, followed by examples of how to perform the same loads using SSIS. In this article we will construct a Business Intelligence Markup Language (Biml) file. The Biml file will build an SSIS package that performs an load using the Incremental Load SSIS Design Pattern.
Building a Basic Incremental Load SSIS Package
The Incremental Load Pattern is fundamental in data integration solutions; especially Extract, Transform, and Load (ETL) solutions. Incremental loads load on the data that has changed or is new. A generic block diagram for an incremental load data flow is shown in Figure 1:
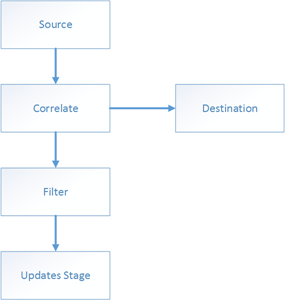
Figure 1 – Generic Block Diagram for an Incremental Load Data Flow
The Data Flow reads from some source, correlates to the destination to see if the record (or a version of the record) already exists in the destination. If the source record does not exist in the destination, it is written to the destination. If a version of the record already exists, the Filter checks for differences between the source and destination versions. If differences are detected, the incremental load stages the updated row(s) in an Update Stage table. Staged updates are applied to the destination in a subsequent operation.
The Incremental Load Data Flow
Biml provides a mechanism for “templating” the Incremental Load SSIS Design Pattern. When we have completed this article we will have designed and coded a Biml file that creates an SSIS package that performs Incremental Loads. The Data Flow of this package will appear as shown in Figure 2:
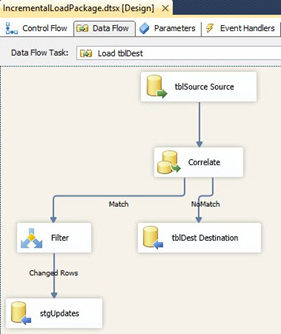
Figure 2 – Incremental Load Data Flow
At a very high level: The Data Flow Task will be named “Load tblDest”. Comparing Figures 1 and 2 (the generic block diagram and the detailed Data Flow screenshot), the Source represented in Figure 1 is the OLE DB Source Adapter named “tblSource Source” in Figure 2. The Correlate operation represented in Figure 1 is the Lookup Transformation named “Correlate” in Figure 2. The Destination represented in Figure 1 is the OLE DB Destination Adapter named “tblDest Destination” in Figure 2. The Filter operation represented in Figure 1 is the Conditional Split Transformation named “Filter” in Figure 2. And the Updates Stage represented in Figure 1 is the OLE DB Destination Adapter named “stgUpdates” in Figure 2.
The Source named “tblSource Source” will read data from a table (tblSource) into the Data Flow Task. The Lookup Transformation named “Correlate” will check the Destination table (tblDest) to see if the record already exists in the Destination. If the record exists in the Source and not in the Destination, no match will be located and the row will flow out of the Lookup Transformation’s NoMatch output to the “tblDest Destination” Destination Adapter. The Destination Adapter will perform operations and the new row will be inserted into the tblDest table. If the record exists in the Source and in the Destination, the row will flow out of the Lookup Transformation’s Match output to the “Filter” Conditional Split Transformation. The Source values of each field in the row will be compared with the Destination values of each corresponding field. If any Destination value does not match its corresponding Source value, the row will flow to the “stgUpdates” Destination Adapter via the “Changed Rows” output. If all Destination values match their corresponding Source values, the row is discarded from the Data Flow.
The Incremental Load Control Flow
The Incremental Load Data Flow Task we just examined is named “Load tblDest” and it is one of three tasks in the Incremental Load Control Flow as shown in Figure 3:
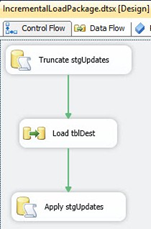
Figure 3 – Incremental Load Control Flow
The other two tasks are Execute SQL Tasks and they manage the stgUpdates table. The first Execute SQL Task truncates the stgUpdates table to clear out any rows that may have been placed there in a previous execution of the package. The last Execute SQL Task contains a Transact-SQL UPDATE statement that updates rows in the destination table (tblDest) if that row is found in the stgUpdates table.
Remember, this is a very high-level examination of the code. We will dig into the SSIS more as we proceed through this article – I promise.
Creating Databases and Tables
Let’s prepare for this demo by building a couple databases and tables. Execute the T-SQL statements from Listing 1 to build and populate the test databases and tables.
Use master
Go
If Not Exists(Select name
              From sys.databases
              Where name = 'SSISIncrementalLoad_Source')
 CREATE DATABASE [SSISIncrementalLoad_Source]
If Not Exists(Select name
              From sys.databases
              Where name = 'SSISIncrementalLoad_Dest')
 CREATE DATABASE [SSISIncrementalLoad_Dest]
Use SSISIncrementalLoad_Source
Go
If Not Exists(Select name
              From sys.tables
              Where name = 'tblSource')
CREATE TABLE dbo.tblSource
 (ColID int NOT NULL
 ,ColA varchar(10) NULL
 ,ColB datetime NULL constraint df_ColB default (getDate())
 ,ColC int NULL
 ,constraint PK_tblSource primary key clustered (ColID))
Use SSISIncrementalLoad_Dest
Go
If Not Exists(Select name
              From sys.tables
              Where name = 'tblDest')
CREATE TABLE dbo.tblDest
 (ColID int NOT NULL
 ,ColA varchar(10) NULL
 ,ColB datetime NULL
 ,ColC int NULL)
 If Not Exists(Select name
              From sys.tables
              Where name = 'stgUpdates')
 CREATE TABLE dbo.stgUpdates
  (ColID int NULL
  ,ColA varchar(10) NULL
  ,ColB datetime NULL
  ,ColC int NULL)
Use SSISIncrementalLoad_Source
Go
 -- insert an "unchanged", a "changed", and a "new" row
INSERT INTO dbo.tblSource
 (ColID,ColA,ColB,ColC)
 VALUES
 (0, 'A', '1/1/2007 12:01 AM', -1),
 (1, 'B', '1/1/2007 12:02 AM', -2),
 (2, 'N', '1/1/2007 12:03 AM', -3)
Use SSISIncrementalLoad_Dest
Go
-- insert a "changed" and an "unchanged" row
INSERT INTO dbo.tblDest
 (ColID,ColA,ColB,ColC)
 VALUES
 (0, 'A', '1/1/2007 12:01 AM', -1),
 (1, 'C', '1/1/2007 12:02 AM', -2)
Listing 1 – Building and Populating Demo Databases and Tables
The T-SQL statements in Listing 1 create two databases; SSISIncrementalLoad_Source and SSISIncrementalLoad_Dest. A table named tblSource is created in SSISIncrementalLoad_Source database and populated with three rows. Another table named tblDest is created in the SSISIncrementalLoad_Dest database and populated with two rows.
The configuration created by Listing 1 is a basic setup for an incremental load. ColID is the business key. This value should never change and should also uniquely identify the row in the Source and Destination systems. The character values in ColA of the Source and Destination tables indicate clues to the type of row. The “A” row is present and identical in both the Source and Destination tables. It is an Unchanged row. The row with a ColID value of 1 contains the ColA value “B” in the Source and the ColA value “C” in the Destination table. This row has Changed in the Source since it was initially loaded into the Destination table. The row with a ColID value of 2 exists only in the Source. It is a New row.
Adding Metadata
In this section, we will:
- Add metadata that defines the Connection Managers used in the Incremental Load SSIS design pattern.
- Add a new Biml file to the Biml project and rename it “IncrementalLoad.biml”.
- Add a “Connections” XML node just after the <Biml> tag.
- Add two “Connection” XML nodes configured to connect with the SSISIncremental_Source and SSISIncremental_Dest databases.
Open the Biml project created in the Stairway to Biml article, Level 2 – Biml Basics, Part 1. In Solution Explorer, right click the Biml Project and click Add New Biml File as shown in Figure 4:
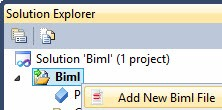
Figure 4 – Adding a New Biml File
Rename the new file “IncrementalLoad.biml”:
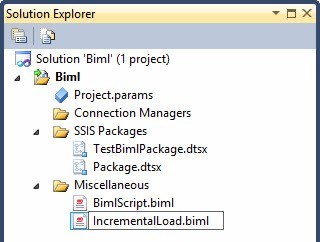
Figure 5 – Renaming the New File
Double-click IncrementalLoad.biml to open the file in SQL Server Data Tools (SSDT). It should appear as shown in Listing 2:
<Biml xmlns="http://schemas.varigence.com/biml.xsd">
</Biml>
Listing 2 – Configured Connections for IncrementalLoad.biml
Add a Connections tag immediately after the Biml tag. When you start typing the new tag, IntelliSense should engage as shown in Figure 6:
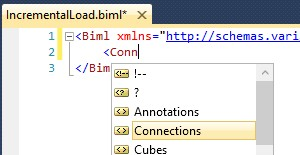
Figure 6 – IntelliSense Engaging
You can navigate to the Connections tag and press the Enter or Tab key to auto-complete the opening tag, or type “>” (without the double-quotes) to auto-complete the opening and closing tags for Connections as shown in Listing 3:
<Biml xmlns="http://schemas.varigence.com/biml.xsd">
<Connections></Connections>
</Biml>
Listing 3 – Completed Connections Tags
Next, add the tags for two Connections shown in Listing 4:
<Biml xmlns="http://schemas.varigence.com/biml.xsd">
  <Connections>
    <Connection Name="SSISIncrementalLoad_Source" ConnectionString="Data Source=(local);Initial Catalog=SSISIncrementalLoad_Source;Provider=SQLNCLI11.1;Integrated Security=SSPI;" />
    <Connection Name="SSISIncrementalLoad_Dest" ConnectionString="Data Source=(local);Initial Catalog=SSISIncrementalLoad_Dest;Provider=SQLNCLI11.1;OLE DB Services=1;Integrated Security=SSPI;" />
  </Connections>
</Biml>
Listing 4 – Configured Connections for IncrementalLoad.biml
Your Biml file will appear as shown in Figure 7:

Figure 7 – IncrementalLoad.biml File with Connections
We could right-click the IncrementalLoad.biml file now and click “Generate SSIS Packages,” but nothing would happen. Why? This Biml file contains only connections. Is this a valid Biml file? Yep. It just doesn’t contain Biml to generate an SSIS package.
Let’s add Package Biml to our IncrementalLoad.biml file. Add a “Packages” node between the </Connections> and </Biml> tags. Just after, add a “Package” XML node. Add a Name attribute the Package node and set the value of the Name attribute to “IncrementalLoadPackage”. Add a ConstraintMode attribute to the Package tag following the Name attribute and set its value to “Parallel”. Add a ProtectionLevel attribute to the Package tag following the ConstraintMode attribute and set its value to “EncryptSensitiveWithUserKey” as shown in Listing 5:
<Biml xmlns="http://schemas.varigence.com/biml.xsd">
       <Connections>
              <Connection Name="SSISIncrementalLoad_Source" ConnectionString="Data Source=(local);Initial Catalog=SSISIncrementalLoad_Source;Provider=SQLNCLI11.1;Integrated Security=SSPI;" />
              <Connection Name="SSISIncrementalLoad_Dest" ConnectionString="Data Source=(local);Initial Catalog=SSISIncrementalLoad_Dest;Provider=SQLNCLI11.1;OLE DB Services=1;Integrated Security=SSPI;" />
       </Connections>
       <Packages>
              <Package Name="IncrementalLoadPackage" ConstraintMode="Parallel" ProtectionLevel="EncryptSensitiveWithUserKey"></Package>
       </Packages>
</Biml>
Listing 5 - Configured Packages and Package Nodes
After saving the IncrementalLoad.biml file, we can now generate an SSIS package as shown in Figure 8:
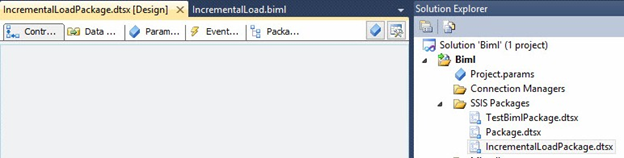
Figure 8 – IncrementalLoadPackage, Generated.
The package is empty, but it exists. The name of the package is IncrementalLoadPackage, just as we specified in the Name attribute of the Package tag. The Package ProtectionLevel property is set to EncryptSensitiveWithUserKey, and you can view this setting by right-clicking in the white space of the Control Flow and then clicking Properties. ProtectionLevel is a Package property under the Security Property Group as shown in Figure 9:
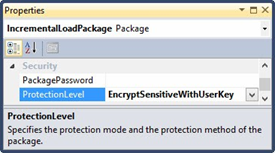
Figure 9 – Package ProtectionLevel Property
What is ConstraintMode? ConstraintMode can be set to “Parallel” or “Linear”. Parallel ConstraintMode means we will specify the Precedence Constraints. Linear means Biml will connect the SSIS executables (containers and tasks) in the order in which they appear in Biml using default precedence constraints (OnSuccess, Constraint-Only).
We next add a Task to the IncrementalLoad.biml file. Before we do, add a “Tasks” node on the line immediately following the “Package” Node as shown in Listing 3:
<Packages>
  <Package Name="IncrementalLoadPackage" ConstraintMode="Parallel" ProtectionLevel="EncryptSensitiveWithUserKey">
    <Tasks></Tasks>
  </Package>
</Packages>
Listing 3 – Adding the Tasks Node
The “Tasks” node contains the SSIS executables hosted within a container. It is important to note here that the Package itself is a container, and the Tasks node we just added is a child of the Package container. Now that we can add tasks to the package, let’s add an Execute SQL Task. If you refer to Figure 3 (the Incremental Load Control Flow) you will note we are adding the Execute SQL Task that truncates the staging table. Listing 4 shows the Biml needed to construct the Execute SQL Task. We add an “ExecuteSQL” opening node immediately after the “Tasks” node. We next add a “Name” attribute to the ExecuteSQL node and supply the value “Truncate stgUpdates”. This is followed by the ConnectionName attribute which is set to the “SSISIncrementalLoad_Dest” connection. Immediately following the opening “ExecuteSQL” node, we add a nested “DirectInput” node. The value for the DirectInput node is the Transact-SQL statement we wish to execute when the Execute SQL Task is called. That statement is:
Truncate Table stgUpdates
Listing 4 shows the Biml used to add the Execute SQL Task:
<Packages>
  <Package Name="IncrementalLoadPackage" ConstraintMode="Parallel" ProtectionLevel="EncryptSensitiveWithUserKey">
    <Tasks>
      <ExecuteSQL Name="Truncate stgUpdates" ConnectionName="SSISIncrementalLoad_Dest">
        <DirectInput>Truncate Table stgUpdates</DirectInput>
      </ExecuteSQL>
    </Tasks>
  </Package>
</Packages>
Listing 4 - Configured Packages, Package, Tasks, and ExecuteSQL Nodes
The closing tags for the ExecuteSQL and DirectInput nodes should be auto-generated for you when you type the tag-closing character (“>”) for their corresponding opening nodes. The Execute SQL Task defined in the Biml in Listing 4 will truncate the stgUpdates staging table that will hold rows that have been changed in the Source table since being loaded into the Destination table.
To test – and I test as much as possible – right-click the IncrementalLoad.biml file in Solution Explorer and then click “Generate SSIS Package” as shown in Figure 10:
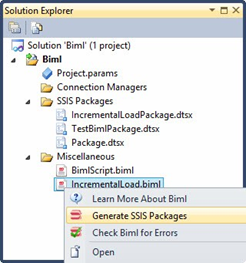
Figure 10 – Test by Clicking “Generate SSIS Packages”
Since we generated this same package earlier, IncrementalLoadPackage.dtsx already exists. We will be prompted to overwrite the package as shown in Figure 11:
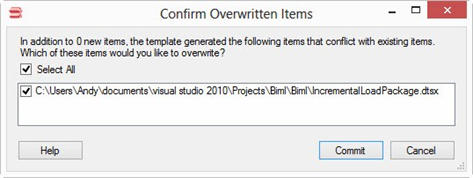
Figure 11 – Confirm Overwrite
Click the Commit button to overwrite the earlier version of IncrementalLoadPackage.dtsx. If IncrementalLoadPackage.dtsx is open in the SQL Server Data Tools environment, you will be prompted to reload the package after overwriting the underlying file, as shown in Figure 12:
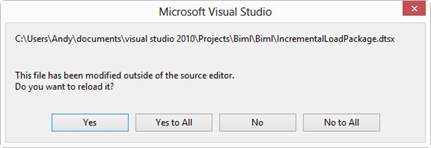
Figure 12 – Reload IncrementalLoadPackage.dtsx
Click the Yes button to reload the SSIS package. Once reloaded, your IncrementalLoadPackage.dtsx package should appear similar to that shown in Figure 13:
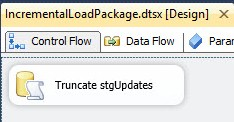
Figure 13 - IncrementalLoadPackage.dtsx with the “Truncate stgUpdates” Execute SQL Task
Your IncrementalLoad.biml file should now appear as shown in Listing 5:
<Biml xmlns="http://schemas.varigence.com/biml.xsd">
<Connections>
   <Connection Name="SSISIncrementalLoad_Source" ConnectionString="Data Source=(local);Initial Catalog=SSISIncrementalLoad_Source;Provider=SQLNCLI11.1;Integrated Security=SSPI;" />
   <Connection Name="SSISIncrementalLoad_Dest" ConnectionString="Data Source=(local);Initial Catalog=SSISIncrementalLoad_Dest;Provider=SQLNCLI11.1;OLE DB Services=1;Integrated Security=SSPI;" />
</Connections>
<Packages>
   <Package Name="IncrementalLoadPackage" ConstraintMode="Parallel" ProtectionLevel="EncryptSensitiveWithUserKey">
          <Tasks>
                 <ExecuteSQL Name="Truncate stgUpdates" ConnectionName="SSISIncrementalLoad_Dest">
                        <DirectInput>Truncate Table stgUpdates</DirectInput>
                 </ExecuteSQL>
          </Tasks>
   </Package>
</Packages>
</Biml>
Listing 5 – IncrementalLoad.biml File
Let’s continue building out the IncrementalLoadPackage.dtsx SSIS package. Next up, adding the Data Flow Task.
Specifying a Data Flow Task
Return to the IncrementalLoad.biml file. After the </ExecuteSQL> tag, add a “Dataflow” XML node. Include a “Name” attribute and set the value of the Name attribute to “Load tblDest” as shown in Listing 6:
<Tasks>
<ExecuteSQL Name="Truncate stgUpdates" ConnectionName="SSISIncrementalLoad_Dest">
   <DirectInput>Truncate Table stgUpdates</DirectInput>
</ExecuteSQL>
<Dataflow Name="Load tblDest"></Dataflow>
</Tasks>
Listing 6 - Adding the “Load tblDest” Data Flow Task
Inside the <Dataflow> tag, add a “PrecedenceConstraints” node. Place an “Inputs” node inside the <PrecedenceConstraints> tag, and an “Input” node that includes an “OutputPathName” attribute with the value “Truncate stgUpdates.Output” inside the <Inputs> tag – as shown in Listing 7:
<Tasks>
<ExecuteSQL Name="Truncate stgUpdates" ConnectionName="SSISIncrementalLoad_Dest">
   <DirectInput>Truncate Table stgUpdates</DirectInput>
</ExecuteSQL>
<Dataflow Name="Load tblDest">
  <PrecedenceConstraints>
        <Inputs>
         <Input OutputPathName="Truncate stgUpdates.Output" />
       </Inputs>
     </PrecedenceConstraints>
</Dataflow>
</Tasks>
Listing 7 - Adding a Precedence Constraint from the “Truncate stgUpdates” Execute SQL Task to the “Load tblDest” Data Flow Task
This code defines an OnSuccess Precedence Constraint between the “Truncate stgUpdates” Execute SQL Task to the “Load tblDest” Data Flow Task. If you re-generate the IncrementalLoadPackage.dtsx SSIS package now, the Control Flow will appear as shown in Figure 14:
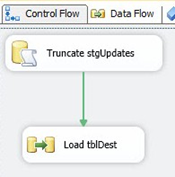
Figure 14 – A Precedence Constraint and Empty Data Flow Task
At this time, your IncrementalLoad.biml file should match Listing 8:
<Biml xmlns="http://schemas.varigence.com/biml.xsd">
  <Connections>
    <Connection Name="SSISIncrementalLoad_Source" ConnectionString="Data Source=(local);Initial Catalog=SSISIncrementalLoad_Source;Provider=SQLNCLI11.1;Integrated Security=SSPI;" />
    <Connection Name="SSISIncrementalLoad_Dest" ConnectionString="Data Source=(local);Initial Catalog=SSISIncrementalLoad_Dest;Provider=SQLNCLI11.1;OLE DB Services=1;Integrated Security=SSPI;" />
  </Connections>
  <Packages>
    <Package Name="IncrementalLoadPackage" ConstraintMode="Parallel" ProtectionLevel="EncryptSensitiveWithUserKey">
      <Tasks>
        <ExecuteSQL Name="Truncate stgUpdates" ConnectionName="SSISIncrementalLoad_Dest">
          <DirectInput>Truncate Table stgUpdates</DirectInput>
        </ExecuteSQL>
        <Dataflow Name="Load tblDest">
          <PrecedenceConstraints>
            <Inputs>
              <Input OutputPathName="Truncate stgUpdates.Output"/>
            </Inputs>
          </PrecedenceConstraints>
        </Dataflow>
      </Tasks>
    </Package>
  </Packages>
</Biml>
Listing 8 - “Load tblDest” Data Flow Task and Precedence Constraint Added
Next let’s add some data flow components.
Adding Components
We are now ready to add metadata that define data flow components, the heart of a Data Flow Task. In this section, we will design an Incremental Load that includes an OLE DB Source adapter, Lookup transformation, Conditional Split transformation, and a couple OLE DB Destination adapters. The subheadings in this section refer to Figure 1.
Source
To begin, add a “Transformations” node just after the </PrecedenceConstraints> tag as shown in Listing 9:
<Dataflow Name="Load tblDest">
  <PrecedenceConstraints>
    <Inputs>
      <Input OutputPathName="Truncate stgUpdates.Output" />
    </Inputs>
  </PrecedenceConstraints>
  <Transformations></Transformations>
</Dataflow>
Listing 9 - The Dataflow Node Containing an OLEDB Source Adapter
Inside the <Transformations> tags, add an “OleDbSource” tag with following the attribute and value pairs:
- Name: tblSource Source
- ConnectionName: SSISIncrementalLoad_Source
Inside the <OleDbSource> tag, add an “ExternalTableInput” node with a “Table” attribute whose value is “dbo.tblSource”. The “Dataflow” XML node will now appear as shown in Listing 10:
<Dataflow Name="Load tblDest">
  <PrecedenceConstraints>
    <Inputs>
      <Input OutputPathName="Truncate stgUpdates.Output" />
    </Inputs>
  </PrecedenceConstraints>
  <Transformations>
    <OleDbSource Name="tblSource Source" ConnectionName="SSISIncrementalLoad_Source">
      <ExternalTableInput Table="dbo.tblSource" />
    </OleDbSource>
  </Transformations>
</Dataflow>
Listing 10 - The Dataflow Node Containing an OLEDB Source Adapter
This metadata constructs an OLEDB Source adapter named “tblSource Source” that connects to the SSISIncrementalLoad_Source Connection defined above inside the <Connections> tag. The OLE DB Source adapter will connect to the table “dbo.tblSource” as specified in the “ExternalTableInput” tag. If you re-generate the IncrementalLoadPackage.dtsx SSIS package now, the Load tblDest Data Flow Task will contain the OLE DB Source Adaper shown in Figure 15:
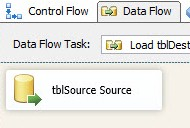
Figure 15 – The “tblSource Source” OLE DB Source Adapter
Correlate
To continue, add a “Lookup” XML node immediately after the </OleDbSource> tag. Include the following attribute and value pairs in the <Lookup> tag:
- Name: Correlate
- OleDbConnectionName: SSISIncrementalLoad_Dest
- NoMatchBehavior: RedirectRowsToNoMatchOutput
The Name attribute sets the name of the Lookup transformation. The OleDbConnectionName instructs Biml to use the Connection Manager defined in the <Connections> tag above. The NoMatchBehavior attribute is configured to redirect non-matching rows to the “NoMatch” output of the Lookup transformation. The Transformations node in your IncrementalLoad.biml file should appear as shown in Listing 11:
<Transformations>
  <OleDbSource Name="tblSource Source" ConnectionName="SSISIncrementalLoad_Source">
    <ExternalTableInput Table="dbo.tblSource" />
  </OleDbSource>
  <Lookup Name="Correlate" OleDbConnectionName="SSISIncrementalLoad_Dest" NoMatchBehavior="RedirectRowsToNoMatchOutput">
  </Lookup>
</Transformations>
Listing 11 – Adding the Correlate Lookup to Transformations
Continue configuring the metadata that define the Lookup transformation by adding a “InputPath” node immediately following the <Lookup> tag. Add an OutputPathName attribute and set its value to “tblSource Source.Output”. Add a “DirectInput” node immediately after the <InputPath> tag. Enter the following T-SQL statement between the <DirectInput> and </DirectInput> tags:
SELECT ColID, ColA, ColB, ColC
 FROM dbo.tblDest
The Transformations node of your IncrementalLoad.biml file should look like that shown in Listing 12:
<Transformations>
  <OleDbSource Name="tblSource Source" ConnectionName="SSISIncrementalLoad_Source">
    <ExternalTableInput Table="dbo.tblSource" />
  </OleDbSource>
  <Lookup Name="Correlate" OleDbConnectionName="SSISIncrementalLoad_Dest" NoMatchBehavior="RedirectRowsToNoMatchOutput">
    <InputPath OutputPathName="tblSource Source.Output" />
    <DirectInput>SELECT ColID, ColA, ColB, ColC FROM dbo.tblDest</DirectInput>
  </Lookup>
</Transformations>
Listing 12 – Adding Lookup Configuration
Continue configuring the “Correlate” Lookup transformation by adding an “Inputs” node immediately following the </DirectInput> tag. Inside the <Inputs> tag, add a “Column” node. Include the following attribute name: value pairs.
- SourceColumn: ColID
- TargetColumn: ColID
The preceding metadata provides the mapping between the Available Input Columns and Available Lookup Columns on the Columns page of the Lookup transformation, and is shown in Listing 13:
<Transformations>
  <OleDbSource Name="tblSource Source" ConnectionName="SSISIncrementalLoad_Source">
    <ExternalTableInput Table="dbo.tblSource" />
  </OleDbSource>
  <Lookup Name="Correlate" OleDbConnectionName="SSISIncrementalLoad_Dest" NoMatchBehavior="RedirectRowsToNoMatchOutput">
    <InputPath OutputPathName="tblSource Source.Output" />
    <DirectInput>SELECT ColID, ColA, ColB, ColC FROM dbo.tblDest</DirectInput>
    <Inputs>
      <Column SourceColumn="ColID" TargetColumn="ColID" />
    </Inputs>
  </Lookup>
</Transformations>
Listing 13 – Adding Lookup Inputs
Add an “Outputs” node immediately following the </Inputs> tag. Inside the <Outputs> tag, add three “Column” nodes with the following attribute name and value pairs.
1.
a. SourceColumn: ColA
b. TargetColumn: Dest_ColA
2.
a. SourceColumn: ColB
b. TargetColumn: Dest_ColB
3.
a. SourceColumn: ColC
b. TargetColumn: Dest_ColC
The preceding metadata “selects” the columns returned from the Lookup transformation’s Available Lookup Columns on the Columns page. Once added, the Lookup transformation metadata should appear as shown in Listing 14:
<Transformations>
  <OleDbSource Name="tblSource Source" ConnectionName="SSISIncrementalLoad_Source">
    <ExternalTableInput Table="dbo.tblSource" />
  </OleDbSource>
  <Lookup Name="Correlate" OleDbConnectionName="SSISIncrementalLoad_Dest" NoMatchBehavior="RedirectRowsToNoMatchOutput">
    <InputPath OutputPathName="tblSource Source.Output" />
    <DirectInput>SELECT ColID, ColA, ColB, ColC FROM dbo.tblDest</DirectInput>
    <Inputs>
      <Column SourceColumn="ColID" TargetColumn="ColID" />
    </Inputs>
    <Outputs>
      <Column SourceColumn="ColA" TargetColumn="Dest_ColA" />
      <Column SourceColumn="ColB" TargetColumn="Dest_ColB" />
      <Column SourceColumn="ColC" TargetColumn="Dest_ColC" />
    </Outputs>
  </Lookup>
</Transformations>
Listing 14 – Transformations Including “Correlate” Lookup Metadata
If you re-generate the IncrementalLoadPackage.dtsx SSIS package, the “Load tblDest” Data Flow will appear as sown in Figure 16:
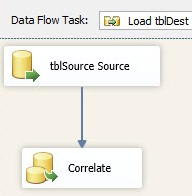
Figure 16 – Data Flow Including “Correlate” Lookup Transformation
Your IncrementalLoad.biml file should now match Listing 15:
<Biml xmlns="http://schemas.varigence.com/biml.xsd">
  <Connections>
    <Connection Name="SSISIncrementalLoad_Source" ConnectionString="Data Source=(local);Initial Catalog=SSISIncrementalLoad_Source;Provider=SQLNCLI11.1;Integrated Security=SSPI;" />
    <Connection Name="SSISIncrementalLoad_Dest" ConnectionString="Data Source=(local);Initial Catalog=SSISIncrementalLoad_Dest;Provider=SQLNCLI11.1;OLE DB Services=1;Integrated Security=SSPI;" />
  </Connections>
  <Packages>
    <Package Name="IncrementalLoadPackage" ConstraintMode="Parallel" ProtectionLevel="EncryptSensitiveWithUserKey">
      <Tasks>
        <ExecuteSQL Name="Truncate stgUpdates" ConnectionName="SSISIncrementalLoad_Dest">
          <DirectInput>Truncate Table stgUpdates</DirectInput>
        </ExecuteSQL>
        <Dataflow Name="Load tblDest">
          <PrecedenceConstraints>
            <Inputs>
              <Input OutputPathName="Truncate stgUpdates.Output"/>
            </Inputs>
          </PrecedenceConstraints>
          <Transformations>
            <OleDbSource Name="tblSource Source" ConnectionName="SSISIncrementalLoad_Source">
              <ExternalTableInput Table="dbo.tblSource" />
            </OleDbSource>
            <Lookup Name="Correlate" OleDbConnectionName="SSISIncrementalLoad_Dest" NoMatchBehavior="RedirectRowsToNoMatchOutput">
              <InputPath OutputPathName="tblSource Source.Output" />
              <DirectInput>SELECT ColID, ColA, ColB, ColC FROM dbo.tblDest</DirectInput>
              <Inputs>
                <Column SourceColumn="ColID" TargetColumn="ColID" />
              </Inputs>
              <Outputs>
                <Column SourceColumn="ColA" TargetColumn="Dest_ColA" />
                <Column SourceColumn="ColB" TargetColumn="Dest_ColB" />
                <Column SourceColumn="ColC" TargetColumn="Dest_ColC" />
              </Outputs>
            </Lookup>
          </Transformations>
        </Dataflow>
      </Tasks>
    </Package>
  </Packages>
</Biml>
Listing 15 – IncrementalLoad.biml File Including an OLEDB Source and Lookup Transformation
Destination
Next, we add an OLE DB Destination adapter and connect it to the NoMatch output of the “Correlate” Lookup Transformation. If the lookup transformation fails to find a match for the incoming row in the destination table, the incoming row is a new row. We will write this row directly to the destination table: SSISIncrementalLoad_Dest.dbo.tblDest.
Immediately following the </Lookup> tag, add an “OleDbDestination” XML node with the following attribute name and value pairs:
- Name: tblDest Destination
- ConnectionName: SSISIncrementalLoad_Dest
Your “Transformations” XML should appear as shown in Listing 16:
<Transformations>
  <OleDbSource Name="tblSource Source" ConnectionName="SSISIncrementalLoad_Source">
    <ExternalTableInput Table="dbo.tblSource" />
  </OleDbSource>
  <Lookup Name="Correlate" OleDbConnectionName="SSISIncrementalLoad_Dest" NoMatchBehavior="RedirectRowsToNoMatchOutput">
    <InputPath OutputPathName="tblSource Source.Output" />
    <DirectInput>SELECT ColID, ColA, ColB, ColC FROM dbo.tblDest</DirectInput>
    <Inputs>
      <Column SourceColumn="ColID" TargetColumn="ColID" />
    </Inputs>
    <Outputs>
      <Column SourceColumn="ColA" TargetColumn="Dest_ColA" />
      <Column SourceColumn="ColB" TargetColumn="Dest_ColB" />
      <Column SourceColumn="ColC" TargetColumn="Dest_ColC" />
    </Outputs>
  </Lookup>
  <OleDbDestination Name="tblDest Destination" ConnectionName="SSISIncrementalLoad_Dest"></OleDbDestination>
</Transformations>
Listing 16 – Adding the First OLEDB Destination
Inside the <OleDbDestination> tag, add an “InputPath” node with an “OutputPathName” attribute set to the value "Correlate.NoMatch". After the <InputPath> tag, add an “ExternalTableOutput” node with a “Table” attribute set to the value "dbo.tblDest."
After this step the “Transformations” XML should appear as shown in Listing 17:
<Transformations>
  <OleDbSource Name="tblSource Source" ConnectionName="SSISIncrementalLoad_Source">
    <ExternalTableInput Table="dbo.tblSource" />
  </OleDbSource>
  <Lookup Name="Correlate" OleDbConnectionName="SSISIncrementalLoad_Dest" NoMatchBehavior="RedirectRowsToNoMatchOutput">
    <InputPath OutputPathName="tblSource Source.Output" />
    <DirectInput>SELECT ColID, ColA, ColB, ColC FROM dbo.tblDest</DirectInput>
    <Inputs>
      <Column SourceColumn="ColID" TargetColumn="ColID" />
    </Inputs>
    <Outputs>
      <Column SourceColumn="ColA" TargetColumn="Dest_ColA" />
      <Column SourceColumn="ColB" TargetColumn="Dest_ColB" />
      <Column SourceColumn="ColC" TargetColumn="Dest_ColC" />
    </Outputs>
  </Lookup>
  <OleDbDestination Name="tblDest Destination" ConnectionName="SSISIncrementalLoad_Dest">
    <InputPath OutputPathName="Correlate.NoMatch" />
    <ExternalTableOutput Table="dbo.tblDest" />
  </OleDbDestination>
</Transformations>
Listing 17 - Transformations Node Including an OLEDB Source, Lookup, and one OLEDB Destination
If you re-generate the SSIS package, the data flow will appear as shown in Figure 17:
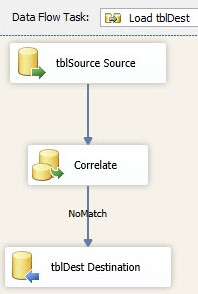
Figure 17 – The NoMatch Output Sends New Rows to the OLE DB Destination Adapter Connected to dbo.tblDest
The preceding metadata defines an OLEDB Destination adapter and configures it to connect the Lookup transformation’s “NoMatch” output to the “SSISIncrementalLoad_Dest” Connection defined above.
Filter
Next, we add a Conditional Split Transformation and connect it to the Match output of the “Correlate” Lookup Transformation. If the lookup transformation finds a match for the incoming row in the destination table, the incoming row is either a changed or unchanged row. We need to detect which and will use a Conditional Split Transformation to filter between changed and unchanged rows.
Add a “ConditionalSplit” XML node immediately after the </OleDbDestination> tag. Add an attribute called “Name” and set its value to “Filter”.
Now, the “Transformations” XML should appear as shown in Listing 18:
<Transformations>
  <OleDbSource Name="tblSource Source" ConnectionName="SSISIncrementalLoad_Source">
    <ExternalTableInput Table="dbo.tblSource" />
  </OleDbSource>
  <Lookup Name="Correlate" OleDbConnectionName="SSISIncrementalLoad_Dest" NoMatchBehavior="RedirectRowsToNoMatchOutput">
    <InputPath OutputPathName="tblSource Source.Output" />
    <DirectInput>SELECT ColID, ColA, ColB, ColC FROM dbo.tblDest</DirectInput>
    <Inputs>
      <Column SourceColumn="ColID" TargetColumn="ColID" />
    </Inputs>
    <Outputs>
      <Column SourceColumn="ColA" TargetColumn="Dest_ColA" />
      <Column SourceColumn="ColB" TargetColumn="Dest_ColB" />
      <Column SourceColumn="ColC" TargetColumn="Dest_ColC" />
    </Outputs>
  </Lookup>
  <OleDbDestination Name="tblDest Destination" ConnectionName="SSISIncrementalLoad_Dest">
    <InputPath OutputPathName="Correlate.NoMatch" />
    <ExternalTableOutput Table="dbo.tblDest" />
  </OleDbDestination>
  <ConditionalSplit Name="Filter"></ConditionalSplit>
</Transformations>
Listing 18 – Adding the Conditional Split Transformation
Begin configuring the Conditional Split transformation by adding an “InputPath” XML node. Just inside the <ConditionalSplit> tags, add an “InputPath” XML node with an “OutputPathName” attribute set to "Correlate.Match" as shown in Listing 19:
<Transformations>
  <OleDbSource Name="tblSource Source" ConnectionName="SSISIncrementalLoad_Source">
    <ExternalTableInput Table="dbo.tblSource" />
  </OleDbSource>
  <Lookup Name="Correlate" OleDbConnectionName="SSISIncrementalLoad_Dest" NoMatchBehavior="RedirectRowsToNoMatchOutput">
    <InputPath OutputPathName="tblSource Source.Output" />
    <DirectInput>SELECT ColID, ColA, ColB, ColC FROM dbo.tblDest</DirectInput>
    <Inputs>
      <Column SourceColumn="ColID" TargetColumn="ColID" />
    </Inputs>
    <Outputs>
      <Column SourceColumn="ColA" TargetColumn="Dest_ColA" />
      <Column SourceColumn="ColB" TargetColumn="Dest_ColB" />
      <Column SourceColumn="ColC" TargetColumn="Dest_ColC" />
    </Outputs>
  </Lookup>
  <OleDbDestination Name="tblDest Destination" ConnectionName="SSISIncrementalLoad_Dest">
    <InputPath OutputPathName="Correlate.NoMatch" />
    <ExternalTableOutput Table="dbo.tblDest" />
  </OleDbDestination>
  <ConditionalSplit Name="Filter">
    <InputPath OutputPathName="Correlate.Match"/>
  </ConditionalSplit>
</Transformations>
Listing 19 – Configuring the Conditional Split by Adding the InputPath
Now we need to add a conditional output path. Immediately following the <InputPath> tag, add an “OutputPaths” node, followed in turn by a “OutputPath” node containing an “Name” attribute set to "Changed Rows". Inside the <OutputPaths> tags, create an “Expression” node. Between the <Expression> and </Expression> tags, add the following SSIS Expression:
(ColA != Dest_ColA) || (ColB != Dest_ColB) || (ColC != Dest_ColC)
Once this step is complete, the “Transformations” XML should appear as shown in Listing 20:
<Transformations>
  <OleDbSource Name="tblSource Source" ConnectionName="SSISIncrementalLoad_Source">
    <ExternalTableInput Table="dbo.tblSource" />
  </OleDbSource>
  <Lookup Name="Correlate" OleDbConnectionName="SSISIncrementalLoad_Dest" NoMatchBehavior="RedirectRowsToNoMatchOutput">
    <InputPath OutputPathName="tblSource Source.Output" />
    <DirectInput>SELECT ColID, ColA, ColB, ColC FROM dbo.tblDest</DirectInput>
    <Inputs>
      <Column SourceColumn="ColID" TargetColumn="ColID" />
    </Inputs>
    <Outputs>
      <Column SourceColumn="ColA" TargetColumn="Dest_ColA" />
      <Column SourceColumn="ColB" TargetColumn="Dest_ColB" />
      <Column SourceColumn="ColC" TargetColumn="Dest_ColC" />
    </Outputs>
  </Lookup>
  <OleDbDestination Name="tblDest Destination" ConnectionName="SSISIncrementalLoad_Dest">
    <InputPath OutputPathName="Correlate.NoMatch" />
    <ExternalTableOutput Table="dbo.tblDest" />
  </OleDbDestination>
  <ConditionalSplit Name="Filter">
    <InputPath OutputPathName="Correlate.Match"/>
    <OutputPaths>
      <OutputPath Name="Changed Rows">
        <Expression>(ColA != Dest_ColA) || (ColB != Dest_ColB) || (ColC != Dest_ColC)</Expression>
      </OutputPath>
    </OutputPaths>
  </ConditionalSplit>
</Transformations>
Listing 20 - Transformations Node Including an OLEDB Source, Lookup, Conditional Split, and one OLEDB Destination
The Conditional Split metadata most recently added configures a single output named “Changed Rows” and assigns an SSIS Expression designed to detect changes in rows that exist in both the Source and Destination tables. If you re-generate the IncrementalLoadPackage.dtsx SSIS package the data flow should appear similar to that shown in Figure 18:
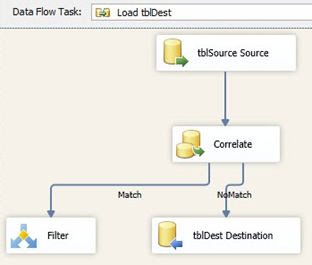
Figure 18 – Adding the Filter Conditional Split Transformation
Updates Stage
The final component in our Data Flow Task is an OLEDB Destination adapter designed to stage rows that will be updated after the data flow completes execution. Immediately following the </ConditionalSplit> tag, add an “OleDbDestination” node with the following attribute name and value pairs.
- Name: stgUpdates
- ConnectionName: SSISIncrementalLoad_Dest
Inside the <OleDbDestination> tag, add a new node named “InputPath” with an attribute named “OutputPathName” and the value set to "Filter.Changed Rows". Immediately thereafter, add a node named “ExternalTableOutput” that includes a “Table” attribute set to "dbo.stgUpdates". This metadata defines an OLEDB Destination adapter that connects the “Changed Rows” output of the Conditional Split named “Filter” to a table named “dbo.stgUpdates” in the database defined by the “SSISIncrementalLoad_Dest” Connection defined above.
The complete Data Flow Task metadata is shown in Listing 21:
<Transformations>
  <OleDbSource Name="tblSource Source" ConnectionName="SSISIncrementalLoad_Source">
    <ExternalTableInput Table="dbo.tblSource" />
  </OleDbSource>
  <Lookup Name="Correlate" OleDbConnectionName="SSISIncrementalLoad_Dest" NoMatchBehavior="RedirectRowsToNoMatchOutput">
    <InputPath OutputPathName="tblSource Source.Output" />
    <DirectInput>SELECT ColID, ColA, ColB, ColC FROM dbo.tblDest</DirectInput>
    <Inputs>
      <Column SourceColumn="ColID" TargetColumn="ColID" />
    </Inputs>
    <Outputs>
      <Column SourceColumn="ColA" TargetColumn="Dest_ColA" />
      <Column SourceColumn="ColB" TargetColumn="Dest_ColB" />
      <Column SourceColumn="ColC" TargetColumn="Dest_ColC" />
    </Outputs>
  </Lookup>
  <OleDbDestination Name="tblDest Destination" ConnectionName="SSISIncrementalLoad_Dest">
    <InputPath OutputPathName="Correlate.NoMatch" />
    <ExternalTableOutput Table="dbo.tblDest" />
  </OleDbDestination>
  <ConditionalSplit Name="Filter">
    <InputPath OutputPathName="Correlate.Match"/>
    <OutputPaths>
      <OutputPath Name="Changed Rows">
        <Expression>(ColA != Dest_ColA) || (ColB != Dest_ColB) || (ColC != Dest_ColC)</Expression>
      </OutputPath>
    </OutputPaths>
  </ConditionalSplit>
  <OleDbDestination Name="stgUpdates" ConnectionName="SSISIncrementalLoad_Dest">
    <InputPath OutputPathName="Filter.Changed Rows" />
    <ExternalTableOutput Table="dbo.stgUpdates" />
  </OleDbDestination>
</Transformations>
Listing 21 – Adding the stgUpdates OLE DB Destination Adapter
If you re-generate the IncrementalLoadPackage.dtsx SSIS package, you can see the OLE DB Destination Adapter created in the data flow by the preceding code, as shown in Figure 19:
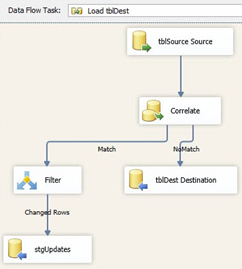
Figure 19 – The IncrementalLoadPackage.dtsx “Load tblDest” Data Flow Task
Back to the Control Flow
Your Control Flow should appear as shown in Figure 20:
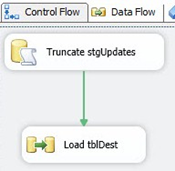
Figure 20 – The IncrementalLoadPackage.dtsx Control Flow
There remains one more Execute SQL Task to complete our Incremental Load SSIS package. This task will update the Destination table by applying the rows stored in the “dbo.stgUpdates” table using a single Update T-SQL statement. Applying the updates in this fashion is generally faster than updating each row individually.
To continue developing the demo code, add an “ExecuteSQL” XML node immediately following the </Dataflow> tag with the following attribute name and value pairs.
- Name: Apply stgUpdates
- ConnectionName: SSISIncrementalLoad_Dest
Immediately following the <ExecuteSQL> tag, add a “PrecedenceConstraints” node, followed by an “Inputs” node. Inside the <Inputs> tag add an “Input” node containing an attribute named “OutputPathName” set to the value "Load tblDest.Output". Add a “DirectInput” node immediately following the </PrecedenceConstraints> tag. Inside the <DirectInput> tags, add the following T-SQL statement:
Update Dest
Set Dest.ColA = Upd.ColA
   ,Dest.ColB = Upd.ColB
   ,Dest.ColC = Upd.ColC
From tblDest Dest
Join stgUpdates Upd
  On Upd.ColID = Dest.ColID
Believe it or not, that’s it! If your Biml looks like Listing 22, you should have compile-able metadata:
<Biml xmlns="http://schemas.varigence.com/biml.xsd">
  <Connections>
    <Connection Name="SSISIncrementalLoad_Source" ConnectionString="Data Source=(local);Initial Catalog=SSISIncrementalLoad_Source;Provider=SQLNCLI11.1;Integrated Security=SSPI" />
    <Connection Name="SSISIncrementalLoad_Dest" ConnectionString="Data Source=(local);Initial Catalog=SSISIncrementalLoad_Dest;Provider=SQLNCLI11.1;OLE DB Services=1;Integrated Security=SSPI;" />
  </Connections>
  <Packages>
    <Package Name="IncrementalLoadPackage" ConstraintMode="Parallel" ProtectionLevel="EncryptSensitiveWithUserKey">
      <Tasks>
        <ExecuteSQL Name="Truncate stgUpdates" ConnectionName="SSISIncrementalLoad_Dest">
          <DirectInput>Truncate Table stgUpdates</DirectInput>
        </ExecuteSQL>
        <Dataflow Name="Load tblDest">
          <PrecedenceConstraints>
            <Inputs>
              <Input OutputPathName="Truncate stgUpdates.Output" />
            </Inputs>
          </PrecedenceConstraints>
          <Transformations>
            <OleDbSource Name="tblSource Source" ConnectionName="SSISIncrementalLoad_Source">
              <ExternalTableInput Table="dbo.tblSource" />
            </OleDbSource>
            <Lookup Name="Correlate" OleDbConnectionName="SSISIncrementalLoad_Dest" NoMatchBehavior="RedirectRowsToNoMatchOutput">
              <InputPath OutputPathName="tblSource Source.Output" />
              <DirectInput>SELECT ColID, ColA, ColB, ColC FROM dbo.tblDest</DirectInput>
              <Inputs>
                <Column SourceColumn="ColID" TargetColumn="ColID" />
              </Inputs>
              <Outputs>
                <Column SourceColumn="ColA" TargetColumn="Dest_ColA" />
                <Column SourceColumn="ColB" TargetColumn="Dest_ColB" />
                <Column SourceColumn="ColC" TargetColumn="Dest_ColC" />
              </Outputs>
            </Lookup>
            <OleDbDestination Name="tblDest Destination" ConnectionName="SSISIncrementalLoad_Dest">
              <InputPath OutputPathName="Correlate.NoMatch" />
              <ExternalTableOutput Table="dbo.tblDest" />
            </OleDbDestination>
            <ConditionalSplit Name="Filter">
              <InputPath OutputPathName="Correlate.Match"/>
              <OutputPaths>
                <OutputPath Name="Changed Rows">
                  <Expression>(ColA != Dest_ColA) || (ColB != Dest_ColB) || (ColC != Dest_ColC)</Expression>
                </OutputPath>
              </OutputPaths>
            </ConditionalSplit>
            <OleDbDestination Name="stgUpdates" ConnectionName="SSISIncrementalLoad_Dest">
              <InputPath OutputPathName="Filter.Changed Rows" />
              <ExternalTableOutput Table="dbo.stgUpdates" />
            </OleDbDestination>
          </Transformations>
        </Dataflow>
        <ExecuteSQL Name="Apply stgUpdates" ConnectionName="SSISIncrementalLoad_Dest">
          <PrecedenceConstraints>
            <Inputs>
              <Input OutputPathName="Load tblDest.Output" />
            </Inputs>
          </PrecedenceConstraints>
          <DirectInput>
                Update Dest
                Set Dest.ColA = Upd.ColA
                ,Dest.ColB = Upd.ColB
                ,Dest.ColC = Upd.ColC
                From tblDest Dest
                Join stgUpdates Upd
                On Upd.ColID = Dest.ColID
          </DirectInput>
        </ExecuteSQL>
      </Tasks>
    </Package>
  </Packages>
</Biml>
Listing 22 – The Complete IncrementalLoad.biml Listing
If you re-generate the IncrementalLoadPackage.dtsx SSIS package, the Control Flow will appear as shown in Figure 21:
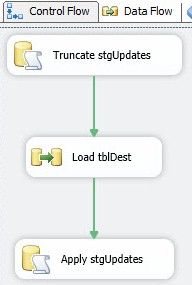
Figure 21 – The IncrementalLoadPackage.dtsx Control Flow
We are now ready to test!
Testing the Biml
Testing the Biml will consist of generating the SSIS package, then executing it. We will look at the data to see if the Incremental Load executed as expected. To begin, I have prepared a T-SQL Reset Rows script shown in Listing 23:
Use SSISIncrementalLoad_Source
Go
TRUNCATE TABLE dbo.tblSource
-- insert an "unchanged" row, a "changed" row, and a "new" row
INSERT INTO dbo.tblSource
(ColID,ColA,ColB,ColC)
VALUES
 (0, 'A', '1/1/2007 12:01 AM', -1),
 (1, 'B', '1/1/2007 12:02 AM', -2),
 (2, 'N', '1/1/2007 12:03 AM', -3)
Use SSISIncrementalLoad_Dest
Go
TRUNCATE TABLE dbo.stgUpdates
TRUNCATE TABLE dbo.tblDest
-- insert an "unchanged" row and a "changed" row
INSERT INTO dbo.tblDest
(ColID,ColA,ColB,ColC)
VALUES
 (0, 'A', '1/1/2007 12:01 AM', -1),
 (1, 'C', '1/1/2007 12:02 AM', -2)
Listing 23 – Resetting the Incremental Load Source and Destination Values
Return to Solution Explorer in SQL Server Data Tools. Right-click IncrementalLoad.biml and click “Generate SSIS Packages.” If you receive no error, your Biml is sound and you should see an SSIS package named IncrementalLoadPackage.dtsx in the SSIS Packages virtual folder in Solution Explorer. If the SSIS package opens with no errors, press the F5 key to execute it in the Debugger. If all is as it should be, you should see results similar to those shown in Figures 22 and 23:

Figure 22 – Successful Control Flow Execution!
The Data Flow should appear as shown in Figure 23:
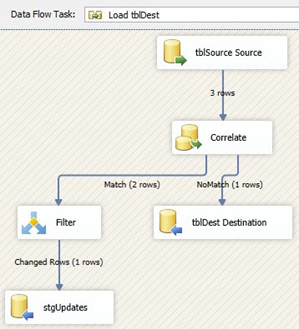
Figure 23 – Successful Data Flow Execution!
Listing 24 contains the test script we will use to examine and compare the contents of the Source and Destination:
Use SSISIncrementalLoad_Source
Go
SELECT TableName = 'tblSource'
      ,ColID
      ,ColA
      ,ColB
      ,ColC
  FROM dbo.tblSource
Go
Use SSISIncrementalLoad_Dest
Go
SELECT TableName = 'tblDest'
      ,[ColID]
      ,[ColA]
      ,[ColB]
      ,[ColC]
  FROM [dbo].[tblDest]
SELECT TableName = 'stgUpdates'
      ,[ColID]
      ,[ColA]
      ,[ColB]
      ,[ColC]
  FROM [dbo].[stgUpdates]
Go
Listing 24 – Test Script for the IncrementalLoad.dtsx SSIS Package
Executing the Test script after executing the Reset script yields the results pictured in Figure 24:
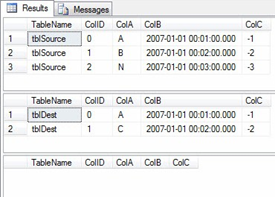
Figure 24 – Pre-SSIS-Package-Execution results of test script
Executing the Test script now returns evidence that SSISIncrementalLoad_Dest.dbo.tblDest has received the updates loaded from SSISIncrementalLoad_Source.dbo.tblSource, as shown in Figure 25:
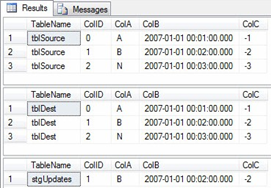
Figure 25 – Results of a successful execution of IncrementalLoadPackage.dtsx
By examining the results and comparing to Figure 25, we can see SSISIncrementalLoad_Dest.dbo.tblDest has been updated to match SSISIncrementalLoad_Source.dbo.tblSource. We can also see the updated row, with ColID = 1, was sent to the SSISIncrementalLoad_Dest.dbo.stgUpdates table.
Conclusion
In this article, we coded a Biml file that built an SSIS package for the Incremental Load SSIS Design Pattern. While this is cool, it is actually more work than simply building the SSIS package in SQL Server Data Tools. This article is really the prelude to the next level of the Stairway to Biml, and the next level is awesome!