Throughout this series, we’ve consistently dealt with delimited text files; comma and tab, for instance. We’ve used the U-SQL built-in extractors to process these files. But what if we need to deal with different types of file, like JSON, XML or fixed width? That’s where custom extractors come in. U-SQL provides us with the ability to create our own extractors, so we can handle specific file types. These can be created in C# and used in scripts, just like any of the built-in extractors.
The Problem
Throughout the series, we’ve been dealing with postcode files in CSV format. Now imagine we’ve been asked to start handling postcode data in JSON format. A new, shiny JSON file has arrived, from which we’ve cut a sample set of records to test with.

We’ve also been asked if we can convert this file into XML format, to fit in with a legacy system. U-SQL, with a bit of help from C#, can be used to achieve this goal. There are three things we need to do:
- Create a custom U-SQL Extractor, to handle the new JSON format for postcode data
- Create a custom U-SQL Outputter, to handle output to the required XML format
- Write appropriate scripts to call the custom objects
In this article, we’ll write the Extractor, register it and see it working. Then we can complete the job in the following article by creating a custom Outputter. Let’s open up our Visual Studio project (download this from GitHub if you don’t already have it) and start coding.
Creating a Custom Extractor
As we’ve already mentioned, U-SQL extractors are created using the C# language. We need to create a new U-SQL class library for our extractor code. We added a class library to our project way back in step 15 of the stairway, to handle the splitting of postcodes. Add a new project via File > Add > New Project. Choose Class Library (For U-SQL Application) and click Next.

Time to name the class library. Call it JsonExtractorLibrary and click Create. This opens up an empty Class1.cs file.

We need to switch this around a bit, so it can be recognised as a U-SQL extractor. Change the line:
public class Class1
To:
public class JsonExtractor : IExtractor
This gives us a class named JsonExtractor, implementing the IExtractor interface.
A Little Bit About Extractors
An interface in .NET defines a framework, which a class implementing that framework must follow. In the case of the IExtractor interface, you only need to implement one method:
public override IEnumerable<IRow> Extract(IUnstructuredReader input, IUpdatableRow output)
The Extract method is called by the U-SQL engine to extract data from the input data for the current row. This is where the JSON data we’ll be dealing with comes in, is converted and then outputted, so that the U-SQL script we’ll write can process the data.
IExtractor also supports a single attribute, SqlUserDefinedExtractor. This is purely used to define whether the incoming file should be dealt with atomically, via the AtomicFileProcessing parameter. It looks like this:
[SqlUserDefinedExtractor(AtomicFileProcessing = true)]
Whether you set this to true or false depends upon the type of input file. If the file could safely be split – so a CSV or text file, for instance – you can set this parameter to false. This will allow the U-SQL engine to stream the file in chunks to the extractor. If the file type doesn’t support splitting – so JSON or XML, for instance – you need to set this flag to true. The U-SQL engine will send the entire file to the extractor, which will then output the converted data row by row.
We’re dealing with a JSON file here, so the flag will be true. Here’s how the outline of our custom JSON extractor looks after all that.
[SqlUserDefinedExtractor(AtomicFileProcessing = true)]
public class JsonExtractor : IExtractor
{
 public override IEnumerable<IRow> Extract(IUnstructuredReader reader, IUpdatableRow row)
 {
 }
}
The last thing to do is to rename the Class1.cs file to JsonExtractor.cs. Now we’re ready to add the code.
The Extractor Code
Our extractor is going to receive JSON data and convert those data into rows, which can be understood by other U-SQL classes, such as outputters. To do this, the code will:
- Convert the JSON data into a postcode information class, as an intermediary measure
- Convert the postcode info data into a U-SQL row
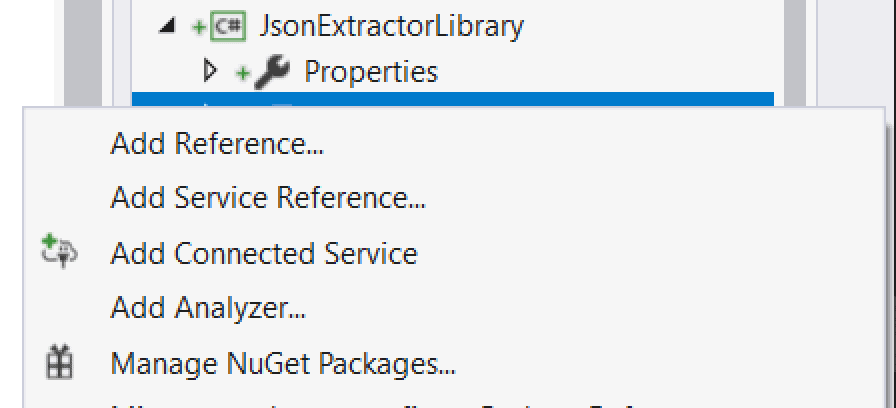
We’ll need to add a new PostcodeInfo class to hold the intermediary data, then use this to output the row. The popular JSON.Net library is used to handle the incoming JSON data, so the first thing to do is to add a reference for that. In the Solution Explorer, right click on References and choose Manage NuGet Packages.
Search for Newtonsoft.Json and click Install, you’ll be good to go in a couple of seconds!

Now you can add the code. Here’s the full listing.
using Microsoft.Analytics.Interfaces;
using System.Collections.Generic;
using System.IO;
using Newtonsoft.Json;
using Newtonsoft.Json.Linq;
namespace JsonExtractorLibrary
{
    [SqlUserDefinedExtractor(AtomicFileProcessing = true)]
    public class JsonExtractor : IExtractor
    {
        // This is the only method exposed by the interface and must be implemented
        public override IEnumerable<IRow> Extract(IUnstructuredReader reader, IUpdatableRow row)
        {
            var jsonReader = new JsonTextReader(new StreamReader(reader.BaseStream));
            var serializer = new JsonSerializer();
            var pc = (JArray)serializer.Deserialize(jsonReader);
            var pcList = (List<PostcodeInfo>)pc.ToObject(typeof(List<PostcodeInfo>));
            foreach (PostcodeInfo pi in pcList)
            {
                row.Set<string>("Postcode", pi.Postcode);
                row.Set<string>("CountyCode", pi.CountyCode);
                row.Set<string>("DistrictCode", pi.DistrictCode);
                row.Set<string>("CountryCode", pi.CountryCode);
                row.Set<decimal?>("Latitude", (decimal?)pi.Latitude);
                row.Set<decimal?>("Longitude", (decimal?)pi.Longitude);
                yield return row.AsReadOnly();
            }
        }
    }
    public class PostcodeInfo
    {
        public string Postcode { get; set; }
        public string CountyCode { get; set; }
        public string DistrictCode { get; set; }
        public string CountryCode { get; set; }
        public float Latitude { get; set; }
        public float Longitude { get; set; }
    }
}
Walking Through
Let’s have a quick look at what the code does. We’ll start at the bottom, where a class called PostcodeInfo has been declared. This has fields which map to the values held for a postcode in each JSON object, and acts as our intermediary step before we convert the data to a row.
On to the Extract method, which accepts two parameters – an IUnstructuredReader and an IUpdatableRow. The reader is a stream, which holds the incoming data. The row is the actual row object, which we need to populate and output as part of the return type. The return type is IEnumerable<Row>, which is essentially a collection of rows.
We kick off by converting the stream to a JsonTextReader, allowing us to obtain the JSON as text. Then we deserialize that text into a JArray, which is to say an array of JSON data. JArrays can be a bit messy to deal with, so we cast this to a List of PostcodeInfo objects. At this point, we have a very simple collection we can manipulate.
As we’re dealing with an atomic file, we may receive multiple rows in the same hit. We therefore have a foreach loop, so we can handle every record in the incoming stream. Properties of the row object are set, with the type of the data being set, along with the column name. The Postcode field, for instance, is a string. The Latitude field is a nullable decimal (that’s what the question mark means).
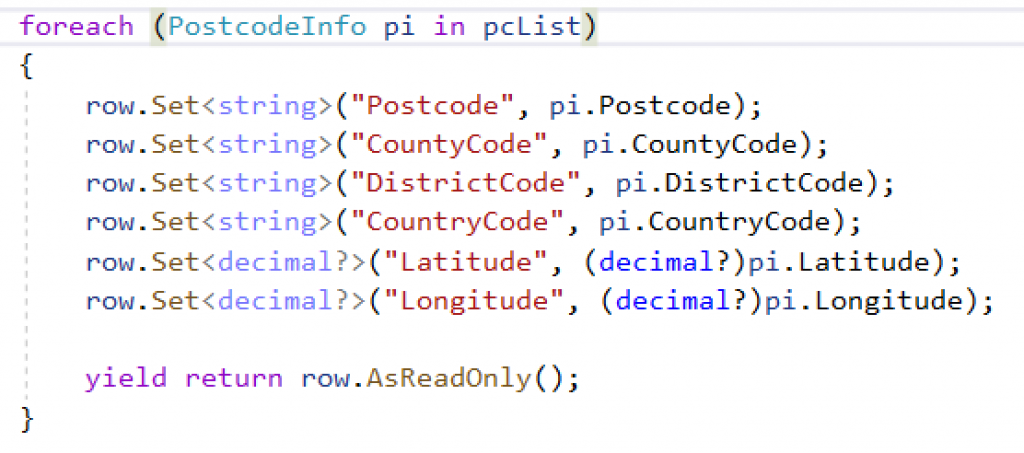
The last line in the loop returns the row, in read only form.
And that’s it, we are ready to test! Ensure the code builds by hitting the F6 key, you should see Build Succeeded at the bottom of the screen. Let’s go register!
Creating a Registration Script
We’ve already seen how to register assemblies, way back in step 15 of this stairway. Here’s the outline of the CREATE ASSEMBLY command:
CREATE ASSEMBLY [IF NOT EXISTS] Assembly_Name FROM PATH [WITH ADDITIONAL_FILES = (Additional Files)];
Last time, we didn’t use the WITH ADDITIONAL FILES clause as, well, there were no additional files. But this new JSON extractor uses the Json.Net library, which we need to reference as an additional file. This is critical. The library will be registered successfully, but when you try to use it you will see an error message telling you the Newtonsoft.Json library could not be found.
Add a new script called 770 Register JsonExtractorLibrary Assembly.usql. Then add this code, which will register the extractor along with the appropriate dependency.
USE DATABASE UkPostcodes;
DECLARE @Path string = @"C:\Users\mike mcquillan\Source\Repos\usql_ssc\JsonExtractorLibrary\bin\Debug\JsonExtractorLibrary.dll";
DROP ASSEMBLY IF EXISTS JsonExtractorLibrary;
CREATE ASSEMBLY JsonExtractorLibrary
FROM @Path
WITH ADDITIONAL_FILES =
(@"C:\Users\mike mcquillan\Source\Repos\usql_ssc\JsonExtractorLibrary\bin\Debug\Newtonsoft.Json.dll");
Make sure you point the @Path variable at the location of your extractor DLL. The Newtonsoft.Json.dll file will be in the same folder, and that’s where you should point the ADDITIONAL_FILES clause. Note we have given the assembly the name JsonExtractorLibrary. This is how we’ll reference the library in our scripts.
Ensure your script is pointing at (Local-machine) in the ADLA Account drop-down, then submit the script. The extractor will be registered. Now we can write a script to test it!
Using the Custom Extractor
Add another script, this time called 780 Reference JsonExtractorLibrary Assembly.usql. Here’s the code you need to add.
USE DATABASE UkPostcodes;
USE SCHEMA Postcodes;
REFERENCE ASSEMBLY [JsonExtractorLibrary];
DECLARE @DataFilePath string = @"C:\Users\Mike McQuillan\source\repos\usql_ssc\SSC_UkPostcodes\ssc_uk_postcodes\postcodes\Postcodes.json";
@postcodes =
    EXTRACT Postcode string,
            CountyCode string,
            DistrictCode string,
            CountryCode string,
            Latitude decimal?,
            Longitude decimal?
    FROM @DataFilePath
    USING new JsonExtractorLibrary.JsonExtractor();
OUTPUT @postcodes TO "/Output/convertedjsonpostcodes.csv"
USING Outputters.Csv();
Most of this has been seen before throughout the stairway, but the REFERENCE ASSEMBLY line is pretty interesting. That’s where we tell the script it can use our JSON Extractor, using the name we specified in the registration.
After that, the code looks just like any other extraction script we’ve written in the past. The only difference is the USING line, which uses the new keyword:
USING new JsonExtractorLibrary.JsonExtractor();
This is needed so the U-SQL engine knows it needs to instantiate an instance of the extractor class. We don’t need to do this with a built-in extractor, like the example below:
USING Extractors.Csv();
The fields in the EXTRACT statement map to the fields in the JSON file, which we saw at the top of the article. We’re not particularly thrilled with the OUTPUT statement, as all this does at the moment is convert the JSON data back to CSV! But we’re going to sort that out in the next article, it’s just here as a placeholder at the moment.
Now we reach the exciting moment of using our custom extractor! Make sure your @DataFilePath variable is point at the JSON file on your machine. Point the ADLA Account drop-down list at (Local-machine) and hit that Submit button! After a few moments, you should see a success message.
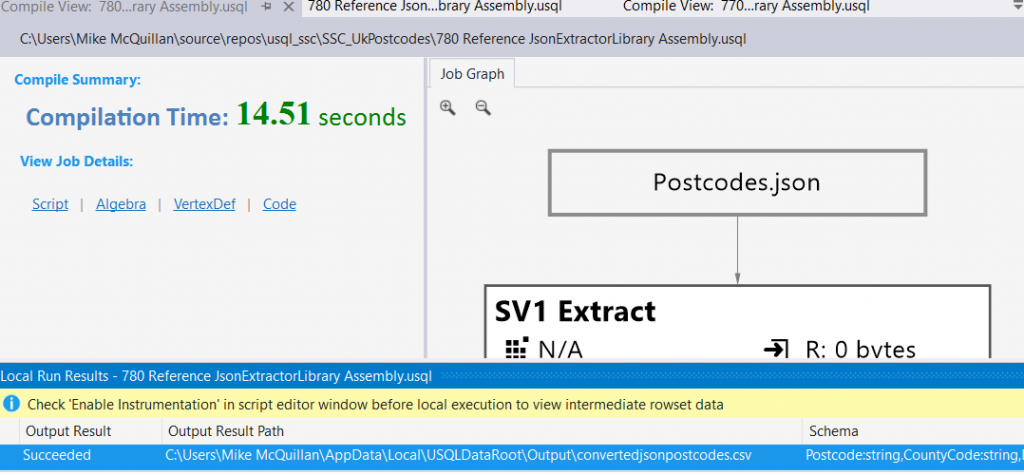
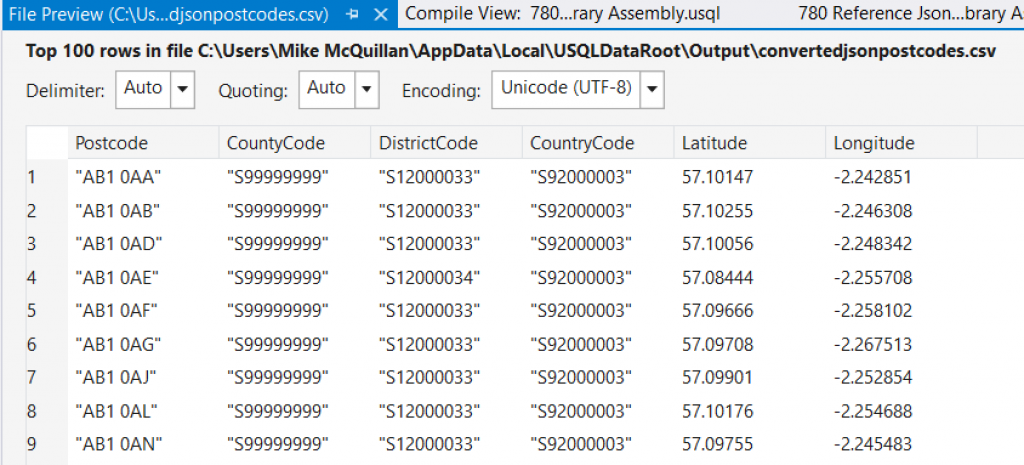
At the bottom is the path to our output file. Double-click on it and you’ll see a preview of the CSV file that has been generated. We’ve hit the jackpot!
How cool is this? Now we can process absolutely any file format we want to into U-SQL, all we have to do is come up with the code for the custom extractor. All that’s left to do now is push this up to Azure and test it.
Deploying the Postcode File to Azure
Before uploading the extractor, you must push up the Postcodes JSON file to your Data Lake storage in Azure. Log on to the portal and open up the Data Explorer to do this manually, or use Powershell if you prefer. Put the file in your preferred location. I’ve put mine in ssc_uk_postcodes/postcodes.

The beady-eyed amongst you will notice two JSON files, which greatly differ in size. The full size file contains the entire postcode set, the other is a subset you can use for lower-cost testing. It’s interesting to see how much larger the JSON file is compared to the CSV file.
The full size file is zipped up in the GitHub repo.
Deploying the Extractor to Azure
Now it’s time to deploy the extractor. Two steps are involved here:
- Upload the extractor assembly files
- Register the assembly
Uploading the assembly files is the same as uploading the Postcodes JSON files. Just put the JsonExtractorLibrary.dll and Newtonsoft.Json.dll files in the required location. Both files must be in the same folder. I’ve dropped mine into a folder called assemblies.

Now we need to amend the script to use the Azure locations. Here’s the amended 770 Register JsonExtractorLibrary Assembly.usql script.
USE DATABASE UkPostcodes;
DECLARE @Path string = @"/assemblies/JsonExtractorLibrary.dll";
DROP ASSEMBLY IF EXISTS JsonExtractorLibrary;
CREATE ASSEMBLY JsonExtractorLibrary
FROM @Path
WITH ADDITIONAL_FILES = (@"/assemblies/Newtonsoft.Json.dll");
Just before we run this, we’ll have a quick look at manually registering the assembly via Visual Studio. Use the Data Lake Analytics Explorer to navigate to the folder you want to drop the assembly into. Right-click on the folder and choose the Register Assembly option. A dialog appears. Choose the assembly you want to upload (hopefully this is the extractor we created earlier!) and click OK. Now you are back in the main dialog. Expand the Managed Dependencies section, and you’ll see Visual Studio has detected the Newtonsoft.Json dependency. How nifty is that!
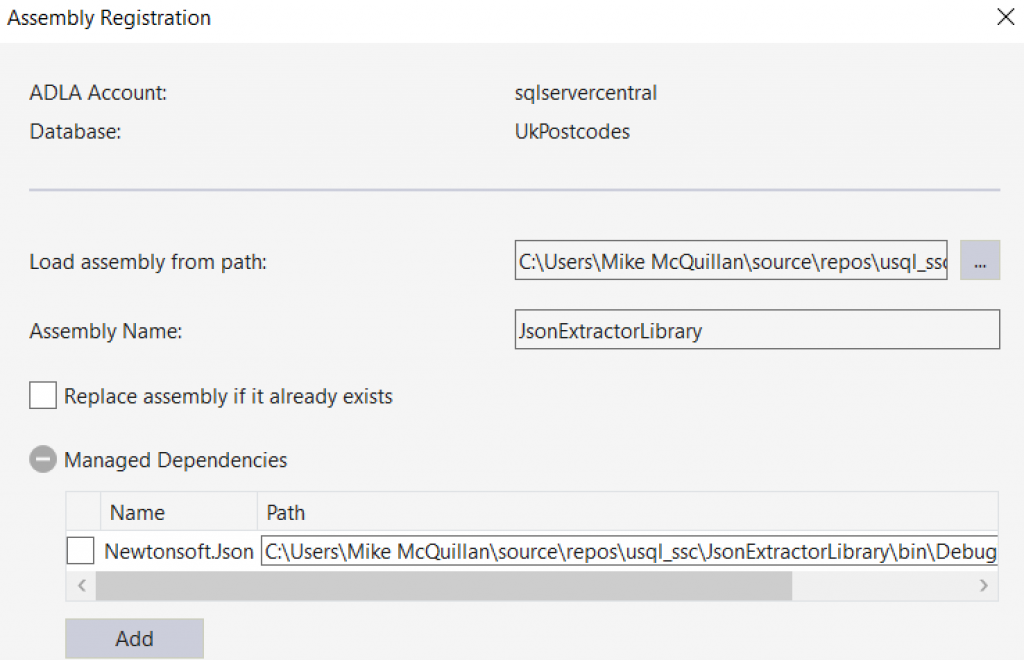
Interestingly, the dependency isn’t checked by default. If you decide to use this route make sure you check the dependency, otherwise it won’t be uploaded and won’t be referenced.
Once you’ve decided upon a registration mechanism (script or manual), run it and make sure the assembly registers! I’ve gone for the script option, making sure I run it against the correct ADLA Account.

Woo-hoo! All we need to do now is change script 780 to try it out.
Using the Custom Extractor in Azure
Head back to script 780 and change the @DataFilePath line. I’ve pointed my line at the smaller Postcodes.json file.
DECLARE @DataFilePath string = "/ssc_uk_postcodes/postcodes/Postcodes.json";
In the ADLA Account drop-down, choose the correct account and click Submit.

Once this is done, we should have a file called convertedjsonpostcodes.csv in the Output folder.

Hurray! JSON data converted in a touch of a button (sort of).
Summary
Creating a custom extractor is a pretty specialised thing, but it does give you complete control over what you can process via U-SQL and the Azure Data Lake. We mentioned XML and JSON files, but you could also write extractors to deal with fixed length files if the need arose.
The task we mentioned at the start of this article was a two-parter. First up was to extract JSON data. We’ve ticked that box. The next part was to output that JSON data as XML, which is what we’ll do in the next article. Come along and find out how to create a custom outputter!