In this fifth level we examine how to install and enable the SQL Server Agent service on Linux.
SQL Server Agent
The SQL Server Agent is a service that runs scheduled SQL Server jobs and can be used to automate common administration tasks. For example, the Agent may notify an operator in case an error is raised or send an alert in response to certain performance conditions.
If you are running a SQL Server instance on Windows Server, the SQL Server Agent service is included as a part of the SQL Server installation process, along with the database engine. This is true for every edition of SQL Server, except for the Express Edition, which requires something different to schedule tasks (we will talk about this later).
SQL Server Agent on Linux
On a Linux server, things are slightly different, based on the version of SQL Server for Linux you are installing: with SQL Server 2017 Cumulative Update 3 or below, SQL Server Agent must be installed in a separate process while, starting from the Cumulative Update 4, SQL Agent is included, but must be activated. We will examine each scenario below.
SQL Server 2017 Cumulative Update 3 or below
If you are running SQL Server 2017 Cumulative Update 3 or below, you must install SQL Server Agent separately. This can be done by running these commands from the command prompt:
# Update packages list
sudo apt-get update
# Install SQL Server agent
sudo apt-get install mssql-server-agent
# restart SQL Server service
sudo systemctl restart mssql-server
If you already have a working SQL Server installation with a previous release, you can use the same commands to update it to the latest version. Please note that SQL Server Agent depends from the SQL Server engine, so you should update the engine before you start updating SQL Server Agent itself.
SQL Server 2017 Cumulative Update 4 and above
Starting with SQL Server 2017 Cumulative Update 4, the SQL Server Agent service comes together with the engine installation, but is disabled due to security reasons. We have to enable SQL Agent with the following command:
sudo /opt/mssql/bin/mssql-conf set sqlagent.enabled true
sudo systemctl restart mssql-server

Did you notice? To set up SQL Server Agent we are using the same tool we used in Level 2 to configure a fresh installation of SQL Server on Linux, the mssql-conf Python script.
SQL Server Agent on a Express Edition
If you are running a SQL Server 2017 Express Edition on your Linux machine, you already know that there’s no SQL Server Agent available. And as we said before, on a Windows operating system you can use the Task Scheduler program, to launch a batch file or use the sqlcmd command line tool to run your scheduled queries (for example like those required to backup your databases or performing indexes and statistics maintenance).
In a Linux operating system there is something similar, the cron tool, that we can use to schedule a process and repeat it on a regular basis.
Thom Andrews wrote a good article about this topic here: https://www.sqlservercentral.com/articles/sql-server-agent-for-sql-express-on-linux.
SQL Server Agent and Containers
As you know, SQL Server 2017 can be installed not only on Windows and Linux operating systems, but also in a container. The installation on a container is even more simpler than other platforms, gaining from the presence of a Dockerfile. This is a Dockerfile example with the required commands to install SQL Server 2017 on a Ubuntu 16.04 machine and enable SQL Server Agent as part of the setup:
# building from ubuntu
FROM ubuntu:16.04
# install curl & sudo & apt-transport-https
RUN apt-get update && apt-get install -y curl sudo && apt-get install -y apt-transport-https
# Import the public repository GPG keys
RUN curl https://packages.microsoft.com/keys/microsoft.asc | apt-key add -
# Register the Microsoft SQL Server Ubuntu repository
RUN curl https://packages.microsoft.com/config/ubuntu/16.04/mssql-server-2017.list | tee /etc/apt/sources.list.d/mssql-server.list
# update package list
RUN apt-get update -y
# install sql server
RUN apt-get install -y mssql-server
# enable the agent
RUN sudo /opt/mssql/bin/mssql-conf set sqlagent.enabled true
# start sql server
CMD /opt/mssql/bin/sqlservr
Create and run a job
To demonstrate the SQL Server Agent’s capabilities in a Linux environment, let’s say that we want to backup our AdventureWorks2017 database to disk.
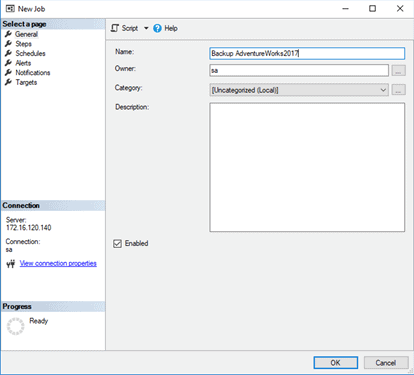
The first step is to open SQL Server Management Studio (or Azure Data Studio), connect to the SQL Server instance on Linux and create a new job like we are used to do in a Windows OS.
Let’s open the SQL Server Agent section, expand the Jobs folder, and create a new job by right-clicking on the Jobs folder, name it Backup AdventureWorks2017 and go to Steps page:
Add a new job step clicking the New button, name it Backup database AdventureWorks, verify that Transact-SQL script type is selected and add the script to backup the database in the command section.
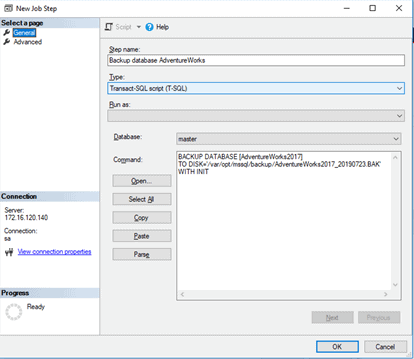
Please note that in a SQL Server instance on Linux the default folder for backup files is the /var/opt/mssql/data folder, if you leaved the default values, so if we want to use a different folder (le’t say /var/opt/mssql/backup), we have to create it with the command:
mkdir /var/opt/mssql/backup
We have to change the owner and the group of the new folder to adjust permissions, using the command:
chown mssql:mssql /var/opt/mssql/backups
Now, let’s schedule our backup job and we are done!
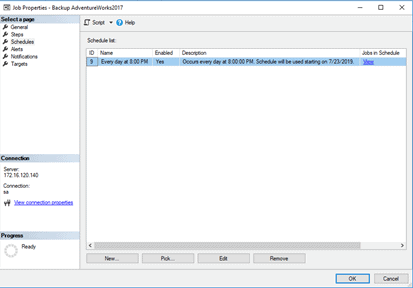
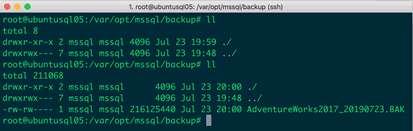
In my example I set up my job to run every day at 8:00PM. At that time if we list the folder content we should see our backup file:
If you don’t remember or don’t know where’s the backup folder, you can extract the full path directly from the backup history tables in the msdb database:
SELECT user_name,
       backup_start_date,
       BS.backup_finish_date,
       type,
       BS.server_name,
       BS.backup_size,
       BMF.physical_device_name
FROM msdb.dbo.backupset BS
    JOIN msdb.dbo.backupmediafamily BMF
        ON BMF.media_set_id = BS.media_set_id
The column physical_device_name contains the information you need.
![]()
This is a short level and for now there’s nothing more to say. In the next level we’ll talk about the High Availability basics with SQL Server on Linux.
Enjoy!