The series so far:
- Getting Started with CQRS – Part 1
- Getting Started with CQRS – Part 2
- Getting Started with CQRS – Part 3
Until now, this series played a bit with a ‘fake’ CQRS implementation built on top of a simple architecture in ASP.NET. It used SQLite and Mongo to store the data at the end of the tiers. It’s been well-known through the community that this pattern, unlike many others, must be carefully analyzed before putting into your systems, especially if your systems are big and have been functioning for a long time.
If you’re a novice developer, or you don’t have much help from experienced .NET engineers, I wouldn’t recommend adding CQRS to your domain. There are tons of things to consider in order to scale up your applications, rather than going for the first design pattern that’ll save the nation. You can (and certainly must) check the performance gaps, refactor the bottlenecks, and safely implement concurrency in places where it would be welcome.
If you feel adventurous (and still want to play safe), you can go for Event Store or Axon.
Instead of thinking about the cons of wanting to adopt CQRS, consider Event Sourcing, or ES. Those are the magic words. After all, why not save as much historical data of your system’s events as possible?
Just think about it. If your system
- deals with actions other than ordinary CRUD operations,
- or it needs to reconstitute the information from and to some point in history,
- or it needs to be audited or analyzed (i.e., machine learning, BI),
- or it is perfectly described by the events happening on it.
Well, then you probably have the need for an ES solution.
The irony here is that, for the sake of simplicity, the example will continue to use the Customers CRUD application, but this time adapted to the use of CQRS along with ES. But don’t worry, I’ll keep it simple and straightforward, so then you can follow up when applying to your systems.
Before you jump into it, understand a bit about ES and some patterns that accompany it next.
What is Event Sourcing?
When you think about reality, how things work, and how they happen, you can see a chronological sequence of steps and events going on. The act of an event ending is called a commit.
The same thing happens with systems. When an API receives a request and stores it to a database, an event (or, usually, a series of events) happens there. Whether it is synchronous or not, they’re taking place in the servers while transporting data around. What if you store these events, like snapshots of how they are exactly when they happen? That’s when ES comes into play.
Then, you can take advantage of distributed systems, cloud and microservices to send those same events over a powerful message broker, store them in robust NoSQL databases, digest and transform them with flexible tools, all of that easily integrated, error-prone and monitored.
Now, put all those events together in a stream, like a river, and let it flow. Alongside the stream, you can plug in subscribers, watchers, or readers that’ll consume the data and do whatever they want with it, without affecting the original data. The data is read-only. Do you want to get the last record? Sort your stream and get the top record. Sounds good, doesn’t it?
Aggregating things
The Aggregate pattern is known for walking hand in hand with the ES. Once you’re dealing with a stream, i.e., a list of items or records, it’s often easier for the domain to consider a specific list of them as a single and cohesive unit — an aggregate.
In other words, to be considered an aggregate a list of objects must be consistent together, they must be related at some point that makes sense to your domain. A good way to think of it is a transaction. If your objects usually commit together within a transaction, they are probably a good fit for an aggregate.
The example project will make use of the pattern below. Then, you’ll get to see how both patterns conversate with each other.
Figure 1 shows how the final project will look.
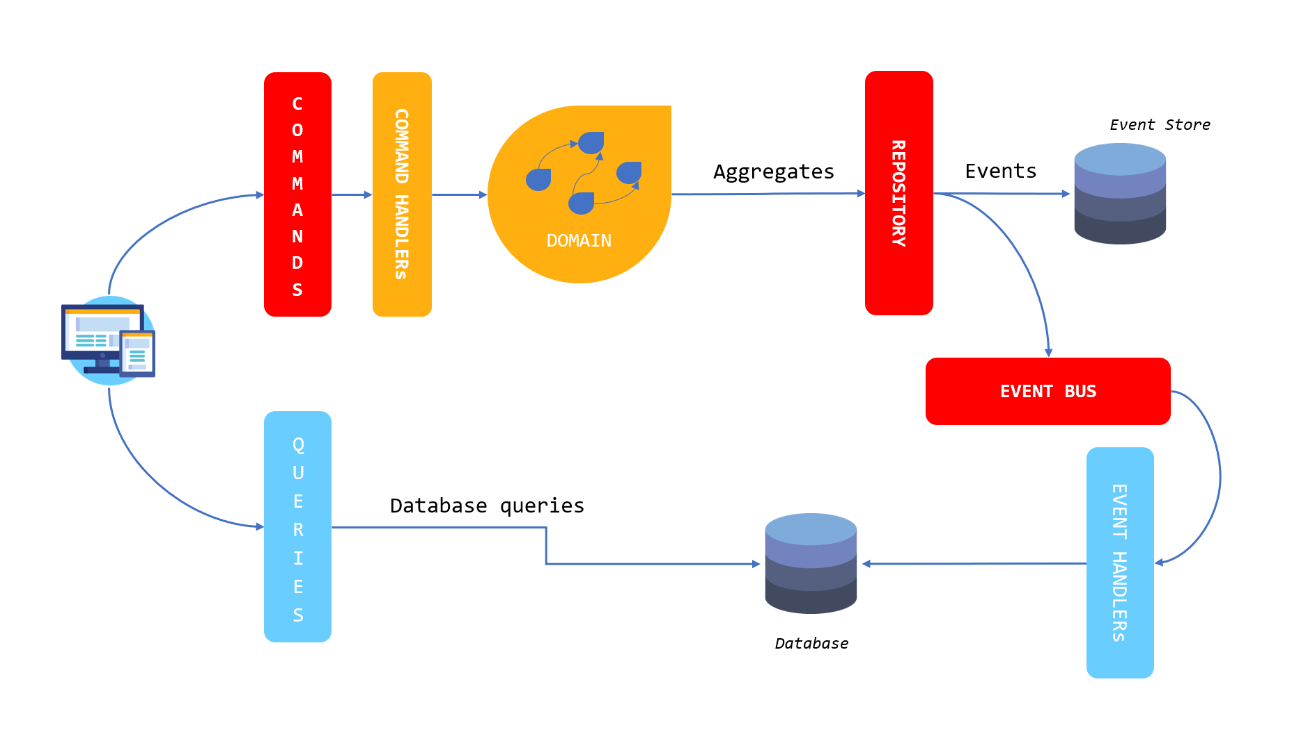
Figure 1. Final project architecture
Here, some new actors arrived at the house. The structure of commands and queries will practically remain the same, with some adjustments. A new layer to handle the commands is necessary to process each one and trigger the correspondent domain aggregations.
The aggregations, in turn, take care of summarizing the data to the repository interface, the one which stores the events in an Event Store. To create the event store, you’ll use an in-memory Dictionary, just to keep things simple. However, you’re free to change any of the tools for the ones of your preference.
An Event Bus layer supplies the features needed to send the events asynchronously from one side to the others. Both Repository and Event Bus layers are going to be reused for reading and writing models since they just define the interface methods for such.
The Event Handlers are a couple of classes that deal with the same RabbitMQ messages created in the previous articles and then save the customers to the Mongo database. However, this time it will be with everything asynchronous.
Mongo is going to be the database to supply data for the read model. Mainly because it’s robust and performant, but also because the NoSQL adapts better to the query side, as already demonstrated. You can choose it to be your Event Store database as well.
To help even more with the amount of code needed for this implementation, a part of it is going to take advantage of the CQRSLite framework, an extended version of a framework proposed and created by Greg Young. It is a lightweight framework to help when creating CQRS and event sourcing applications in C# and provides the classes and features colored in red in Figure 1. Don’t worry; by the end of the article, you’ll understand how it works integrated with the application.
Setup adjustments
For this part of the tutorial, I’ll change things a bit. First, the example doesn’t use SQLite anymore. As you may have noticed, Mongo is the only database tool used for storing data.
RabbitMQ, MongoDB, Compass, and Postman are used as developing and testing tools as before.
Before proceeding, download the source code to your local machine, and copy the /CQRSLite folder to the root of your current CustomerApi project.
Note: The reason you’re copying from my project is that the original GitHub project is updated continuously, and so are the package names. If you still want to go with the GitHub version, be aware of these naming changes.
The example also makes use of some new packages from NuGet:
- NLog: it’ll be interesting to have some logs spread around
- System.Runtime.Caching: this one is useful for in-memory caching
- System.ServiceModel.Primitives and System.Private.ServiceModel: these provide the common types used by all of the WCF libraries
- Castle.Windsor.MsDependencyInjection and Castle.Facilities.AspNetCore: the Castle Project facilitates the configuration of dependencies and avoids circular dependencies problems since everything is going to work together within the same project.
Go ahead and install them all via NuGet Package Manager.
Don’t forget to install the packages used in the previous two articles:
- RabbitMQ.Client
- mongocsharpdriver
The current project structure will change almost completely. It can be seen in Figure 2. The only remaining folder is the /Controllers which hosts the CustomersController.cs the same way, with a few changes to be made.

Figure 2. New project structure.
Please, update your project with the same folders accordingly. The new division is made of:
- Commons: it’ll store common interfaces for the bus components, and repositories, as well as constants, exceptions, etc.
- CQRSLite: the framework you’ve imported previously
- ReadModels: it’ll contain the services to provide reading features for the queries
- WriteModels: the domain, commands, events, event store for the command side.
- Services: contains the services, in this case, just CustomerService.
The Write Models
Begin by working on the lengthiest side. The folder /WriteModels will have five others inside of it: /Commands, /Domain, /Events, /EventStore and /VOs. Go ahead and create them.
Create a new class called Command (or move the old one to here), along with its three basic implementations: CreateCustomerCommand, UpdateCustomerCommand and DeleteCustomerCommand. You can check their respective codes in Listing 1 below.
Listing 1. Command classes.
|
1 2 3 4 5 6 7 8 9 10 11 12 13 14 15 16 17 18 19 20 21 22 23 24 25 26 27 28 29 30 31 32 33 34 35 36 37 38 39 40 41 42 43 44 45 46 47 48 49 50 51 52 53 54 55 56 57 58 59 60 61 62 63 64 |
// class Command using CQRSlite.Commands; using System; using System.Runtime.Serialization; namespace CustomerApi.WriteModels.Commands { [DataContract] [KnownType(typeof(CreateCustomerCommand))] [KnownType(typeof(UpdateCustomerCommand))] [KnownType(typeof(DeleteCustomerCommand))] public abstract class Command : ICommand { [DataMember] public Guid Id { get; set; } [DataMember] public int ExpectedVersion { get; set; } } } // class CreateCustomerCommand using CustomerApi.WriteModels.VOs; using System.Collections.Generic; using System.Runtime.Serialization; namespace CustomerApi.WriteModels.Commands { [DataContract] public class CreateCustomerCommand : Command { [DataMember] public string Name { get; set; } [DataMember] public string Email { get; set; } [DataMember] public int Age { get; set; } [DataMember] public List<Phone> Phones { get; set; } } } // class UpdateCustomerCommand using CustomerApi.WriteModels.VOs; using System.Collections.Generic; using System.Runtime.Serialization; namespace CustomerApi.WriteModels.Commands { [DataContract] public class UpdateCustomerCommand : Command { [DataMember] public string Name { get; set; } [DataMember] public int Age { get; set; } [DataMember] public List<Phone> Phones { get; set; } } } // class DeleteCustomerCommand using System.Runtime.Serialization; namespace CustomerApi.WriteModels.Commands { [DataContract] public class DeleteCustomerCommand : Command { } } |
Note that their constitution is not that different from what’s been created before, except for getting simpler. The id is now a Guid (A globally unique identifier represented by a hash string), which facilitates the usage with Mongo. The conversion methods (to events and entities) are removed and, now, left with the attributes only.
They are annotated with data contracts from the System Serialization package to help with the serialization and deserialization through the API.
You’ll see that the VOs’ class is missing. For that, under the /VOs folder, create a new class called Phone and add the following code:
|
1 2 3 4 5 6 7 8 9 10 11 12 13 14 15 |
using CustomerApi.Commons; using System.Runtime.Serialization; namespace CustomerApi.WriteModels.VOs { [DataContract] public class Phone { [DataMember] public PhoneType Type { get; set; } [DataMember] public int AreaCode { get; set; } [DataMember] public int Number { get; set; } } } |
Next, create a new folder /Handlers inside of the /Commands folder, and add the class CustomerCommandHandler represented in Listing 2.
Listing 2. CustomerCommandHandler class.
|
1 2 3 4 5 6 7 8 9 10 11 12 13 14 15 16 17 18 19 20 21 22 23 24 25 26 27 28 29 30 31 32 33 34 35 36 37 38 39 40 41 42 43 44 45 46 47 48 49 50 51 52 53 54 55 56 57 58 59 60 61 62 63 64 65 66 67 68 69 70 71 72 |
using CQRSlite.Commands; using CQRSlite.Domain; using CustomerApi.WriteModels.Domain.Aggregates; using CustomerApi.WriteModels.VOs; using System; using System.Linq; namespace CustomerApi.WriteModels.Commands.Handlers { public class CustomerCommandHandler : ICommandHandler<CreateCustomerCommand>, ICommandHandler<UpdateCustomerCommand>, ICommandHandler<DeleteCustomerCommand> { private readonly ISession _session; private NLog.Logger logger = NLog.LogManager.GetLogger("CustomerCommandHandlers"); public CustomerCommandHandler(ISession session) { _session = session; } public void Handle(CreateCustomerCommand command) { var item = new CustomerAggregate( command.Id, command.Email, command.Name, command.Age, command.Phones.Select(x => new Phone() { Type = x.Type, AreaCode = x.AreaCode, Number = x.Number }).ToList(), command.ExpectedVersion); _session.Add(item); _session.Commit(); } private T Get<T>(Guid id, int? expectedVersion = null) where T : AggregateRoot { try { return _session.Get<T>(id, expectedVersion); } catch (Exception e) { logger.Error("Cannot get object of type {0} with id={1} ({2}) from session", typeof(T), id, expectedVersion); throw e; } } public void Handle(UpdateCustomerCommand command) { logger.Info("Handling UpdateCustomerCommand {0} ({1})", command.Id, command.ExpectedVersion); CustomerAggregate item = Get<CustomerAggregate>(command.Id); item.Update( command.Id, command.Name, command.Age, command.Phones.Select(x => new Phone() { Type = x.Type, AreaCode = x.AreaCode, Number = x.Number }).ToList(), command.ExpectedVersion); _session.Commit(); } public void Handle(DeleteCustomerCommand command) { CustomerAggregate item = Get<CustomerAggregate>(command.Id); item.Delete(); _session.Commit(); } } } |
There are some interesting changes here. The previous version of this class kept both the repository and eventPublisher, at the same time, to mock the behavior of a CQRS. Now, with the courtesy of CQRSLite, there is the ICommandHandler interface that enables the command handler to implement as many Handle() methods as the total of commands. This way, you can decide what is going to happen with each type of command once they arrive.
Get back to Figure 1 again and take another look. From now on, you need to safely aggregate the command’s data and store it to the event store as events. That’s why you’re saving, updating and deleting the information directly to the session object. The session is also another perk from the CQRSLite framework. It has a triad of repositories with fallback management, to assure that the information is going to be persisted. Of course, everything is in memory, so make sure to adapt the framework to connect to a real database in case you’re considering using it in production.
Each operation over the session must be committed. At the end of this operation, the framework publishes the event as a message to the IEventPublisher object it has injected. If you want to overwrite its behavior (and you do), you need to create your own publisher handler and implement it (soon).
Obs: For all the CQRSLite components mentioned in this article, and for a better understanding, it’s recommended that you go into each one and analyze their content.
Next stop: Domain folder. This has two inner folders: /Aggregates and /Bus (create them). Inside of the first folder, create the class shown in Listing 3.
Listing 3. CustomerAggregate class.
|
1 2 3 4 5 6 7 8 9 10 11 12 13 14 15 16 17 18 19 20 21 22 23 24 25 26 27 28 29 30 31 32 33 34 35 36 37 38 39 40 41 42 43 44 45 46 47 48 49 50 51 52 53 54 55 56 57 58 59 60 61 62 63 |
using CQRSlite.Domain; using CustomerApi.WriteModels.Events; using CustomerApi.WriteModels.VOs; using System; using System.Collections.Generic; namespace CustomerApi.WriteModels.Domain.Aggregates { public class CustomerAggregate : AggregateRoot { private string email; private string name; private int age; private List<Phone> phones; private void Apply(CustomerCreatedEvent e) { Version = e.Version++; email = e.Email; age = e.Age; phones = e.Phones; } private void Apply(CustomerUpdatedEvent e) { Version = e.Version++; name = e.Name; age = e.Age; phones = e.Phones; } private void Apply(CustomerDeletedEvent e) { Version = e.Version++; } private CustomerAggregate() { } public CustomerAggregate(Guid id, string email, string name, int age, List<Phone> phones, int version) { if (string.IsNullOrEmpty(email)) { throw new ArgumentException("email"); } else if (string.IsNullOrEmpty(name)) { throw new ArgumentException("name"); } else if (age == 0) { throw new ArgumentException("age"); } else if (phones == null || phones.Count == 0) { throw new ArgumentException("phones"); } Id = id; ApplyChange(new CustomerCreatedEvent(id, email, name, age, phones, version)); } public void Update(Guid id, string name, int age, List<Phone> phones, int version) { ApplyChange(new CustomerUpdatedEvent(id, name, age, phones, version)); } public void Delete() { ApplyChange(new CustomerDeletedEvent(Id, Version)); } } } |
The Aggregate pattern is rich not only for allowing you to group data that’s relevant but also for being a great place to validate it. Again, you’re making use of AggregateRoot class from CQRSLite, which provides a handful of methods to apply the pattern to any object that extends from it. Don’t forget that it keeps the list of events in memory, and it’s ok to be this way since you’re interested in the data being transported to the event store.
For each creation, update or deletion, you’re making sure to increment the version and validate the data. It’s focused in simple validations, like whether the data is null or empty. Feel free to play around here too, even injecting other validator classes of your own and fancy treat the exception flows.
In the /Bus folder, start with the Rabbit stuff. You’ve already created a publisher and a subscriber, so you’ll just adapt them a bit and make sure it works integrated with CQRSLite. Please, refer to the Listings 4 and 5 for that.
Listing 4. AMQPEventSubscriber class.
|
1 2 3 4 5 6 7 8 9 10 11 12 13 14 15 16 17 18 19 20 21 22 23 24 25 26 27 28 29 30 31 32 33 34 35 36 37 38 39 40 41 42 43 44 45 46 47 48 49 50 51 52 53 54 55 56 57 58 59 60 61 62 63 64 65 66 67 68 69 70 71 72 73 74 75 76 77 78 79 80 81 82 83 84 85 86 87 88 89 90 91 92 93 94 95 96 97 98 99 100 101 102 103 104 105 106 107 108 109 110 111 112 113 114 115 116 117 118 119 120 121 122 123 124 125 126 127 128 129 130 131 132 133 134 135 136 137 138 139 140 141 142 143 144 145 146 147 148 149 150 151 152 153 154 |
using CQRSlite.Events; using CustomerApi.WriteModels.Events; using CustomerApi.WriteModels.Events.Handlers; using Microsoft.AspNetCore.Hosting; using Microsoft.Extensions.Configuration; using Newtonsoft.Json; using RabbitMQ.Client; using RabbitMQ.Client.Events; using RabbitMQ.Client.MessagePatterns; using System; using System.Collections.Generic; using System.Linq; using System.Reflection; using System.Text; using System.Threading; using System.Threading.Tasks; namespace CustomerApi.WriteModels.Domain.Bus { public class AMQPEventSubscriber { private readonly IBusEventHandler[] _handlers; private Dictionary<Type, MethodInfo> lookups = new Dictionary<Type, MethodInfo>(); public AMQPEventSubscriber(IHostingEnvironment env, IBusEventHandler[] handlers) { _handlers = handlers; foreach (var handler in _handlers) { var meth = (from m in handler.GetType() .GetMethods(BindingFlags.Public | BindingFlags.Instance) let prms = m.GetParameters() where prms.Count() == 1 && m.Name.Contains("Handle") select new { EventType = handler.HandlerType, Method = m }).FirstOrDefault(); if (meth != null) { lookups.Add(meth.EventType, meth.Method); } } new Thread(() => { Start(env.ContentRootPath); }).Start(); } public void Start(string contentRootPath) { ConnectionFactory connectionFactory = new ConnectionFactory(); var builder = new ConfigurationBuilder() .SetBasePath(contentRootPath) .AddJsonFile("appsettings.json", optional: false, reloadOnChange: false) .AddEnvironmentVariables(); builder.Build().GetSection("amqp").Bind(connectionFactory); connectionFactory.AutomaticRecoveryEnabled = true; connectionFactory.NetworkRecoveryInterval = TimeSpan.FromSeconds(15); using (IConnection conn = connectionFactory.CreateConnection()) { using (IModel channel = conn.CreateModel()) { DeclareQueues(channel); var subscriptionCreated = new Subscription(channel, Constants.QUEUE_CUSTOMER_CREATED, false); var subscriptionUpdated = new Subscription(channel, Constants.QUEUE_CUSTOMER_UPDATED, false); var subscriptionDeleted = new Subscription(channel, Constants.QUEUE_CUSTOMER_DELETED, false); while (true) { // Sleeps for 5 sec before trying again Thread.Sleep(5000); new Thread(() => { ListerCreated(subscriptionCreated); }).Start(); new Thread(() => { ListenUpdated(subscriptionUpdated); }).Start(); new Thread(() => { ListenDeleted(subscriptionDeleted); }).Start(); } } } } private void ListenDeleted(Subscription subscriptionDeleted) { BasicDeliverEventArgs eventArgsDeleted = subscriptionDeleted.Next(); if (eventArgsDeleted != null) { string messageContent = Encoding.UTF8.GetString(eventArgsDeleted.Body); HandleEvent(JsonConvert.DeserializeObject<CustomerDeletedEvent>(messageContent)); subscriptionDeleted.Ack(eventArgsDeleted); } } private void ListenUpdated(Subscription subscriptionUpdated) { BasicDeliverEventArgs eventArgsUpdated = subscriptionUpdated.Next(); if (eventArgsUpdated != null) { string messageContent = Encoding.UTF8.GetString(eventArgsUpdated.Body); HandleEvent(JsonConvert.DeserializeObject<CustomerUpdatedEvent>(messageContent)); subscriptionUpdated.Ack(eventArgsUpdated); } } private void ListerCreated(Subscription subscriptionCreated) { BasicDeliverEventArgs eventArgsCreated = subscriptionCreated.Next(); if (eventArgsCreated != null) { string messageContent = Encoding.UTF8.GetString(eventArgsCreated.Body); HandleEvent(JsonConvert.DeserializeObject<CustomerCreatedEvent>(messageContent)); subscriptionCreated.Ack(eventArgsCreated); } } private void HandleEvent(IEvent @event) { var theHandler = _handlers.SingleOrDefault(x => x.HandlerType == @event.GetType()); Task.Run(() => { foreach (KeyValuePair<Type, MethodInfo> entry in lookups) { if (entry.Key == @event.GetType()) { entry.Value.Invoke(theHandler, new[] { (object)@event }); } } }).Wait(); } private static void DeclareQueues(IModel channel) { channel.QueueDeclare( queue: Constants.QUEUE_CUSTOMER_CREATED, durable: false, exclusive: false, autoDelete: false, arguments: null ); channel.QueueDeclare( queue: Constants.QUEUE_CUSTOMER_UPDATED, durable: false, exclusive: false, autoDelete: false, arguments: null ); channel.QueueDeclare( queue: Constants.QUEUE_CUSTOMER_DELETED, durable: false, exclusive: false, autoDelete: false, arguments: null ); } } } |
Don’t forget to add the same Constants class created in the previous tutorial to /Bus folder:
|
1 2 3 4 5 6 7 8 9 |
namespace CustomerApi.WriteModels.Domain.Bus { public class Constants { public const string QUEUE_CUSTOMER_CREATED = "customer_created"; public const string QUEUE_CUSTOMER_UPDATED = "customer_updated"; public const string QUEUE_CUSTOMER_DELETED = "customer_deleted"; } } |
The class is pretty much the same as before, so this section. Except for the constructor that injects an array of IBusEventHandler (more on it soon). Just for you to not see a bunch of errors in your IDE, create this class into Events/Handlers/ folder:
|
1 2 3 4 5 6 7 8 9 10 |
using CQRSlite.Events; using System; namespace CustomerApi.WriteModels.Events.Handlers { public interface IBusEventHandler { Type HandlerType { get; } void Handle(IEvent @event); } } |
Look carefully at the code in Listing 4’s constructor. It makes use of reflection to collect the handler type (an attribute of each event handler to define which type of event it takes care of) and the respective method it must execute when called. The method, in case, will always be Handle().
Plus, the thread to start the RabbitMQ subscriber that was previously located into the Startup class, has been moved to this class, just to make more sense.
Every ListenXX method calls the new HandleEvent() that, in turn, invokes (via reflection) the method mapped for the current event being subscribed.
Listing 5. AMQPEventPublisher class.
|
1 2 3 4 5 6 7 8 9 10 11 12 13 14 15 16 17 18 19 20 21 22 23 24 25 26 27 28 29 30 31 32 33 34 35 36 37 38 39 40 41 42 43 44 45 46 47 48 49 50 |
using CQRSlite.Events; using CustomerApi.WriteModels.Events; using Microsoft.AspNetCore.Hosting; using Microsoft.Extensions.Configuration; using Newtonsoft.Json; using RabbitMQ.Client; using System.Text; namespace CustomerApi.WriteModels.Domain.Bus { public class AMQPEventPublisher : IEventPublisher { private readonly ConnectionFactory connectionFactory; public AMQPEventPublisher(IHostingEnvironment env, AMQPEventSubscriber aMQPEventSubscriber) { connectionFactory = new ConnectionFactory(); var builder = new ConfigurationBuilder() .SetBasePath(env.ContentRootPath) .AddJsonFile("appsettings.json", optional: false, reloadOnChange: false) .AddEnvironmentVariables(); builder.Build().GetSection("amqp").Bind(connectionFactory); } public void Publish<T>(T @event) where T : IEvent { using (IConnection conn = connectionFactory.CreateConnection()) { using (IModel channel = conn.CreateModel()) { var queue = @event is CustomerCreatedEvent ? Constants.QUEUE_CUSTOMER_CREATED : @event is CustomerUpdatedEvent ? Constants.QUEUE_CUSTOMER_UPDATED : Constants.QUEUE_CUSTOMER_DELETED; channel.QueueDeclare( queue: queue, durable: false, exclusive: false, autoDelete: false, arguments: null ); var body = Encoding.UTF8.GetBytes(JsonConvert.SerializeObject(@event)); channel.BasicPublish( exchange: "", routingKey: queue, basicProperties: null, body: body ); } } } } } |
The publisher class is the same as before, except it implements the IEventPublisher interface from CQRSLite — the one that is called by session after each commit.
The Constants class, which hosts the names of the queues, must be moved to the Bus folder too.
The folder /Events hosts, as the name suggests, the same events already created. The changes are very slight. The first one is an AbstractEvent class to hold the information of ids, version, and datetime of the event:
|
1 2 3 4 5 6 7 8 9 10 11 |
using CQRSlite.Events; using System; namespace CustomerApi.WriteModels.Events { public class AbstractEvent : IEvent { public Guid Id { get; set; } public int Version { get; set; } public DateTimeOffset TimeStamp { get; set; } } } |
This will compensate the repetition of values among its children. Look at the current implementation of the creation event:
|
1 2 3 4 5 6 7 8 9 10 11 12 13 14 15 16 17 18 19 20 21 22 23 24 25 |
using CustomerApi.WriteModels.VOs; using System; using System.Collections.Generic; namespace CustomerApi.WriteModels.Events { public class CustomerCreatedEvent : AbstractEvent { public string Email { get; set; } public string Name { get; set; } public int Age { get; set; } public List<Phone> Phones { get; set; } public CustomerCreatedEvent() { } public CustomerCreatedEvent(Guid id, string email, string name, int age, List<Phone> phones, int version) { Id = id; Email = email; Name = name; Age = age; Phones = phones; Version = version; } } } |
The converter methods are removed; the rest is just fields and constructors. If you feel that’s too repetitive, you can set one single VO class for all the operations you’re dealing with: database storing, API and event transits. Go ahead and adjust the other events alike:
|
1 2 3 4 5 6 7 8 9 10 11 12 13 14 15 16 17 18 19 20 21 22 23 24 |
// CustomerUpdatedEvent class using CustomerApi.WriteModels.VOs; using System; using System.Collections.Generic; namespace CustomerApi.WriteModels.Events { public class CustomerUpdatedEvent : AbstractEvent { public string Name { get; set; } public int Age { get; set; } public List<Phone> Phones { get; set; } public CustomerUpdatedEvent() { } public CustomerUpdatedEvent(Guid id, string name, int age, List<Phone> phones, int version) { Id = id; Name = name; Age = age; Phones = phones; Version = version; } } } |
And for the event of deletion, you have:
|
1 2 3 4 5 6 7 8 9 10 11 12 13 |
// CustomerDeletedEvent class using System; namespace CustomerApi.WriteModels.Events { public class CustomerDeletedEvent : AbstractEvent { public CustomerDeletedEvent(Guid id, int version) { Id = id; Version = version; } } } |
Now’s time to create the implementations of IBusEventHandler. One for each event. Start with the event of creation (Listing 6).
Listing 6. CustomerCreatedEventHandler class.
|
1 2 3 4 5 6 7 8 9 10 11 12 13 14 15 16 17 18 19 20 21 22 23 24 25 26 27 28 29 30 31 32 33 34 35 36 37 38 39 40 41 42 |
using CQRSlite.Events; using CustomerApi.ReadModels; using CustomerApi.ReadModels.Repositories; using NLog; using System; using System.Linq; namespace CustomerApi.WriteModels.Events.Handlers { public class CustomerCreatedEventHandler : IBusEventHandler { private readonly CustomerReadModelRepository readModelRepository; private Logger logger = LogManager.GetLogger("CustomerCreatedEventHandler"); public CustomerCreatedEventHandler(CustomerReadModelRepository readModelRepository) { this.readModelRepository = readModelRepository; } public Type HandlerType { get { return typeof(CustomerCreatedEvent); } } public async void Handle(IEvent @event) { CustomerCreatedEvent customerCreatedEvent = (CustomerCreatedEvent)@event; await readModelRepository.Create(new Customer() { Id = customerCreatedEvent.Id, Email = customerCreatedEvent.Email, Name = customerCreatedEvent.Name, Age = customerCreatedEvent.Age, Phones = customerCreatedEvent.Phones.Select(x => new Phone() { Type = x.Type, AreaCode = x.AreaCode, Number = x.Number }).ToList() }); logger.Info("A new CustomerCreatedEvent has been processed: {0} ({1})", customerCreatedEvent.Id, customerCreatedEvent.Version); } } } |
The first thing to note is that those are the classes responsible for updating the final database, Mongo.
Second, the HandlerType. Remember the reflection created to define which method takes care of each event that’s arriving? Well, the Handle() is the method based on this type. Each handler is associated with an event by what’s defined in HandlerType field.
Third, be aware of the asynchronous nature of the methods now. It helps to turn the whole implementation faster by no locking of resources. The handling per se is just the same Mongo management seen before with a few changes.
Listing 7 shows how the update event is handled.
Listing 7. CustomerUpdatedEventHandler class.
|
1 2 3 4 5 6 7 8 9 10 11 12 13 14 15 16 17 18 19 20 21 22 23 24 25 26 27 28 29 30 31 32 33 34 35 36 37 38 39 40 41 42 43 44 |
using CQRSlite.Events; using CustomerApi.ReadModels; using CustomerApi.ReadModels.Repositories; using NLog; using System; using System.Linq; namespace CustomerApi.WriteModels.Events.Handlers { public class CustomerUpdatedEventHandler : IBusEventHandler { private readonly CustomerReadModelRepository readModelRepository; private Logger logger = LogManager.GetLogger("CustomerUpdatedEventHandler"); public CustomerUpdatedEventHandler(CustomerReadModelRepository readModelRepository) { this.readModelRepository = readModelRepository; } public Type HandlerType { get { return typeof(CustomerUpdatedEvent); } } public async void Handle(IEvent @event) { CustomerUpdatedEvent customerUpdatedEvent = (CustomerUpdatedEvent)@event; Customer customer = await readModelRepository.GetCustomer(@event.Id); await readModelRepository.Update(new Customer() { Id = customerUpdatedEvent.Id, Email = customer.Email, Name = customerUpdatedEvent.Name != null ? customerUpdatedEvent.Name : customer.Name, Age = customerUpdatedEvent.Age != 0 ? customerUpdatedEvent.Age : customer.Age, Phones = customerUpdatedEvent.Phones != null ? customerUpdatedEvent.Phones.Select(x => new Phone() { Type = x.Type, AreaCode = x.AreaCode, Number = x.Number }).ToList() : customer.Phones }); logger.Info("A new CustomerUpdatedEvent has been processed: {0} ({1})", customerUpdatedEvent.Id, customerUpdatedEvent.Version); } } } |
This class has the implementation except for the handle method. This time, it checks for the nullity of each customer’s attribute, since you don’t want to update absent or null values.
Finally, Listing 8 shows how the deletion takes place.
Listing 8. CustomerDeletedEventHandler class.
|
1 2 3 4 5 6 7 8 9 10 11 12 13 14 15 16 17 18 19 20 21 22 23 24 25 26 27 |
using CQRSlite.Events; using CustomerApi.ReadModels.Repositories; using NLog; using System; namespace CustomerApi.WriteModels.Events.Handlers { public class CustomerDeletedEventHandler : IBusEventHandler { private readonly CustomerReadModelRepository readModelRepository; private Logger logger = LogManager.GetLogger("CustomerDeletedEventHandler"); public CustomerDeletedEventHandler(CustomerReadModelRepository readModelRepository) { this.readModelRepository = readModelRepository; } public Type HandlerType { get { return typeof(CustomerDeletedEvent); } } public async void Handle(IEvent @event) { CustomerDeletedEvent customerDeletedEvent = (CustomerDeletedEvent)@event; await readModelRepository.Remove(customerDeletedEvent.Id); logger.Info("A new CustomerDeletedEvent has been processed: {0} ({1})", customerDeletedEvent.Id, customerDeletedEvent.Version); } } } |
This class has just a single call to Mongo’s removal method. Don’t worry about the errors in Visual Studio caused by not finding the class CustomerReadModelRepository. As soon it’s created it in the read model part, they’ll disappear.
Now to finish the write model by creating the last class into the /EventStore folder: CustomerEventStore (Listing 9).
Listing 9. CustomerEventStore class.
|
1 2 3 4 5 6 7 8 9 10 11 12 13 14 15 16 17 18 19 20 21 22 23 24 25 26 27 28 29 30 31 32 |
using CQRSlite.Events; using System; using System.Collections.Generic; using System.Linq; namespace CustomerApi.WriteModels.EventStore { public class CustomerEventStore : IEventStore { private readonly Dictionary<Guid, List<IEvent>> customerInMemDictionary = new Dictionary<Guid, List<IEvent>>(); public IEnumerable<IEvent> Get(Guid aggregateId, int fromVersion) { List<IEvent> customerEvents; customerInMemDictionary.TryGetValue(aggregateId, out customerEvents); if (customerEvents != null) { return customerEvents.Where(x => x.Version > fromVersion); } return new List<IEvent>(); } public void Save(IEvent @event) { List<IEvent> customerEvents; customerInMemDictionary.TryGetValue(@event.Id, out customerEvents); if (customerEvents == null) { customerEvents = new List<IEvent>(); customerInMemDictionary.Add(@event.Id, customerEvents); } customerEvents.Add(@event); } } } |
It is a simple event store with just two operations: get an aggregated element from the history and save a new one to the dictionary. Note that the get method receives a second argument fromVersion that you’ll use to filter the items from that specific version.
The key of each aggregation is the customer Guid, and the values a List. Since List guarantees the order of the stacked items, you can rest assured that the events are ok.
The Read Models
The read models are much simpler; they constitute the Mongo entities (you can import the same ones from the previous article) and the Mongo repository. For the matter of the best architecture, you can decide if you want to place the classes responsible for the event handling here since they exist in the borders of both worlds.
First, create the entity models into the /ReadModels folder, adapting from the ones in the previous tutorial:
|
1 2 3 4 5 6 7 8 9 10 11 12 13 14 15 16 17 18 19 20 21 22 23 24 25 26 27 28 29 30 31 32 33 34 35 36 |
// Customer entity class using MongoDB.Bson; using MongoDB.Bson.Serialization.Attributes; using System; using System.Collections.Generic; namespace CustomerApi.ReadModels { public class Customer { [BsonElement("Id")] public Guid Id { get; set; } [BsonElement("Email")] public string Email { get; set; } [BsonElement("Name")] public string Name { get; set; } [BsonElement("Age")] public int Age { get; set; } [BsonElement("Phones")] public List<Phone> Phones; } } // Phone entity class using CustomerApi.Commons; using MongoDB.Bson.Serialization.Attributes; namespace CustomerApi.ReadModels { public partial class Phone { [BsonElement("Type")] public PhoneType Type { get; set; } [BsonElement("AreaCode")] public int AreaCode { get; set; } [BsonElement("Number")] public int Number { get; set; } } } |
Listing 10 shows the content of the CustomerReadModelRepository class.
Listing 10. CustomerReadModelRepository class.
|
1 2 3 4 5 6 7 8 9 10 11 12 13 14 15 16 17 18 19 20 21 22 23 24 25 26 27 28 29 30 31 32 33 34 35 36 37 38 39 40 41 42 43 44 45 46 47 48 49 50 51 52 53 54 55 56 57 58 59 60 61 62 63 64 65 66 67 |
using System; using System.Collections.Generic; using System.Threading.Tasks; using MongoDB.Driver; namespace CustomerApi.ReadModels.Repositories { public class CustomerReadModelRepository { private const string _customerDB = "CustomerDB"; private const string _customerCollection = "Customers"; private IMongoDatabase _db; public CustomerReadModelRepository() { MongoClient _client = new MongoClient("mongodb://localhost:27017"); _db = _client.GetDatabase(_customerDB); _db.DropCollection(_customerCollection); _db.CreateCollection(_customerCollection); } public Task<List<Customer>> GetCustomers() { return Task.Run(() => { return _db.GetCollection<Customer>(_customerCollection).Find(_ => true).ToList(); }); } public Task<Customer> GetCustomer(Guid id) { return Task.Run(() => { return _db.GetCollection<Customer>(_customerCollection).Find(customer => customer.Id.Equals(id)).SingleOrDefault(); }); } public Task<List<Customer>> GetCustomerByEmail(string email) { return Task.Run(() => { return _db.GetCollection<Customer>(_customerCollection).Find(customer => customer.Email == email).ToList(); }); } public Task<bool> Create(Customer customer) { return Task.Run(() => { _db.GetCollection<Customer>(_customerCollection).InsertOne(customer); return true; }); } public Task<bool> Update(Customer customer) { return Task.Run(() => { var filter = Builders<Customer>.Filter.Where(_ => _.Id == customer.Id); _db.GetCollection<Customer>(_customerCollection).ReplaceOne(filter, customer); return true; }); } public Task<bool> Remove(Guid id) { return Task.Run(() => { var filter = Builders<Customer>.Filter.Where(_ => _.Id.Equals(id)); var operation = _db.GetCollection<Customer>(_customerCollection).DeleteOne(filter); return true; }); } } } |
Most of its content remained the same. Pay attention to the dropping and recreating of the Mongo collection right into the constructor. That’s because the whole implementation works based on in-memory collections storing the data and simulating a real environment.
Once you restart the application multiple times and create many events, they’ll lose the link to the original data in the physical database.
Here, two options apply: you get to choose whether you prefer to implement the same repository to the session and event store management or delete all the items from the database, for the sake of simplicity. You can also create a routine to insert data to both database and event store, in order to test without having to input manually every time.
Except for that, the only change left is that the methods are now async. Every operation runs inside of a new thread and returns a Task. The same task would be transported all the way up to the controller and, so, to the ASP.NET HTTP async engine, making the application’s architecture async.
The rest of the classes
Two packages remain to be coded. Start with the /Commons folder. The first class to be created is PhoneType (that already existed). I decided to put it here to facilitate its usage over the whole application.
|
1 2 3 4 5 6 7 |
namespace CustomerApi.Commons { public enum PhoneType { HOMEPHONE, CELLPHONE, WORKPHONE } } |
The ServiceException class just embraces a new type of exception to be used in the services. It’s a generic utilitarian exception class.
|
1 2 3 4 5 6 7 8 9 10 11 12 13 14 |
using System; using System.Runtime.Serialization; using System.Security; namespace CustomerApi.Commons { public class ServiceException : Exception { public ServiceException() : base() { } public ServiceException(string message) : base(message) { } [SecuritySafeCritical] protected ServiceException(SerializationInfo info, StreamingContext context) : base(info, context) { } public ServiceException(string message, Exception innerException) : base(message, innerException) { } } } |
The /Services folder, in turn, is made of the methods that embrace both queries and commands of the CQRS model. Here, it’s interesting to note that the development of these facades doesn’t have to necessarily be in the same class, not even in the same project.
Methods to request queries or issue commands can be in different applications and still work well as a distributed system that accesses the same data sources.
Despite the fact they are put together, take a look at how they differentiate from each other (Listing 11).
Listing 11. CustomerService class.
|
1 2 3 4 5 6 7 8 9 10 11 12 13 14 15 16 17 18 19 20 21 22 23 24 25 26 27 28 29 30 31 32 33 34 35 36 37 38 39 40 41 42 43 44 45 46 47 48 49 50 51 52 53 |
using CustomerApi.Commons; using CustomerApi.ReadModels; using CustomerApi.ReadModels.Repositories; using CustomerApi.WriteModels.Commands; using CustomerApi.WriteModels.Commands.Handlers; using System; using System.Collections.Generic; using System.Linq; using System.Reflection; using System.Threading.Tasks; namespace CustomerApi.Services { public class CustomerService : ICustomerService { private readonly CustomerCommandHandler _commandHandlers; private readonly CustomerReadModelRepository _readModelRepository; public CustomerService(CustomerCommandHandler commandHandlers, CustomerReadModelRepository readModelRepository) { this._commandHandlers = commandHandlers; this._readModelRepository = readModelRepository; } public async Task<bool> IssueCommandAsync(Command cmd) { await Task.Run(() => { var method = (from meth in typeof(CustomerCommandHandler) .GetMethods(BindingFlags.Public | BindingFlags.Instance) let @params = meth.GetParameters() where @params.Count() == 1 && @params[0].ParameterType == cmd.GetType() select meth).FirstOrDefault(); if (method == null) { var name = cmd.GetType().Name; throw new ServiceException(string.Format("Command handler of {0} not found", name)); } method.Invoke(_commandHandlers, new[] { cmd }); }); return true; } public async Task<List<Customer>> GetAllCustomersAsync() { return await _readModelRepository.GetCustomers(); } public async Task<Customer> GetCustomerAsync(Guid orderId) { return await _readModelRepository.GetCustomer(orderId); } public async Task<List<Customer>> GetCustomersByEmailAsync(string email) { return await _readModelRepository.GetCustomerByEmail(email); } } } |
There are two main parts in this class, identifying the queries and commands. The method IssueCommandAsync() takes as a parameter a command itself to run in the correspondent command handler. Here, it’s making use of reflection once more to inflect flexibility, similarly to what was done before in the write model.
The rest of the methods are all query related. They access the Mongo repository directly to ensure they’ll get the stored information, i.e., the data that’s not guaranteed to be the most recent, which is fine given the CQRS nature of the API.
Here’s how the interface of the service ICustomerService should look:
|
1 2 3 4 5 6 7 8 9 10 11 12 13 14 15 16 17 18 19 20 21 |
using System; using System.Collections.Generic; using System.ServiceModel; using System.Threading.Tasks; using CustomerApi.ReadModels; using CustomerApi.WriteModels.Commands; namespace CustomerApi.Services { [ServiceContract] public interface ICustomerService { [OperationContract] Task<bool> IssueCommandAsync(Command cmd); [OperationContract] Task<List<Customer>> GetAllCustomersAsync(); [OperationContract] Task<Customer> GetCustomerAsync(Guid custId); [OperationContract] Task<List<Customer>> GetCustomersByEmailAsync(string email); } } |
Controller and Startup
The controller class also remains almost intact. Regarding the structure, method signatures, etc. nothing has suffered changes. However, now it’s async by the core, and so, the methods should be too. See at Listing 12 the new code.
Listing 12. New CustomersController class.
|
1 2 3 4 5 6 7 8 9 10 11 12 13 14 15 16 17 18 19 20 21 22 23 24 25 26 27 28 29 30 31 32 33 34 35 36 37 38 39 40 41 42 43 44 45 46 47 48 49 50 51 52 53 54 55 56 57 58 59 60 61 62 63 64 65 66 67 68 69 70 71 72 73 74 75 76 77 78 79 80 81 82 83 84 85 86 87 88 89 90 91 92 93 94 95 96 97 98 99 100 101 102 103 104 105 106 107 |
using CustomerApi.Services; using CustomerApi.WriteModels.Commands; using Microsoft.AspNetCore.Mvc; using System; using System.Threading.Tasks; namespace CustomerApi.Controllers { [Route("api/[controller]")] public class CustomersController : Controller { private readonly ICustomerService _customerService; public CustomersController(ICustomerService customerService) { _customerService = customerService; } [HttpGet] public Task<IActionResult> Get([FromQuery] string email) { return Task.Run(async () => { if (email != null) { IActionResult result = NotFound(); var customer = await _customerService.GetCustomersByEmailAsync(email); if (customer != null) { result = new ObjectResult(customer); } return result; } else { return new ObjectResult(await _customerService.GetAllCustomersAsync()); } }); } [HttpGet("{id}", Name = "GetCustomer")] public Task<IActionResult> GetById(Guid id) { return Task.Run(async () => { IActionResult result = NotFound(); var customer = await _customerService.GetCustomerAsync(id); if (customer != null) { result = new ObjectResult(customer); } return result; }); } [HttpPost] public Task<IActionResult> Post([FromBody] CreateCustomerCommand customer) { customer.Id = Guid.NewGuid(); return Task.Run(async () => { IActionResult result = NotFound(); bool created = await _customerService.IssueCommandAsync(customer); if (created) { result = CreatedAtRoute("GetCustomer", new { id = customer.Id }, customer); } return result; }); } [HttpPut("{id}")] public Task<IActionResult> Put(Guid id, [FromBody] UpdateCustomerCommand customer) { return Task.Run(async () => { IActionResult result = NotFound(); var record = await _customerService.GetCustomerAsync(id); if (record != null) { customer.Id = id; bool updated = await _customerService.IssueCommandAsync(customer); if (updated) { result = NoContent(); } } return result; }); } [HttpDelete("{id}")] public Task<IActionResult> Delete(Guid id) { return Task.Run(async () => { IActionResult result = NotFound(); var record = await _customerService.GetCustomerAsync(id); if (record != null) { bool updated = await _customerService.IssueCommandAsync(new DeleteCustomerCommand() { Id = id }); if (updated) { result = NoContent(); } } return result; }); } } } |
The changes are very straightforward, so there is not much to do here.
The Startup class, in turn, changed a bit more, since you’re adding a new library to manage the registration of the services to the IServiceProvider. Look at Listing 13 for that.
Listing 13. Startup configuration class.
|
1 2 3 4 5 6 7 8 9 10 11 12 13 14 15 16 17 18 19 20 21 22 23 24 25 26 27 28 29 30 31 32 33 34 35 36 37 38 39 40 41 42 43 44 45 46 47 48 49 50 51 52 53 54 55 56 57 58 59 60 61 62 63 64 65 66 67 68 69 70 71 72 73 74 75 76 77 78 79 80 81 82 83 84 85 86 87 88 89 |
using Castle.Facilities.AspNetCore; using Castle.MicroKernel.Registration; using Castle.Windsor; using CQRSlite.Cache; using CQRSlite.Domain; using CQRSlite.Events; using CustomerApi.Controllers; using CustomerApi.ReadModels.Repositories; using CustomerApi.Services; using CustomerApi.WriteModels.Commands.Handlers; using CustomerApi.WriteModels.Domain.Bus; using CustomerApi.WriteModels.Events.Handlers; using CustomerApi.WriteModels.EventStore; using Microsoft.AspNetCore.Builder; using Microsoft.AspNetCore.Hosting; using Microsoft.AspNetCore.Http; using Microsoft.Extensions.Configuration; using Microsoft.Extensions.DependencyInjection; using System; using System.Threading.Tasks; namespace CustomerApi { public class Startup { private IHostingEnvironment _env; private static readonly WindsorContainer Container = new WindsorContainer(); public Startup(IHostingEnvironment env, IConfiguration config) { _env = env; Configuration = config; } public IConfiguration Configuration { get; } // This method gets called by the runtime. Use this method to add services to the container. public IServiceProvider ConfigureServices(IServiceCollection services) { services.AddMvc(); // Setup component model contributors for making windsor services available to IServiceProvider Container.AddFacility<AspNetCoreFacility>(f => f.CrossWiresInto(services)); // Custom application component registrations, ordering is important here RegisterApplicationComponents(services); // Castle Windsor integration, controllers, tag helpers and view components, this should always come after RegisterApplicationComponents return services.AddWindsor(Container, opts => opts.UseEntryAssembly(typeof(CustomersController).Assembly), // <- Recommended () => services.BuildServiceProvider(validateScopes: false)); // <- Optional } private void RegisterApplicationComponents(IServiceCollection services) { // Application components Container.Register( Component.For<IEventPublisher>().ImplementedBy<AMQPEventPublisher>().LifeStyle.Singleton, Component.For<AMQPEventSubscriber>().LifeStyle.Singleton, Component.For<CustomerCommandHandler>().LifeStyle.Transient, Component.For<CustomerReadModelRepository>().LifeStyle.Singleton, Component.For<ICustomerService>().ImplementedBy<CustomerService>().LifeStyle.Transient, Component.For<CQRSlite.Domain.ISession>().ImplementedBy<Session>(), Component.For<IEventStore>().ImplementedBy<CustomerEventStore>().LifeStyle.Singleton, Component.For<IBusEventHandler>().ImplementedBy<CustomerCreatedEventHandler>() .Named("CustomerCreatedEventHandler").LifeStyle.Singleton, Component.For<IBusEventHandler>().ImplementedBy<CustomerUpdatedEventHandler>() .Named("CustomerUpdatedEventHandler").LifeStyle.Singleton, Component.For<IBusEventHandler>().ImplementedBy<CustomerDeletedEventHandler>() .Named("CustomerDeletedEventHandler").LifeStyle.Singleton, Component.For<IRepository>().UsingFactoryMethod( kernel => { return new CacheRepository(new Repository( // kernel.Resolve<IEventStore>(), kernel.Resolve<IEventPublisher>()), kernel.Resolve<IEventStore>()); })); } public void Configure(IApplicationBuilder app, IHostingEnvironment env) { if (env.IsDevelopment()) { app.UseDeveloperExceptionPage(); } // For making component registrations of middleware easier Container.GetFacility<AspNetCoreFacility>().RegistersMiddlewareInto(app); app.UseMvc(); } } // Example of framework configured middleware component, can't consume types registered in Windsor public class FrameworkMiddleware : IMiddleware { public async Task InvokeAsync(HttpContext context, RequestDelegate next) { await next(context); } } } |
First, an instance of WindsorContainer needs to be created on the top of the class, to provide the methods for registering the services and adding facilities. The code itself is commented, so you can understand the context while following the configs down the lines.
Don’t forget to add any of the services, repositories and handlers, since that’ll lead to errors.
That’s it. It was a long way to the implementation, and now’s time to test it.
As a warning, remember that you’ve been using the same Rabbit queues created in parts 1 and 2 of this series. Before testing, you need to make sure that those queues are empty; otherwise, old messages stuck in there could cause problems with the new event subscriber.
For that, just go to the Rabbit management panel, click in Queues tab and locate the option Purge at the end of the screen. Click the button and confirm the action. Then, do the same with the Delete option, right above. See Figure 3 for reference. Don’t worry, every time the app starts up, it checks for the existence of the queues and, if they’re not there, the app recreates them.
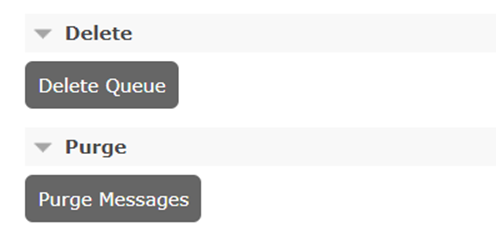
Figure 3. Purging and deleting queues.
Now, run the application, open Postman, and run the same requests configured in Part 2 of this tutorial. You don’t have to change anything to send a POST request, for example.
The result should look like:
|
1 2 3 4 5 6 7 8 9 10 11 12 13 14 |
{ "name": "John Paul 2", "email": "j@paul.com", "age": 23, "phones": [ { "type": 0, "areaCode": 321, "number": 1544 } ], "id": "8ef5a99f-72c7-4876-9970-5cc83a0c3f04", "expectedVersion": 0 } |
Note that now there is a different id coming up, and the attribute expectedVersion from the CQRSLite framework. The creation is faster than before since you don’t have to wait for a database during the creation of a record.
The same id must be used to the other endpoints to update and delete a customer. Be careful to provide the same expectedVersion when updating a value. You can update the framework not to need this, and always upgrade the latest data in the store when the version is not provided.
Don’t forget to check the database after each operation has finished. The same goes for your RabbitMQ queues. You can also debug each part of the application when running it, to see how each step goes on, in which class and order.
Conclusion
This is it for the series. I hope it’s been fruitful and helpful, at least for you to have a better understating of these patterns, since they’re quite confusing, even for experienced developers.
I highly recommend reading over Martin Fowler’s articles about CQRS and Event-driven architectures, a reference to the community for years. Also, take a look at Greg Young’s first CQRS sample repo at GitHub.
If you still feel adventurous, what about implementing the example over the Event Store stream database? It’s free and open source. And its usage is very simple and clean. Good luck!

Load comments