As with any programming language, PowerShell supports comments. In fact, it will support two styles of comments. However, as you will see later in this article, PowerShell can use comments in a couple of interesting and unexpected ways that can be quite powerful.
Using Comments
The most common style of comment you will see is a line preceded with a # symbol. (I leave it to you to decide if you want to call that a hashtag, a pound symbol, or even a good old octothorpe!)
As an example, you might have a comment block at the start of your program with details about it:
|
1 2 3 4 5 6 |
#This is an example of single-line comments # #Author: Greg D. Moore mooregr@greenms.com #Date: 2019-11-12 #Version: 1.0 # |
Comments like this can go anywhere in your code. An alternative way of doing this, however, would be more what I would call a C language style or sometimes referred to as a block comment:
|
1 2 3 4 5 |
<#This is an example of a block comment Author: Greg D. Moore mooregr@greenms.com Date: 2019-11-12 Version: 1.0 #> |
This style allows you to more easily add lines of comments without having a # in front of each one. You’re free to use either style or even both. Just remember, though, the usefulness of comment blocks like this when you come back to debug your own code a year from now. However, comments don’t have to come at the start of a line either. In fact, personally I find myself only using comment blocks like above at the start of a script or right before a particularly complicated block of code. I’m far more likely to do endline commenting such as:
|
1 |
$Callback_Test_Form.Show() | Out-Null #absorbs cancel message at end. This occurs for reasons outside scope of this article |
I included this comment in a recent script because the | Out-Null was not something I expected to be required, and I know a year from now if I didn’t have the comment there I’d be wondering why I had it there. Or worse, I’d remove it and then wonder why I was getting a cancel message that kept showing up.
Note that when you start a comment with a #, everything to the end of the line is treated as a comment. This can be useful for example when you are testing and might want to comment out the end of a command.
|
1 |
get-help write-host #Ooops, I don't want to go -online |
This lets you later remove the comment and get the –online version of help, but what if you want a comment in the middle? Again, PowerShell gives you that power.
|
1 |
get-help write-host <# I want the most recent, so I'll go #> -online |
Note that by using a block style comment, you get the ability to have a comment in the middle of your command and still execute or interpret items to the right of it. Finally, you may be wondering, “what if I want to print out a # or do something similar?” If you try
|
1 |
write-host Press # on your phone |
You’ll find it doesn’t write out what you want. You simply get:
![]()
This is where the grave-accent ` comes in handy.
|
1 |
write-host Press `# on your phone |
This will print out the message you want.
![]()
You could also wrap that entire string in quotes:
|
1 |
write-host 'Press # on your phone' |
![]()
That would work, but I wanted to give an example of how to escape the # qualifier.
If you, like me, often use the PowerShell ISE to write scripts, there is one last useful trick I want to share, but can only describe and give some screenshots for, not actually provide a script for it. It’s a keyboard shortcut that’s not comment specific but useful if you have a chunk of code you want to comment out, say for testing. Put the cursor at the start of the line and holding down Shift-Alt use the arrow keys to move it up or down. You will notice a thin line (blue on my screen) appear. Once you’ve marked the lines you want to comment, simply type a # and it will appear at the start of each line.
This is an example of the code to comment:
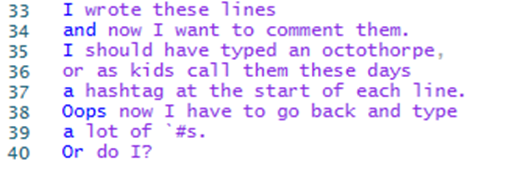
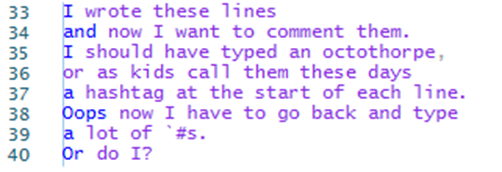
When clicking at the right of the text on line 40 and after pressing Shift-Alt and the up arrow several times, you’ll see the blue line:
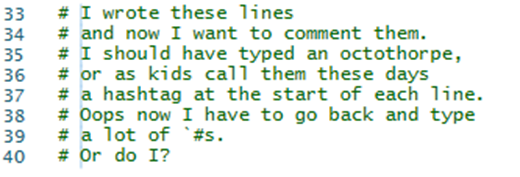
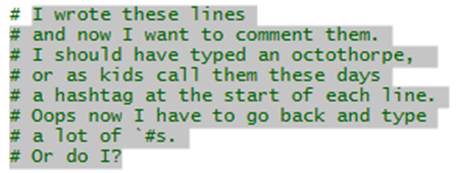
After pressing # <space> you’ll see the characters added to the code:
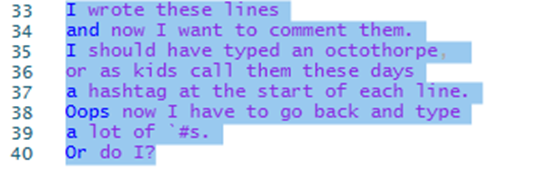
As a note, you can use this trick anywhere on the line (so if you wanted to put a bunch of comments at the end of a number of lines you could use this trick to easily put in the # for you) and is obviously not specific to commenting, but that’s one of the most obvious usages. You can also do this using regular expressions. Highlight the block of code in question:
Then Ctrl-H to get the Find and Replace dialog box. Make sure Find in Selection and Regular expressions are selected:
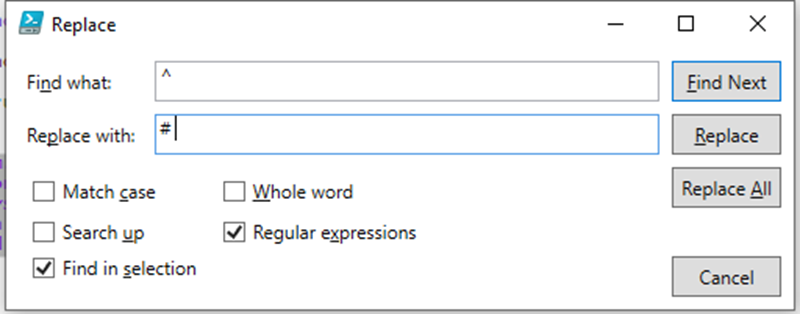
The caret ^ is used to anchor the start of a line and of course the # (there is a space there) basically inserts a # and space at the end of the highlighted lines. Note if you fail to highlight a block of code, this will operate on your entire script.
And More
However, if that was all that comments could do in PowerShell this would be a very short and boring article (and my editor would be shaking her head saying, “Greg, I need more than 850 words!”) Like many things in PowerShell, the creators added features that make it more powerful than you might expect.
I was recently preparing for a presentation I was giving at the Hampton Roads SQL Server User Group. During this presentation, I run a script in PowerShell that starts and stops SQL Server. To do this, I need to run it as administrator. Of course, I had completely forgotten that during a practice, and when I ran it as myself, it ended up throwing several ugly errors. This was not a showstopper, but not what you want during a demo. This got me thinking about how I could ensure this wouldn’t happen during the actual talk.
My first thought was to find some cmdlet that would check to see who I was logged in as and then abort if I wasn’t the right user. Part of the problem with this approach of course is that when you run a program (such as PowerShell ISE) as administrator, you show up as the user logged in. This was going to be harder than I thought.
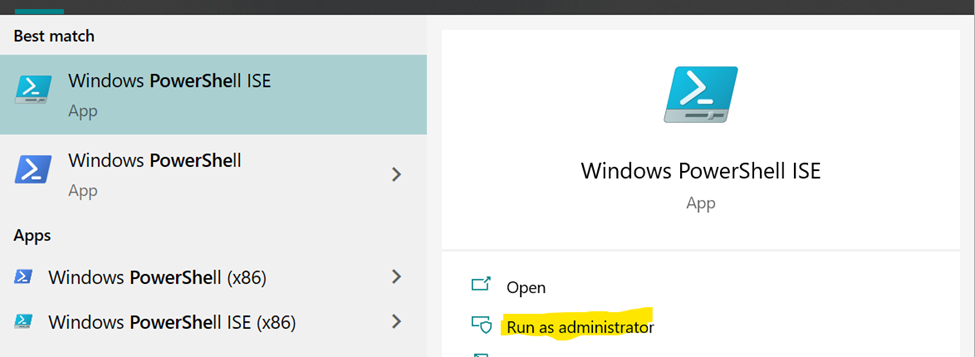
Once again, PowerShell surprised me. Solving this problem is trivial. To see how to solve the problem, open the PowerShell ISE as yourself (i.e. do NOT select Run as administrator and make sure your user doesn’t have local admin privileges) and enter the following code:
|
1 2 |
stop-service "windows time" start-service "windows time" |
Save this to a file called restart timer service example.ps1 and then try to run it. Unless you’re a local admin on your machine you should get an error screen similar to below.
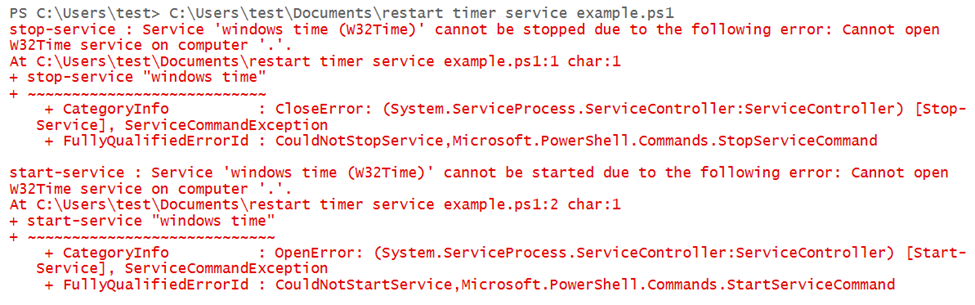
If you run this using the Run as Administrator option, it should run without error. In this example, the failure is pretty benign, but perhaps you’re writing a script were a failure would not be so harmless. To solve this problem, simply put the following comment at the top of the script above and resave it.
|
1 |
#Requires -RunAsAdministrator |
Now you will get a different error:

It’s still a bit ugly but far better than running the script and perhaps breaking something. Note if you simply cut and paste the script into a new window, but do not save it, PowerShell will attempt to run the whole thing. Basically the #requires gets ignored unless it’s an actual saved file. This solved my initial issue, but it got me looking into other features I wasn’t aware of. For #requires, there’s an entire list:
|
1 2 3 4 5 6 |
#Requires -Version N[.n] #Requires -PSEdition [ Core | Desktop ] #Requires –PSSnapin PSSnapin-Name [-Version N[.n]] #Requires -Modules { Module-Name | Hashtable } #Requires –ShellId ShellId #Requires –RunAsAdministrator |
As you can see, these give you a lot of power in controlling how and when your script is run. The #Requires –Version is useful if your script requires features that are only available in a more recent version of PowerShell. Note that this is a minimum number. The version of PowerShell you are running must match this or be higher. You can’t use this to require a previous version of PowerShell. For example, a useful cmdlet I used in a recent script is compress-archive. Fortunately, this script was specific to the problem I was trying to solve, but if I were trying to write a more general script, I might want to put #requires –Version 5.0 at the stop of my script. To demonstrate save the following script as requires version example.ps1.
|
1 2 3 |
#requires -Version 5.0 Get-Process | Out-File -FilePath .\Process.txt Compress-Archive -Path .\Process.txt -DestinationPath .\Process.zip -Force |
If you run this within your existing PowerShell ISE instance, it should run without an issue, but if you try to run in an older version, such as PowerShell 2.0, the script will error on the #requires line and never execute the rest of the script. This is the desired outcome.
For testing, you could also put in something like –Version 99.99 and you will see error messages similar to the examples below, but I wanted to show how this would work in the real world on existing systems and also demonstrate the command line ability to fall back to a previous version of PowerShell.

To test this, you will have to use command line version of PowerShell and start it as follows:
|
1 |
C:\>Powershell –version 2.0 |
Then run the file you saved above requires version example.ps1. You should see an error such as:
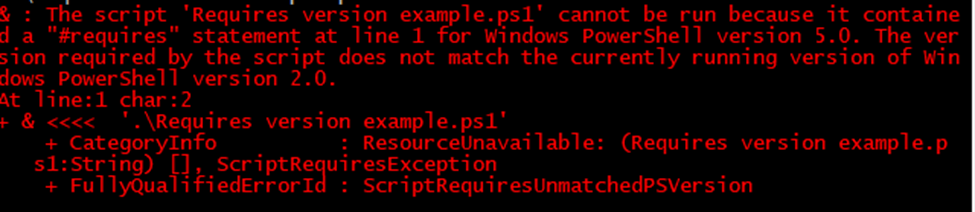
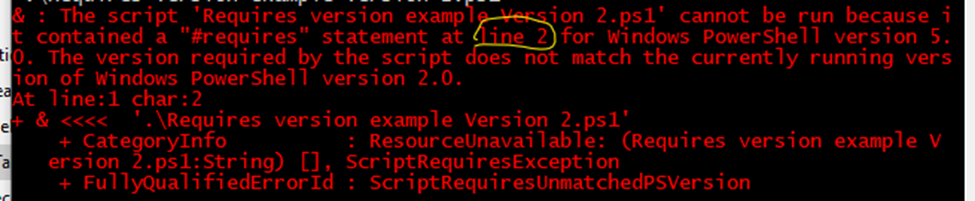
While I would recommend putting the #Requires comment at the very beginning of the file, in truth, you can put it anywhere and it will act the same way. If you recreate the above file but move the comment down after the Get-Process and save as requires version example Version 2.ps1.
|
1 2 3 |
Get-Process | Out-File -FilePath .\Process.txt #requires -Version 5.0 Compress-Archive -Path .\Process.txt -DestinationPath .\Process.zip -Force |
Try to run it under version 2.0 as above, and you’ll get a similar error and the entire script will fail to run.
This means you can’t have part of a script that can run under an older version (or run as non-administrator) and then part that requires a particular version or to run as administrator. If you want to do something like that in code, you need to get smarter. Save the following script as Requires version example Version 3.ps1.
|
1 2 3 4 5 6 7 8 9 |
Get-Process | Out-File -FilePath .\Process.txt if ($PSVersionTable.PSVersion. Major -ge 5) { Compress-Archive -Path .\Process.txt -DestinationPath .\Process.zip -Force } else { Write-Host "I'm sorry Dave, I can't do that." } |
If you run this under Version 5 or greater, it will create the Process.txt file and zip it up. If you run it under an earlier version, such as the –Version 2.0 above, the script will still be able to create the Process.txt file since Get-Process is a cmdlet available in version 2.0. Since Compress-Archive is not, the script will skip that step and give an error message. It’s up to you if you want to write scripts that can detect the version of PowerShell and behave differently depending on the version, but in many cases if you simply want to abort the script, the #Requires comment is by far the easiest way of handling things.
Two last caveats on using a #Requires comment. It must start at the beginning of the line; you can’t have any spaces or tabs before it. In addition, you can’t try to outsmart it and put it as part of a try/catch block to more gracefully handle it. Save the following script to illustrate both caveats: Requires version example Version 4.ps1.
|
1 2 3 4 5 6 7 8 9 10 |
#requires -Version 5.0 try { write-host "We're at version 5.0!" #requires -Version 5.0 } catch { write-host "Hey, we're not at version 5!" } |
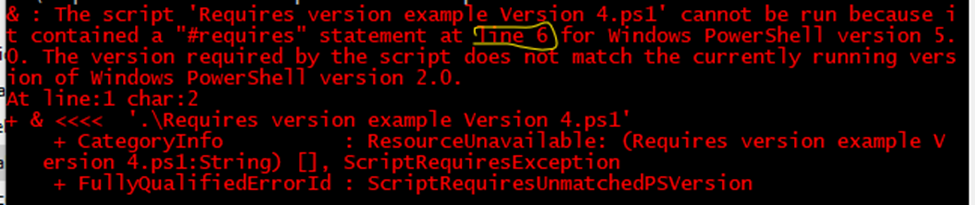
Note it is the #requires on line 6 that aborted the script, not the one on line 1, and the try/catch had no effect. #Requires are global and impact the entire script, regardless of where they are, provided they start on the line. And yes, you can have more than one #Requires in a script. You could require a specific version of PowerShell, certain modules to be present and to RunAsAdministrator.
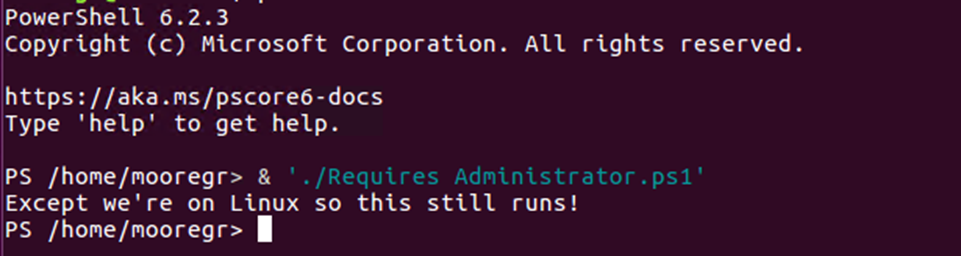
Two final caveats on the #Requires – RunAsAdministrator comment. It was introduced in PowerShell version 4.0 and does not work on non-Windows systems (yes, remember, PowerShell is now cross-platform!). Save the following script as Requires Administrator.ps1.You will need a Linux instance to test this, but assuming you do, PowerShell can be installed on Linux using the methods explained here. Once installed copy over or save the script above to your Linux instance. To run the script you can enter:
|
1 |
Pwsh "./Requires Administrator.ps1" |
You should see
Finally, you may be wondering if you can use block style comments with the #Requires. From my limited testing, this does not work. You need to put each Requires on its own line with a preceding #. This script works:
|
1 2 |
#Requires -RunAsAdministrator #Requires -Version 5.0 |
This script doesn’t work:
|
1 2 |
<#Requires -RunAsAdministrator Requires -Version 5.0 #> |
Conclusion
As you can see, PowerShell comments are useful not only for their obvious role of allowing you to comment your code, but also are useful for controlling execution of your code. You can choose between single-line comments or block comments and you can put them before blocks of code or inline with the code. Note that all these scripts are available on Github.

Load comments