

SQL Server on Linux only allows you to create a linked server to another SQL Server instance, so you need to use the Polybase feature to consume data from Oracle. Note, however, that this feature is only available in the 2019 version; for the 2017 version you need to use a different approach as described in this article.
We're going to create a Polybase reference to an Oracle database using two Docker images, one with Oracle 12c and the other with SQL Server on Linux 2019, so we can test every step taken and indicate the possible errors you may encounter. We will change a Docker setting for the Polybase feature, create the Oracle container, create the SQL Server container, install the Polybase feature, and finally create the Polybase reference to the Oracle database and consume data.
Configure Docker Desktop
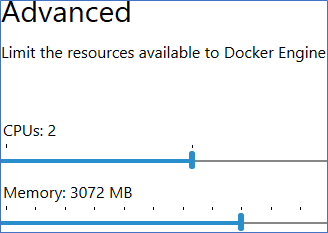
Because I have Windows 10, I installed Docker Desktop 2.1.0.5 ,which by default, limited the memory to 2 GB. The Polybase feature requires 1 GB just for itself and the SQL Server image requires 2 GB, so we have to increase this limit, or when we create the external data source we will start getting errors like:
HResult 0x274D, Level 16, State 1 TCP Provider: No connection could be made because the target machine actively refused it. OLE DB Provider returned message "Login timeout expired". Failed allocate pages: FAIL_PAGE_ALLOCATION 1. Error 17300, Severity: 16, State: 1. (Params:). The error is printed in terse mode because there was an error during formatting. Tracing, ETW, notifications etc are skipped. SQL Server was unable to run a new system task, either because there is insufficient memory or the number of configured sessions exceeds the maximum allowed in the server. Verify that the server has adequate memory. Error: 701, Severity: 17, State: 123. There is insufficient system memory in resource pool 'internal' to run this query. Error 17312, Severity: 16, State: 1. SQL Server is terminating a system or background task QDS Data Persist Task due to errors in starting up the task (setup state 1). Error: 28709, Severity: 16, State: 19. Dispatcher was unable to create new thread.
In Docker Desktop, you can change this by raising the resources available.
Create the Oracle container
We create this container using the latest stable image from Oracle with the command below.
Note: you need to be logged in Docker Hub web page, agree to the terms of service for this image, and be logged in Docker Desktop using the command docker login. Also note by default the database domain is going to be localdomain; if you want to change it, you can either specify it in the docker run command with the environment variable -e "DB_DOMAIN=" or you can change it manually using this guide.
docker run -d -it --name OracleTest -P store/oracle/database-enterprise:12.2.0.1
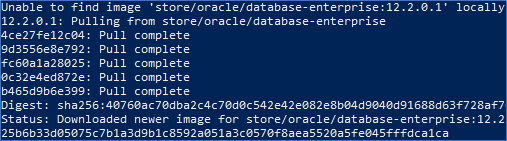
Once the image has been downloaded, you can confirm the running status with the command
docker ps -f 'name=OracleTest'
The container may still be running setup scripts, so you need to run the command below to view the logs.
docker logs OracleTest
To view the resources consumed by this image, run this:
docker stats
Wait until the resources stabilize, meaning it is not doing any further processing.
One of the things we need to set up Polybase is the IP address that was assigned to this image; use the following command to get this. In my case the output was 172.17.0.2:
docker inspect -f '{{range .NetworkSettings.Networks}}{{.IPAddress}}{{end}}' OracleTestThen we need to login into this container with the following command to get information and configure other things:
docker exec -it OracleTest /bin/bash
We must know the service name and port of the database, so we will see the content of the file tnsnames.ora. In my case the values were ORCLCDB.localdomain and 1521. If you don't specify these values correctly, you will get the error
Generic ODBC error: [Microsoft][ODBC Oracle Wire Protocol driver][Oracle]TNS-12514: TNS:listener could not resolve SERVICE_NAME give in connect descriptor.
Use this command to see the values.
cat $TNS_ADMIN/tnsnames.ora

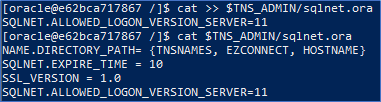
We must increase the connectivity compatibility by changing the minimum authentication protocol allowed; we need it to support version 11. Otherwise, you will get the error:
Generic ODBC error: [Microsoft][ODBC Oracle Wire Protocol driver][Oracle]ORA-28040: No matching authentication protocol, SqlState: HY000, NativeError: 28040.
Change this with the following command.
cat >> $TNS_ADMIN/sqlnet.ora
SQLNET.ALLOWED_LOGON_VERSION_SERVER=11
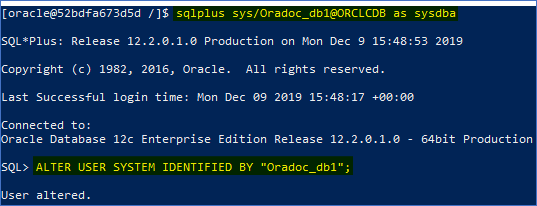
We must reset the password of the SYSTEM user, even when it is correct and is the same you use to login. If you don't, you will get this error:
110045;User authorization failed: [Microsoft][ODBC Oracle Wire Protocol driver][Oracle]ORA-01017: invalid username/password; logon denied, SqlState: 28000, NativeError: 1017. Change this with the following command:
sqlplus sys/Oradoc_db1@ORCLCDB as sysdba
ALTER USER SYSTEM IDENTIFIED BY "Oradoc_db1";
And finally, we must create the test table from where we will consume the data. You need to know the schema name, and in my case it was SYS. Note that even when you enter the column names in lowercase, they get converted to uppercase, and if you enter it incorrectly you will get this error:
105083;The following columns in the user defined schema are incompatible with the external table schema: user defined column was not found in the external table. The detected external table schema is: ([MESSAGE] VARCHAR(128) COLLATE Latin1_General_100_BIN2_UTF8).
Note, however, the error message clearly specifies the column name, type, length and collation, so you can use this information to create it successfully.
CREATE TABLE T1 (MESSAGE VARCHAR(128));
INSERT INTO T1 VALUES ('Succeeded!');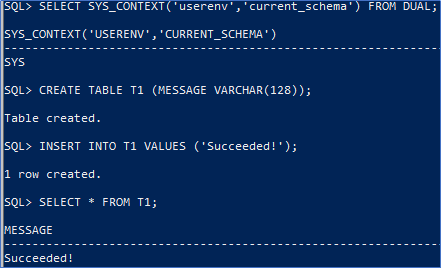
Create the SQL Server container and install the Polybase feature
We create the SQL Server container using the latest stable image from Microsoft SQL Server 2019 with the command below:
docker run --name SqlTest -e "ACCEPT_EULA=Y" -e "SA_PASSWORD=@Sq1T3st" -d mcr.microsoft.com/mssql/server:2019-GA-ubuntu-16.04
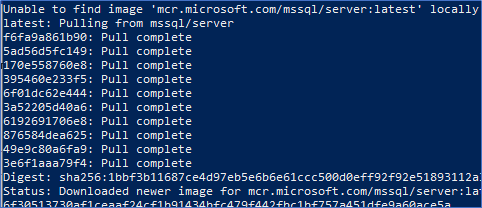
Once the image gets downloaded, and the container is running, we need to login as root with the following command. We do this to get information and configure the instance:
docker exec -u0 -it SqlTest /bin/bash
We must run the following commands in order, one by one, to make the Polybase feature discoverable and get it installed (see this link and this link for reference):
apt-get update
apt-get install software-properties-common
wget -qO- https://packages.microsoft.com/keys/microsoft.asc | apt-key add -
add-apt-repository "$(wget -qO- https://packages.microsoft.com/config/ubuntu/16.04/mssql-server-preview.list)"
apt-get update
apt-get install mssql-server-polybase
If there are no errors, at the end it shows the message: Please restart mssql-server to enable PolyBase. To do this, we need to get out of the shell, get the container ID, and restart it (in my case the container ID was 25ec1f7d4ed4):
exit
docker ps
docker restart 25ec1f7d4ed4
Once it has been restarted, the container may still be running setup scripts, so you need to run this command to view the logs
docker logs SqlTest
We can run this command (same as above) to view the resources consumed by this container and wait until they stabilize, meaning it is not doing any further processing.
docker stats
Next we need to login into the container, then into sqlcmd, in order to finish the setup and create a database from where we will access the Oracle table. We will use the commands below:
docker exec -it SqlTest /bin/bash
/opt/mssql-tools/bin/sqlcmd -S localhost -U sa -P @Sq1T3st
EXEC sp_configure 'show advanced options',1
GO
RECONFIGURE
GO
EXEC sp_configure 'polybase enabled',1
GO
RECONFIGURE
GO
CREATE DATABASE [Test]
GO
USE [Test]
GO
CREATE MASTER KEY ENCRYPTION BY PASSWORD = '@Sq1T3st'
GO
Now we will create a test table and a loopback data source to test the functionality, using the commands below:
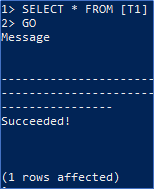
CREATE TABLE [T1] ([Message] VARCHAR(MAX))
GO
INSERT INTO [T1] VALUES ('Succeeded!')
GO
SELECT * FROM [T1]
GO
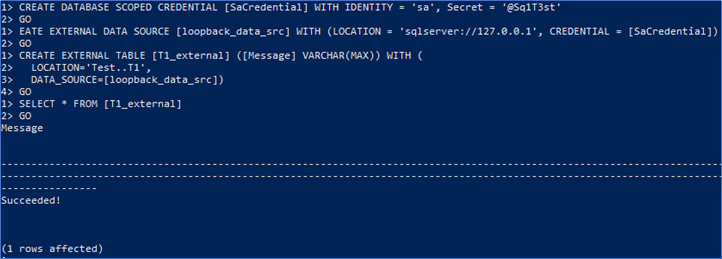
CREATE DATABASE SCOPED CREDENTIAL [SaCredential] WITH IDENTITY='sa', Secret='@Sq1T3st'
GO
CREATE EXTERNAL DATA SOURCE [loopback_data_src] WITH (LOCATION='sqlserver://127.0.0.1', CREDENTIAL=[SaCredential])
GO
CREATE EXTERNAL TABLE [T1_external] ([Message] VARCHAR(MAX)) WITH (
LOCATION='Test..T1',
DATA_SOURCE=[loopback_data_src])
GO
SELECT * FROM [T1_external]
GOWe can see the table created with data:
And we see the external table working.
We now know the Polybase feature is functioning, and we create the Polybase reference for the Oracle source with the commands below.
CREATE DATABASE SCOPED CREDENTIAL [OracleTestCredential] WITH IDENTITY='SYSTEM', SECRET='Oradoc_db1'
GO
CREATE EXTERNAL DATA SOURCE [OracleTest] WITH (
  LOCATION='oracle://172.17.0.2:1521',
  -- PUSHDOWN=ON|OFF,
  CREDENTIAL=[OracleTestCredential])
GO
CREATE EXTERNAL TABLE [T1Oracle] (
  [MESSAGE] VARCHAR(128) COLLATE Latin1_General_100_BIN2_UTF8)
WITH (
  LOCATION='[ORCLCDB.localdomain].SYS.T1',
  DATA_SOURCE=[OracleTest])
GO
SELECT * FROM [T1Oracle]
GO
Your results should look something like this image:
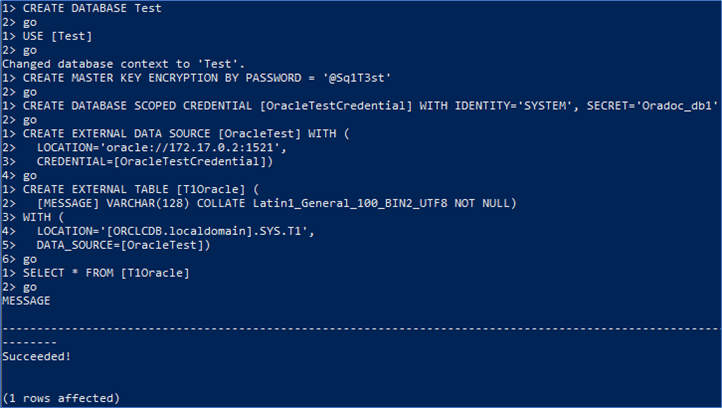
We confirm it is working successfully., but there are several things we need to notice here:
- When creating the external data source, the default for PUSHDOWN is ON, but you can change it if needed.
- When the external data source is created, it doesn't access any database. You only establish a connection to a specific IP and port.
- When creating the external table you need to specify the location as a three-part identifier (no less, no more) separated by dots. The first being the database (and domain), the second the user schema, and the third the table name. In case the database has a domain you must enclose it in square brackets as any other character makes the string unparseable and throws an error like 105076;The specified LOCATION string could not be parsed.
Here is the official documentation about Polybase on Linux and Polybase configuration for Oracle.
