One of the more common problems I’ve faced with a particular client is setting up data extractions from outside sources such as SFTP servers. Since this client deals with PII data, it’s essential that this is done in as a secure manner as possible. For example, all connections need to be encrypted using protocols such as SFTP instead of FTP.
Securely connecting is particularly easy to accomplish if one uses a 3rd party module such as Posh-SSH. However, you are still stuck with the problem of logging into the remote SFTP server securely.
For this article, I will be using snippets of code from Posh-SSH, but I will not be diving deep into the actual usage of Posh-SSH. I recommend you download the module from the above link and learn about it yourself. Perhaps in the future, I’ll write a complete article on using Posh-SSH, but the focus of this one will be on using Secure Strings.
A typical SFTP connection using Posh-SSH may look like:
|
1 |
New-SFTPSession -ComputerName "test.rebex.net" |
If you run the above command, which includes a valid SFTP server name, you’ll get a dialog box that asks for a username and password. For this test site, you can use the username of demo and the password password. This works great if you want to do an interactive session with the SFTP server, but this doesn’t help with automation. In most cases, you need to automate this process and find a way to pass the username and password to the cmdlet.
Looking closely at the New-SFTPSession cmdlet syntax, you will see there is a parameter, Credential, that appears to be useful. The first trick is in creating a valid credential object. To get there, take a look at the cmdlet Get-Credential. By changing your code to the following, you get one step closer, but you are still prompted for the username and password.
|
1 2 3 4 5 |
$sftpServername = 'test.rebex.net' $Credential =Get-Credential $session = New-SFTPSession -ComputerName $sftpServername -Credential $Credential # do some stuff here Remove-SFTPSession -SessionId $session.Sessionid |
You may want to add AcceptKey as a parameter to the New-SFTPSession Cmdlet to run this in non-interactive mode, or it will again hang waiting for a response to the dialog box asking if you want to accept the key from the remote server.
You’ll notice that I’ve added a $session object to capture information about the SFTP session being created. Part of the reason is so that you can properly close the session when you’re done with it as shown in the last line using the Remove-SFTPSession cmdlet.
You are now a step closer, as you can pass a valid credential object to the New-SFTPSession cmdlet, but you are still being prompted for it. Next, I’ll show you how to encode the password directly in the script.
|
1 2 3 4 5 6 7 |
$sftpUsername = 'demo' $sftpPassword = ConvertTo-SecureString 'password' -AsPlainText -Force $sftpServername = 'test.rebex.net' $Credential = New-Object System.Management.Automation.PSCredential ($sftpUsername, $sftpPassword) $session = New-SFTPSession -ComputerName $sftpServername -Credential $Credential # do some stuff here Remove-SFTPSession -SessionId $session.Sessionid |
If you run the above script with the provided username, password and SFTP server, you’ll see it automatically creates the session without prompting you for any information. This is a huge leap forward.
There are two key parts to this. The first one is the New-Object System.Management.Automation.PSCredential. This cmdlet takes the username and password and creates a credential object. This credential object then can be used by the New-SFTPSession cmdlet.
My first inclination was to pass in a normal string to both the username and password, and indeed, a standard string for the username actually works. However, if you try passing in a normal string as the password, you’ll get an error.
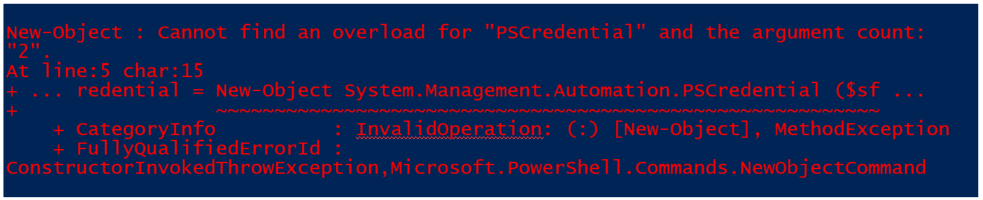
This message is not very helpful. Fortunately, the authors of PowerShell had security in mind and essentially force you to be secure. The trick is, PSCredential requires a secure string for the password.
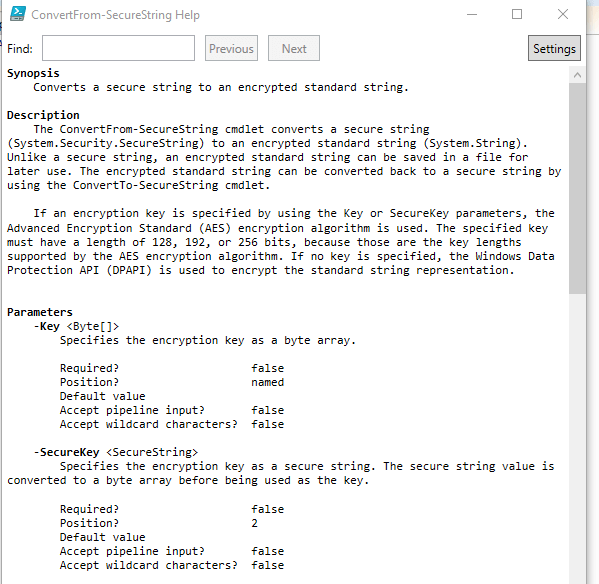
This is why you see the cmdlet ConvertTo-SecureString as the second line in the above script. To understand what this does, it is worth checking out the help on this cmdlet. The easiest way to do this, of course, is via the command
|
1 |
get-help -ShowWindow ConvertTo-SecureString |
This command will pop up the following window
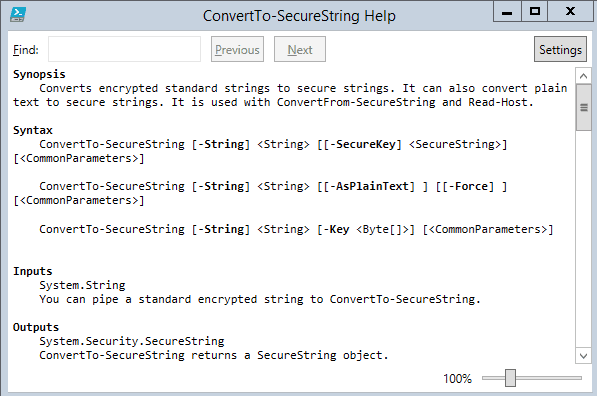
The key here is the second example in the syntax where it shows the parameters of –AsPlainText and –Force. You will need to use both. As the synopsis states, Converts encrypted standard strings to secure strings. It can also convert plain text to secure strings. Normally this cmdlet expects an encrypted string, which is not what you are passing to it, but it can be forced to take a plaintext string and convert it to a secure string. That’s what happens in the above script.
You’re now a step closer. You have a script you can save and run as needed. However, as you’re probably worried about, the secure password is now embedded as plaintext in your script. This means anyone with access to that script now has access to the password which is far from ideal.
The obvious next step then is to somehow create an encrypted password and to use that. To do this, I will assume that it’s ok to interactively enter the plain text password once.
|
1 2 |
$LocalFilePath='C:\temp' read-host -AsSecureString | ConvertFrom-SecureString | Out-File $LocalFilePath\cred_$env:UserName.txt |
I will break this apart a bit. The setting of the $LocalFilePath is pretty simple. In production, I obviously would not use a temporary location. Where you chose to store the resulting file will depend on your specific needs.
The second line, however, is a bit more interesting. The read-host cmdlet waits for the user to input text. Note, if you run it without the AsSecureString it may appear to hang. In actuality, it will merely wait until you type some text and press enter. This text may be visible on the screen. When you use the AsSecureString it will give you a dialog box which will use dots to mask what you type in.
Once the cmdlet gets the string you’ve entered, it will pipe the output to ConvertFrom-SecureString. If you run just those two parts read-host -AsSecureString | ConvertFrom-SecureString you will get output similar to the following:

ConvertFrom-SecureString does the opposite of what ConvertTo-SecureString does. It will take a secure string and convert it to an encrypted string. Note that a secure string is simply a string that is masked so it can’t be read on the screen. It’s not actually encrypted. Don’t mistake secure for encrypted.
Finally, the script takes the output from ConvertFrom-SecureString and pipes it to Out-File $LocalFilePath\cred_$env:UserName.txt
You will note that the filename is based on my environment variable UserName. This is important for reasons I will explain in a moment. If you run the above, and look in the directory you set in the $LocalFilePath (which above is set to C:\temp), you will see a file name similar to cred_gregmoore.txt. If you try to read that file, you will see it contains the encrypted string created above.
Finally, you have the encrypted password stored in a file. This is a huge step because it means that you only need to enter the password once, in a secure fashion (i.e. no one looking over your shoulder will see the actual password; they will just see the dots in the dialog box prompting for it.)
The next step is to use that now encrypted password in the connection. That’s fairly simple to do:
|
1 2 3 |
$LocalFilePath='C:\temp' $password = get-content $LocalFilePath\cred_$env:UserName.txt | ConvertTo-SecureString $Credential = New-Object System.Management.Automation.PSCredential ($sftpUSerName, $Password) |
The second line retrieves the encrypted password you created and converts it to a Secure String. Even then, the string is still not readable by anyone. If you try to read the $password variable’s value, you will see:
![]()
The third line in the script above passes that Secure String to the cmdlet creating the credential. After this, you can run the following:
|
1 2 3 |
$session = New-SFTPSession -ComputerName $sftpServername -Credential $Credential # do some stuff here Remove-SFTPSession -SessionId $session.Sessionid |
Congratulations, you now have a secure way of running a script to connect to your SFTP server. The above scripts can be used to pass credentials to other internet services, but that’s beyond the scope of this article, other than to say that the above technique will work for anything using a $Credential object.
I will admit, I was quite happy with the above solution until I tried to put it into production running as a scheduled task. Then it simply wouldn’t work. It took me a while to figure out a fundamentally simple reason that was obvious in hindsight.
First, I checked the help on ConvertTo-SecureString
|
1 |
get-help -ShowWindow ConvertTo-SecureString |
The help information was not super helpful, though it was interesting to learn the various options. The reason the script failed in production was that I wanted to run the entire script as a scheduled task with a service account. After some experimentation, I realized that when the scheduled task was set up to log in as me, the script ran fine. However, when I ran it as the service account my customer uses for scheduled tasks, it would fail but in no obvious way.
To troubleshoot, I did what any decent programmer would do; I added some lines to print out debug information.
At the time, I was using a line more like:
|
1 |
$password = get-content $LocalFilePath\sftp_password.txt | ConvertTo-SecureString |
The goal was to use the same file I had created when I ran the script manually. Even though I was using a service account, the password needed for the SFTP service is the same no matter which account is running the script.
Now at this point, an astute reader is probably guessing what the problem is. For those who haven’t quite figured it out, I will say my debugging showed that the script ran fine up to that point but failed on that particular line.
It took me a bit to realize that the PowerShell creators were smarter than me and that the ConvertTo-SecureString and ConvertFrom-SecureString cmdlets based their encryption key on the identity of the user logged in. In hindsight, this, of course, made perfect sense when I thought about it. It allows me to encrypt a string and save it to a file but prevents anyone else from reading the same file and decrypting the same string. A system wouldn’t be very secure if anyone could come along and decrypt files that others had encrypted.
My solution was to brute-force the password into a secure string and then into an encrypted string. This involves running a script to create an encrypted file. The key is a block of script like the following:
|
1 2 3 4 5 6 |
$LocalFilePath='C:\temp' if (-not (test-path $LocalFilePath\cred_$env:UserName.txt)) { read-host -AsSecureString | ConvertFrom-SecureString | Out-File $LocalFilePath\cred_$env:UserName.txt "Setting Password first time for $env:UserName" | out-file $LocalFilePath\app_log.txt -append } |
Note a couple of things in this block of code:
- The filename has a prefix of cred_ (short for credential) and the name of the user setting the credential file. This convention helps administrators keep track of who has created credential files.
- The credential file will be stored in the directory set by
$LocalFilePath, in this case, C:\temp, but on production, it should be someplace else. - The snippet above is written to be run in an interactive mode, i.e., the user will be presented with a dialog box to type in the password. This will then create the appropriate credential file for them. This file then gets used later when I want to create my SFTP session.
For this to work for a service account, the admin, such as myself either has to log in as that service account and run the script and enter the appropriate password. If that is not possible, for example, you are not allowed to log in as the service account, but you can run the following script to create the file in a scheduled task running as that user:
|
1 2 3 4 5 6 7 8 |
# Set Service Account Password Script # Remember to remove the plain-text password after running this under the service account $LocalFilePath='C:\temp' if (-not (test-path $LocalFilePath\cred_$env:UserName.txt )) { "password" | ConvertTo-SecureString -AsPlainText -Force | ConvertFrom-SecureString | Out-File $LocalFilePath\cred_$env:Username.txt "Setting Password first time for $env:UserName" | out-file $LocalFilePath\app_log.txt -append } |
- Once the script is run once as the service account in question, remove the script with the plain-text password or edit it to remove the plain-test password.
- You’ll note as a good programmer, I’m logging this step.
Using a script like this is far from the only way to handle the issue. The important point to keep in mind is that when running as a scheduled task, as a service account, it is the service account that somehow has to create its own credential file. You can use alternative methods; this is just the one I happen to use.
So now that there is a secure way of storing the password on the disk, here’s a script with all the pieces together. A simple script might look something like this:
|
1 2 3 4 5 6 7 8 9 10 11 12 13 14 15 16 17 18 19 20 21 22 23 24 25 26 27 28 |
# To set the password for a Service Account, run the Set Service Account Password Script before running this one! Otherwise, this will hang since it expects user input. # To set password interactively, run this script as is: $LocalFilePath='C:\temp' if (-not (test-path $LocalFilePath\cred_$env:UserName.txt)) { read-host -AsSecureString | ConvertFrom-SecureString | Out-File $LocalFilePath\cred_$env:UserName.txt "Setting Password first time for $env:UserName" | out-file $LocalFilePath\app_log.txt -append } $sftpUsername = 'demo' $password = get-content $LocalFilePath\cred_$env:UserName.txt | ConvertTo-SecureString $Credential = New-Object System.Management.Automation.PSCredential ($sftpUSerName, $Password) try { $sftpServername = 'test.rebex.net' $session = New-SFTPSession -ComputerName $sftpServername -Credential $Credential # do some stuff here Remove-SFTPSession -SessionId $session.Sessionid } catch { $exception = $_.Exception.Message "Error in New-SFTPSession -ComputerName $sftpURL -Credential $Credential" | out-file $LocalFilePath\app_log.txt -append Remove-SFTPSession -SessionId $session.SessionId return } |
With that, you should have the framework to securely access your SFTP server without having to save a password in plaintext anywhere on the disk. And with a slight modification, you can also make this work for service accounts, albeit with briefly storing the password as plaintext before deleting it.
One final addendum, if the SFTP password ever changes, you need to delete the credential file you created and rerun the Service Account Password script under the service account credentials and with the new password embedded in the script. Just remember to delete the password itself from the script when done.
Load comments