In Part 1 of this series I shared an overview of a system that allows developers to restore production backups to test servers. In Part 2 of this series I will go into detail of the SQL side of the system. This system assumes you have a test DB server. The zip file attached has the creation scripts for all the object described in this article.
It is important to note that if you choose to use these scripts you will need to modify the locations of the data and log files along with the backup locations. You will also need to modify the email addresses in the code since they are not valid.
Step 1
Access/connect to your test server and run the CreateDBCopy script to create the DBCopy database.
- There isn’t a lot to this step, you just need to make sure you update the script so the data and log file paths are correct for your server.
Step 2
Run the CreateCopyParams script along with the scripts that start with usp which are the stored procedures.
There are four stored procedures included in the script file.
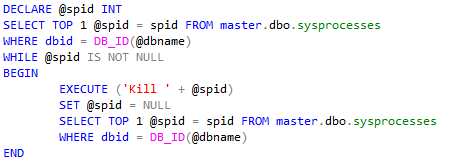
- The usp_KillConnections script should reside in the Master database. It allows the refresh procedure to kill any connections to the database you are trying to restore. This is important since you cannot restore a database if it is in use.

- The usp_PYRefreshSelect is used to return the databases available for refresh in the web site. NOTE: if you don’t want a database to show up in the website just change the active column to 0 for that row.
- The usp_PYRefreshUpdate is used by the website to update the copyParams table. This is where the 30-minute future time is set.
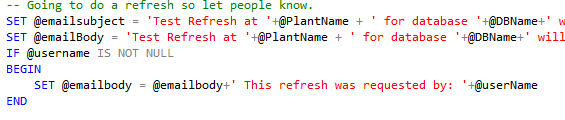
It also calls xp_regread to figure out the time zone of the local plant. If you don’t need this call because all your locations are in one timezone you can always comment it out. This procedure is also where the initial email gets sent out saying that a refresh is going to happen. NOTE: if you change the refresh in the website to false an email will be sent out saying the refresh was cancelled. NOTE: you will need to replace the DevGroupEmail@YourCompany.com with your actual Dev group email.
- The usp_ProcessPYRefresh script is where the core code of this process exists. This is the proc that is called by the SQL job once a minute to see if there are any databases that need to be restored. It calls master.sys.xp_dirtree to get a list of the backup files on the backup share drive.Since a lot of companies keep more than one copy of backups this allows you to pick the latest backup that was done. Once the backup file is obtained, a call to usp_killConnections is done to close all connections to the database you are trying to restore.
Next the restore database command is built and executed via sp_executesql.
If any exception is caught, then an email is sent to the DBA email. Otherwise, a success email is sent to the developer group email and the record is marked as processed. NOTE: you will need to replace the DevGroupEmail@YourCompany.com with your actual Dev group email. You will also need to replace the DBA@YourCompany.com email with the proper DBA email group. If the database was restored successfully, the Recovery mode is set to simple.


Step 3
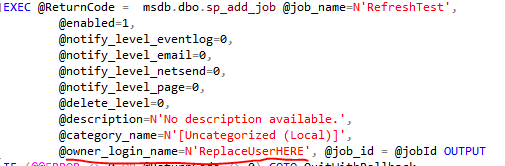
Run the RefreshSqlJob script so the job is created.
NOTE: this job script needs to have the @owner_login_name replaced with the correct owner.
It is important to realize that the user that this job runs as will need rights to restore databases, call extended stored procedures, have file access to backup shares, otherwise the job will fail.
Step 4
Either run the SampleData script to create sample data or create the actual data yourself. This is where most of your setup work will be done. You need to make sure the data in the copyParams table is correct so that database restore will work. Once you have properly setup the backup location, data and log file location and the data and log file names everything should work.
Step 5
Enable and configure Database Mail if it is not already setup on this test server. If you need help, this article should help.
Step 6
Enable xp_cmdShell so extended stored procedures will work. You can do this with an sp_configure command or with the SSMS GUI.
Be sure that once you enable this, you run the RECONFIGURE command.
Troubleshooting problems
Most the time if the restore fails you will just get an email telling you it failed. In those cases, you can figure out which record has an issue with this query:
SELECT *
 FROM dbo.CopyParams
 WHERE error = 1
Normally, I will disable the Refresh job. Set the needprocess back to 1 on the record with the error then run the Refresh procedure with the @showoutput parameter set to 1. NOTE: don’t forget to re-enable the sql job after you are done figuring out the error!
EXEC dbo.usp_ProcessPYRefresh @showOutput = 1
This will print out the actual restore command. This way you can see if there are any typos or mistakes in the command. You can also copy and paste the restore command and run it to see a more accurate error message.
The only issues I have seen after the copyParams data is correct have been:
- The test server runs out of data or log file space.
- The production share backup location moved.
- The usp_killConnections was removed from master.
If you or your developers find that you want to bi-pass the 30-minute wait, (because it is 11pm and no one else cares) You can run this update after you have marked the database(s) to be refreshed via the web site:
UPDATE dbo.CopyParams
 SET ProcessTime = GETDATE()
  WHERE NeedProcess =1
I hope this article has been informative on how I went about creating the test refresh solution. Stay tuned for the final part in this series where I go into the details of how to setup the website portion of this solution.