NOTE: The sqlps utility has been deprecated, but it’s still in use on older servers. Be sure to check out the SqlServer PowerShell module which has much greater functionality.
As I started to use PowerShell more and more, one of the reasons I found it useful, as have many DBAs, is that it permits running the same script across multiple servers. The scripts in my last article took advantage of this capability.
One of the reasons I automate is because I hate to repeat work. But here is a potential problem. What happens when I have 20 different scripts to perform various audits, updates and the like of my SQL Servers and I now add a new SQL Server to the mix?
Well, if I haven’t planned things out, I now need to update 20 different scripts. And I have to hope I get them all right! That sounds like more work than I care to do.
In this post, I’m going to show you two possible solutions you can use to make your life easier: one using a simple text file imported into an array and the second using JSON to store additional data related to each server.
String and Arrays Primer
Before I begin, I want to explore a bit how PowerShell handles strings and how to create arrays. PowerShell has multiple ways to create an array, but initially, I want to create an array of strings, and my preferred way is to use the explicit syntax, but I will demonstrate both.
Run the following script in the PowerShell ISE:
|
1 2 3 4 |
$explicitArray = @("one","two","three") Write-Host "explicit: " $explicitArray $implicitArray = "one","two","three" Write-Host "implicit: $implicitArray" |
You should get output like:

Note that the two statements act the same way. However, I prefer using the explicit syntax as it makes it more obvious that I’m working with an array. If you look closely, you will notice that in the case of writing out the $implicitArray, instead of concatenating it to the output for Write-Host, I put it inside the double-quotes. PowerShell is smart enough to expand the variable inside double-quotes. Note that single-quotes will treat the string exactly as shown and will not expand the variable.
|
1 |
Write-Host 'implicit: $implicitArray' |
![]()
Note also that you can write out a string directly, without Write-Host simply by referencing it. However, in this case, you have to use a+ to perform concatenation.
|
1 2 |
"explicit direct write: " + $explicitArray "implicit direct write: $implicitArray" |

Now that I’ve covered some string and array basics, I will dive into how to use arrays and more to help automate your servers.
Create a Server List
Before you can begin, create a small file in your home directory called sqlserverlist.txt and put in the following:
one
two
three
Save the file. To read the file back, you can run
|
1 |
get-content -Path ".\sqlserverlist.txt" |
One issue you may realize right away is that if you are not in the right directory, you may get an error like the following:
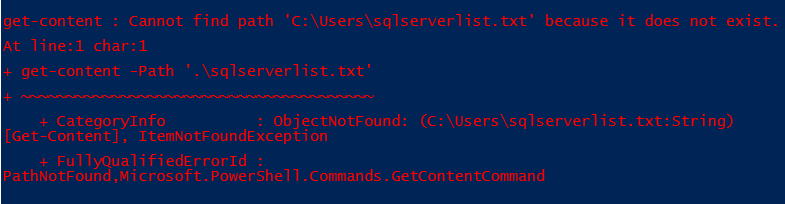
You can solve that by hardcoding the path:
|
1 |
get-content -Path "c:\temp\sqlserverlist.txt" |
Slight Detour: Environment Variables
I want to take a slight detour here and remind you of my last article where I demonstrated that you could use get-psdrive to see a list of objects that PowerShell can access.
|
1 |
get-psdrive |
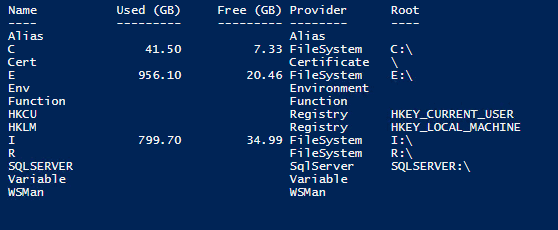
You may notice two interesting names, Env and Variable. Again, as a reminder, PowerShell treats everything as an object and Env is an object you can access.
On your system run the following command:
|
1 |
get-childitem ENV: |
You will see it returns a list of your environment variables. So, any environment variable set on your machine can be used within a PowerShell Script.
If you run
|
1 |
get-childitem Variable: |
You will see a list of all the variables currently within your PowerShell session. Some of these are set by PowerShell, and the rest are the ones you created.
To access your environment variables, you need to tell PowerShell you want to access that object as follows:
|
1 |
$ENV:variable |
For example, $ENV:COMPUTERNAME should return the name of your computer.
Detour Ends
If you want to keep the above file in your home directory you can also use a hardcoded path or dynamically generate one as follows:
|
1 |
get-content -Path "$env:HOMEDRIVE$env:HOMEPATH\sqlserverlist.txt" |
Note here you are taking advantage of the fact that when using double quotes, PowerShell will expand variables inside the string. Of course, you can put the file wherever works best for your needs.
You can take advantage of any environment variables you want that are set on your machine or by your domain login to access files in a common location.
So now you’re a step closer to having a central repository of all your servers in a simple text file.
The next step is to assign the values to an array as follows:
|
1 |
$serverlist = @(get-content -Path "$env:HOMEDRIVE$env:HOMEPATH\sqlserverlist.txt") |
Note here I used the explicit definition of an array as it makes it more clear to me later on that I’m creating an array of strings, not simply assigning the contents of this file to a simple string.
Next run:
|
1 2 3 4 |
foreach ($server in $serverlist) { write-host "server: $server" } |
You should have the following results, just as you would expect:

Obviously instead of write-host you could substitute a SQLcmd (if you run this now, you’ll get errors since since the file doesn’t contain real server names at this point):
|
1 2 3 4 5 6 7 |
$serverlist = @(get-content -Path "$env:HOMEDRIVE$env:HOMEPATH\sqlserverlist.txt") import-module sqlps foreach ($sqlserver in $serverlist) { cd sqlserver:\sql\$sqlserver ls logins -force| select-object name,ispasswordexpired, MustChangePassword, isdisabled, passwordexpirationenabled | format-table } |
You should recognize this script from the previous article, but this time instead of explicitly creating the array in the script, it’s now reading in from an external file. This means that, if you add a server to your network, you only need to update a single file, sqlserverlist.txt and all your scripts should work as before, but now also work on the new server.
That’s definitely an improvement over updating 20 different scripts every time you add or remove a server from your network. However, if you’re like most companies, you may have servers in different groups that you need to treat differently. For example, you might need to treat Production servers differently from Dev servers. You also might want to do things differently depending on the version of the OS or SQL Server.
Objects to the Rescue
Once again the key to the solution is to think in terms of objects. Specifically, your SQL Server is more than simply a name; it’s an object and should be treated as one.
Up until now, all the scripts you’ve run have used built-in objects. However, you can also create your own objects. Like string handling, there are multiple ways to create an object. For now, though, I will show you how to create an object explicitly. Once you get the hang of it, you can use some of the other methods of creating objects that use less verbiage.
Run the following code to create an object:
|
1 2 3 4 5 |
$serverObject = New-Object -TypeName psobject $serverObject | Add-Member -MemberType NoteProperty -Name ComputerName -Value "one" $serverObject | Add-Member -MemberType NoteProperty -Name Environment -Value "Production" $serverObject | Add-Member -MemberType NoteProperty -Name SQLVersion -Value "2016" $serverObject | Add-Member -MemberType NoteProperty -Name OSVersion -Value "2012" |
If you then run:
|
1 |
Write-Host $serverObject |
You should see:

You can also run:
|
1 |
$serverObject | gm | ogv |
Now you should see:

You will notice that your object automatically has some methods built in.
For example, if you run:
|
1 |
$serverobject.GetType() |
You will see:

Notice the base type is a System.Object.
If you run:
|
1 |
$explicitArray.GetType() |
You will get

This makes sense, because $explicitArray is an array. It was explicitly created above. Additionally, if you run:
|
1 |
$implicitArray.GetType() |
You will get the same results:

In other words, PowerShell is smart enough to recognize that both objects, $explicitArray and $implicitArray are objects of type System.Array, even though you created them using different syntax.
You may find yourself using the .GetType() method often to keep track of what type of objects you are working with.
Finally run:
|
1 |
Write-host $serverObject.ComputerName |
You should see:
![]()
If you type
|
1 |
write-host $serverobject.Environment |
You should see:
![]()
You now have an object that provides more than simply the name of a server. You can add more properties if you want, but the ones here are enough for moving forward.
To make use of this object, you will need to save it to a file.
Your first inclination might be to do something like:
|
1 |
$serverObject | out-file -FilePath "$env:HOMEDRIVE$env:HOMEPATH\sqlserverobjectlist.txt" |
That appears to work until you look at the file and see:

This output is not ideal. With some effort, you could get rid of the header information, but then you might face other issues. For example what if your Environment for another server is called Dev and QA. This means you can’t rely on spaces to delimit your properties. You can perhaps then wrap your properties in single quotes and do other fancy stuff, but very quickly this becomes complex. I’d prefer a simpler solution.
JSON is the rage among all the kids these days, and this provides a simple and convenient solution.
Run:
|
1 |
ConvertTo-Json $serverObject |
You should see the following:
If you pipe that to Out-file as follows:
|
1 |
ConvertTo-Json $serverObject | out-file -FilePath "$env:HOMEDRIVE$env:HOMEPATH\sqlserverobjectlist.json" |
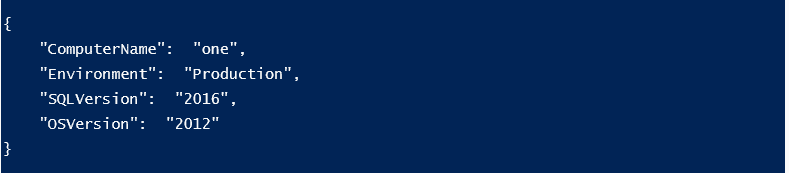
Now if you look at the output file you will see:

This output looks useful.
To continue, replace the contents of the file that was created with this JSON:
|
1 2 3 4 5 6 7 8 9 10 11 12 13 14 15 16 17 18 19 20 |
[ { "ComputerName": "one", "Environment": "Production", "SQLVersion": "2016", "OSVersion": "2012" }, { "ComputerName": "two", "Environment": "DEV", "SQLVersion": "2016", "OSVersion": "2012" }, { "ComputerName": "three", "Environment": "TEST", "SQLVersion": "2017", "OSVersion": "2012" } ] |
Notice now you still have three servers, but you have more complete information about them. Save the above file.
Now run the following:
|
1 |
Get-Content -Raw -Path "$env:HOMEDRIVE$env:HOMEPATH\sqlserverobjectlist.json" | ConvertFrom-Json |
You should see the following output:

Now you’ve made progress!
Assign that input to a variable:
|
1 |
$serverobjlist = Get-Content -Raw -Path "$env:HOMEDRIVE$env:HOMEPATH\sqlserverobjectlist.json" | ConvertFrom-Json |
Now you can actually do something useful:
|
1 2 3 4 5 6 7 8 9 10 11 12 13 14 15 16 |
$serverobjlist = Get-Content -Raw -Path "$env:HOMEDRIVE$env:HOMEPATH\sqlserverobjectlist.json" | ConvertFrom-Json foreach ($server in $serverobjlist) { if ($server.environment -eq "Production") { Write-host "$($server.ComputerName) is a production server" } else { Write-Host "$($server.ComputerName) is a $($server.Environment) server" } if ($server.SQLVersion -lt "2017") { Write-Host "$($server.ComputerName) doesn't have the latest and greatest. Send email to finance to request money to upgrade!" } } |
You could have more useful commands in there, but this shows how you can do different things depending on the environment or version. One thing that you should notice is that you have to wrap the $server.ComputerName and $server.Environment in parenthesis preceded by an additional $. This seems strange, but the reason is to force the $server object to expand the property and then treat that as a variable to embed in the string. If you left off the encapsulation, you would see something like:

This is because PowerShell would expand the entire object and then append the string .computername to it.
The above script is a bit silly but illustrates how you can use the $server.environment property to perform useful operations. Most likely though, you will want to use the same script, but in different environments.
Save the following script to a file called Server Script with passed in parameter.ps1.
|
1 2 3 4 5 6 7 8 9 10 11 12 13 14 15 16 17 |
if ($args.count -eq 0) { Write-Host "You must enter an environment name!" return } else { $environment = [string]$args[0] $serverobjlist = Get-Content -Raw -Path "$env:HOMEDRIVE$env:HOMEPATH\sqlserverobjectlist.json" | ConvertFrom-Json foreach ($server in $serverobjlist) { if ($server.Environment -eq $environment) { Write-Host "The following operation will be done on server $($Server.ComputerName)" } } } |
If you simply run the script from within the Windows Powershell ISE, you should get
![]()
This makes sense since you did not pass in an environment name.
From the lower command window in ISE enter
|
1 |
& '.\Server Script with passed in parameter.ps1' "DEV" |
The & is telling the ISE that you’re calling a script.
You should see:

Here are two changes you can make to the script:
|
1 2 3 4 5 6 7 8 9 10 11 12 13 14 |
param([string]$environment) if ($environment -eq "") { Write-Host "You must enter an environment name!" return } else { $serverobjlist = Get-Content -Raw -Path "$env:HOMEDRIVE$env:HOMEPATH\sqlserverobjectlist.json" | ConvertFrom-Json foreach ($server in $serverobjlist | where-object {$_.Environment -eq $environment}) { Write-Host "The following operation will be done on server $($Server.ComputerName) in the $environment Environment" } } |
Note in the first, there is a new block, which has to be the first block in the file, a param block. In this case, it only specifies a single parameter called $environment. However, you could specify multiple parameters (such as $OSVersion or $SQLVersion). You can also assign default values if you wish.
The advantage of this solution is, when you’re typing the command from the PowerShell Command Line, if you enter – after the command, you will be prompted for the parameter name. This makes it much easier for a new user to know what parameters are required. As long as you enter the full parameter name as shown below, you can enter parameters in any order you want. This reduces errors.
Save the modified script to Server Script with passed in parameter version 2.0.ps1 and run the next command in the ISE command window:
|
1 |
& '.\Server Script with passed in parameter version 2.0.ps1' -environment "dev" |
And you should get:
![]()
The second change made was to pipe the loop through a Where-object cmdlet. This lets you reduce the verbiage a bit. Either this method or the previous one will give the same results, but this shortens the script a bit. I tend to prefer this method.
This also allows one more minor change:
|
1 2 3 4 5 6 7 8 9 10 11 12 13 14 |
param([string]$environment) if ($environment -eq "") { Write-Host "You must enter an environment name!" return } else { $serverobjlist = Get-Content -Raw -Path "$env:HOMEDRIVE$env:HOMEPATH\sqlserverobjectlist.json" | ConvertFrom-Json foreach ($server in $serverobjlist | where-object {$_.Environment -in $environment.split(",")}) { Write-Host "The following operation will be done on server $($Server.ComputerName) in the $($Server.Environment) Environment" } } |
Notice the user of .split(“,”) on the $environment variable, and I’ve changed the output string to use $($Server.Environment) value since now it is specific to the server in question.
This allows you to run the following after saving the new file:
|
1 |
& '.\Server Script with passed in parameter version 3.0 with split.ps1' -environment "dev,production" |
You should see:

This allows you to run the script against more than one environment at the same time. One caveat is, in this case, you must wrap your list of environments in quotes.
Conclusion
This article has given you the tools to take any existing PowerShell Scripts you’ve created to manage your SQL Servers and expand them so you can maintain a central list of SQL Servers. You can also store related information control how the scripts run based on the environment or other factors.

Load comments