There are better and more interesting things to do than the tedious task of writing tons of almost similar SSIS packages for importing text files into your data warehouse. So, why not automate this task? This article will show you how.
First, a very short introduction to Biml and BimlScript: Biml (Business Intelligence Markup Language) is a domain-specific XML dialect for defining data models, ETL-processes and multidimensional models. BimlScript is an extension of Biml where you can write C# or VB.NET code that makes your Biml documents dynamic. It's similar to the way ASP.NET is used for producing HTML. For more details, I suggest also reading the Stairway to Biml written by Andy Leonard.
You have two options to use when writing Biml/BimlScript. The first is BIDS Helper. This is a free add-on for Visual Studio that every Business Intelligence developer should have. Read more about BIDS Helper here. There will be some necessary configuration in Visual Studio to use this.
The second option is MIST, which is a commercial product from Varigence (the company behind Biml and BimlScript). MIST provides additional functionality and a much better user experience than BIDS Helper.
Start of walkthrough - Example files
Let's start with two example files. Of course this whole thing makes more sense the more files you have, but for demo purposes I think it's enough with two.
I've created this first file containing winners of the Eurovision Song Contest, but the contents really doesn't matter for this walkthrough.
EurovisionWinners.txt
Year;HostCity;WinningCountry;SongTitle;Performer 2005;Kiev;Greece;My Number One;Helena Paparizou 2006;Athens;Finland;Hard Rock Hallelujah;Lordi 2007;Helsinki;Serbia;Molitva;Marija Serifovic 2008;Belgrade;Russia;Believe;Dima Bilan 2009;Moscow;Norway;Fairytale;Alexander Rybak 2010;Oslo;Germany;Satellite;Lena 2011;Düsseldorf;Azerbaijan;Running Scared;Ell & Nikki 2012;Baku;Sweden;Euphoria;Loreen 2013;Malmö;Denmark;Only Teardrops;Emmelie de Forest 2014;Copenhagen;Austria;Rise Like a Phoenix;Conchita Wurst 2015;Vienna;Sweden;Heroes;Måns Zelmerlöw The second file represents potential venues for the Eurovision Song Contest 2016.
Venues.txt
City;Venue;Capacity
Göteborg;Scandinavium;14000
Göteborg;Ullevi;75000
Malmö;Malmö Arena;15500
Stockholm;Ericsson Globe;16000
Stockholm;Friends Arena;65000
Stockholm;Tele2 Arena;45000
The files are saved in ANSI-format through Notepad. Download the attached files if you don't want to create your own.
Step 1 - Create the tables
My example assumes you have a database named JohanBimlDemo. Of course you can replace with your own name, but then you need to replace the name in the scripts.
Using MIST
MIST can help you autogenerate the tables for importing the files. Unfortunately BIDS Helper doesn't have this functionality.
In order to create the tables, I use a BimlScript that reads the top row of each file and collects the column names from there. One table is created per file (only one in our example, but could be extended). Each column is assigned the Biml type "string" (means nvarchar) with a maximum length of 4000. You could of course improve this logic by reading more rows and determining a better datatype.
Before running the script, change "directory" so that it points to the location of your files.
<Biml xmlns="http://schemas.varigence.com/biml.xsd">
<#+
// Create tables BimlScript
// by Johan Åhlén 2015
// Settings here...
const string directory = @"C:\Johan\Dev\BimlDemo";
const char separator = ';';
#>
<Connections>
<Connection Name="JohanBimlDemoConnection" ConnectionString="Provider=SQLNCLI11;Data Source=localhost;Integrated Security=SSPI;Initial Catalog=JohanBimlDemo" />
</Connections>
<Databases>
<Database Name="JohanBimlDemo" ConnectionName="JohanBimlDemoConnection" />
</Databases>
<Schemas>
<Schema Name="Import" DatabaseName="JohanBimlDemo" />
</Schemas>
<Tables>
<# foreach (var filename in System.IO.Directory.EnumerateFiles(directory, "*.txt")) { #>
<Table Name="<#= System.IO.Path.GetFileNameWithoutExtension(filename) #>" SchemaName="JohanBimlDemo.Import">
<Columns>
<Column Name="RowId" DataType="Int32" IdentityIncrement="1" IsNullable="false"/>
<# var sr = new System.IO.StreamReader(filename);
var firstRow = sr.ReadLine();
sr.Close();
var columnNames = firstRow.Split(separator);
foreach (var columnName in columnNames) { #>
<Column Name="<#= columnName #>" DataType="String" Length="4000" IsNullable="false"/>
<# } #>
</Columns>
<Keys>
<PrimaryKey Name="PK_<#= System.IO.Path.GetFileNameWithoutExtension(filename) #>" Clustered="true">
<Columns>
<Column ColumnName="RowId"/>
</Columns>
</PrimaryKey>
</Keys>
</Table>
<# } #>
</Tables>
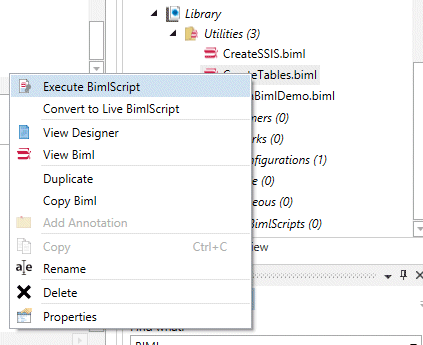
</Biml>The script should be created under Library/Utilities in MIST. Then right click on the script and choose "Execute BimlScript".
After executing the script, you will have the option in MIST to autogenerate the T-SQL code to create the tables.
Without MIST
You will have to create the tables manually. Here's the script for our example:
USE [JohanBimlDemo];
GO
CREATE SCHEMA [Import] AUTHORIZATION [dbo];
GO
CREATE TABLE [Import].[EurovisionWinners]
(
    [RowId] INT IDENTITY(1, 1) PRIMARY KEY CLUSTERED
,   [Year] NVARCHAR(4000) NOT NULL
,   [HostCity] NVARCHAR(4000) NOT NULL
,   [WinningCountry] NVARCHAR(4000) NOT NULL
,   [SongTitle] NVARCHAR(4000) NOT NULL
,   [Performer] NVARCHAR(4000) NOT NULL
);
CREATE TABLE [Import].[Venues]
(
    [RowId] INT IDENTITY(1, 1) PRIMARY KEY CLUSTERED
,   [City] NVARCHAR(4000) NOT NULL
,   [Venue] NVARCHAR(4000) NOT NULL
,   [Capacity] NVARCHAR(4000) NOT NULL
);
Step 2 - BimlScript for the SSIS packages
Our goal is to create one package per file that first truncates the table and then loads it with data.

This is possible to autogenerate both from BIDS Helper and MIST.
Our BimlScript file needs to generate the following Biml objects:
- FileFormat - that describes the structure of the files we are importing
- FlatFileConnection - that referes to the file name
- Project - that acts as a container for the packages
- Package - the SSIS packages
The details of these objects can be found in the BimlScript below. Change "directory" so that it points to the location of your files.
<Biml xmlns="http://schemas.varigence.com/biml.xsd">
<#+
    // BimlScript to autogenerate tables and SSIS-packages for loading extract files
    // By Johan Åhlén 2015

    // Settings here...
    const string directory = @"C:\Johan\Dev\BimlDemo";
    const char separator = ';';
    const string codepage = "1252"; // ANSI
#>

<#+
    // This class and the list "files" will contain necessary information
    public class ExtractFileInfo
    {
        public string Path;
        public string FilenameWithoutExtension;
        public string[] Columns;
        public bool IsLastColumn(string column) { return column == Columns[Columns.Length - 1]; }
    }
    System.Collections.Generic.List<ExtractFileInfo> files = new System.Collections.Generic.List<ExtractFileInfo>();
#>
<#
    foreach (var filepath in System.IO.Directory.EnumerateFiles(directory, "*.txt")) {
        var sr = new System.IO.StreamReader(filepath);
        var firstRow = sr.ReadLine();
        sr.Close();
        var efi = new ExtractFileInfo { Path = filepath, FilenameWithoutExtension = System.IO.Path.GetFileNameWithoutExtension(filepath), Columns = firstRow.Split(separator) };
        files.Add(efi);
    }
#>

    <Databases>
        <Database Name="JohanBimlDemo" ConnectionName="JohanBimlDemoConnection" />
    </Databases>
    <Schemas>
        <Schema Name="Import" DatabaseName="JohanBimlDemo" />
    </Schemas>

    <Tables>
<# foreach (var file in files) { #>
        <Table Name="<#= file.FilenameWithoutExtension #>" SchemaName="JohanBimlDemo.Import">
            <Columns>
<# foreach (var column in file.Columns) { #>
                <Column Name="<#= column #>" DataType="String" Length="4000" IsNullable="false"/>
<# } #>
            </Columns>
        </Table>
<# } #>
    </Tables>

    <FileFormats>
<# foreach (var file in files) { #>
        <FlatFileFormat Name="<#= file.FilenameWithoutExtension #>_Format" CodePage="<#= codepage #>" ColumnNamesInFirstDataRow="true" RowDelimiter="CRLF" IsUnicode="false">
            <Columns>
                <# foreach (var column in file.Columns) { #>
                <Column Name="<#= column #>" Length="4000" DataType="String" Delimiter="<#= !file.IsLastColumn(column) ? separator.ToString() : "CRLF" #>" MaximumWidth="4000" />
                <# } #>
            </Columns>
        </FlatFileFormat>
        <# } #>
    </FileFormats>

    <Connections>
        <Connection Name="JohanBimlDemoConnection" ConnectionString="Provider=SQLNCLI11;Data Source=localhost;Integrated Security=SSPI;Initial Catalog=JohanBimlDemo" />
<# foreach (var file in files) { #>
        <FlatFileConnection Name="<#= file.FilenameWithoutExtension #>_FileConnection" DelayValidation="true" FileFormat="<#= file.FilenameWithoutExtension #>_Format" FilePath="<#= file.Path #>"/>
<# } #>
    </Connections>

    <Projects>
        <PackageProject Name="JohanBimlDemoProject" ProtectionLevel="EncryptSensitiveWithUserKey">
            <Packages>
<# foreach (var file in files) { #>
                <Package PackageName="Load_<#= file.FilenameWithoutExtension #>"/>
<# } #>
            </Packages>
        </PackageProject>
    </Projects>

    <Packages>
<# foreach (var file in files) { #>
        <Package Name="Load_<#= file.FilenameWithoutExtension #>" ProtectionLevel="EncryptSensitiveWithUserKey">
            <Tasks>
                <ExecuteSQL Name="Truncate" ConnectionName="JohanBimlDemoConnection">
                    <DirectInput>TRUNCATE TABLE [Import].[<#= file.FilenameWithoutExtension #>];</DirectInput>
                </ExecuteSQL>
                <Dataflow Name="Load">
                    <PrecedenceConstraints>
                        <Inputs>
                            <Input OutputPathName="Truncate.Output"/>
                        </Inputs>
                    </PrecedenceConstraints>
                    <Transformations>
                        <FlatFileSource Name="Src" ConnectionName="<#= file.FilenameWithoutExtension #>_FileConnection" />
                        <OleDbDestination Name="Dst" DefaultCodePage="<#= codepage #>" ConnectionName="JohanBimlDemoConnection">
                            <InputPath OutputPathName="Src.Output"/>
                            <ExternalTableOutput Table="[Import].[<#= file.FilenameWithoutExtension #>]" />
                        </OleDbDestination>
                    </Transformations>
                </Dataflow>
            </Tasks>
        </Package>
<# } #>
    </Packages>
</Biml>
The script above also includes the table definitions (from step 1). I include it for convenience so that you have everything in one script. BIDS Helper will just ignore it so you won't run into any problems.
Step 3 - Generate the SSIS packages
Note that this demo has two example files and will generate two SSIS packages. If you add more files, you can just reexecute the BimlScript to create the SSIS packages for your new files.
Using MIST
Include the BimlScript in your project, right click on it and choose "Execute BimlScript". Then right click on your project and choose "Build" to get your SSIS packages.
The autogenerated SSIS packages will be placed in the output folder of your MIST project. You can open them from Visual Studio.
Using BIDS Helper
Start Visual Studio and create a new Integration Services project. Right-click on the project and choose "Add New Biml File".

After creating the Biml file (actually you are adding a BimlScript file), run it by right clicking on the file and choosing "Generate SSIS Packages".

The autogenerated SSIS packages will be automatically added to your project.
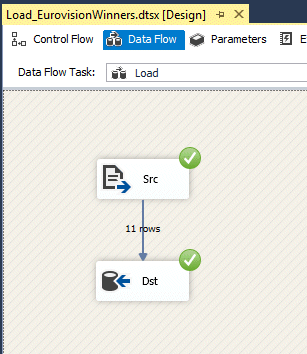
Step 4 - Test your SSIS packages
Open your newly created SSIS packages in Visual Studio and enjoy!