The series so far:
- Introduction to Game Development with Unity and C#
- Using C# Functions in Your Animations
- Procedural Generation with Unity and C#
- Pathfinding with Unity and C#
- Extending the Unity Editor with C#
- Using Unity UI and C# to Create a Tic-Tac-Toe Game
Animations are what make a game go from dull to exciting. Imagine playing Super Mario Bros without Mario’s animations. This would mean that anytime you move, you’d just be moving a static image across the level. That wouldn’t be very exciting, would it? Often taken for granted, animations play a vital role in giving a game its tone and personality.
Now what if you were told that animations could do more than just bringing an object to life? What if you could use functions you wrote in C# during specific frames of an animation in your game? Turns out, it is possible to time certain code actions to an animation frame, whether it be something as simple as changing a boolean variable to creating a fireball in the player’s hand. Virtually anything is possible if you know how to do it. Even better, the Unity game engine gives us an easy way to use animations and code in tandem.
Setting up the Project
The first task that you must do is to create the project. Open Unity and select New on the projects screen as shown in Figure 1.

Figure 1: Creating a new project
Call your project Animations and Functions and set it as a 2D project. Figure 2 shows what your screen should look like.
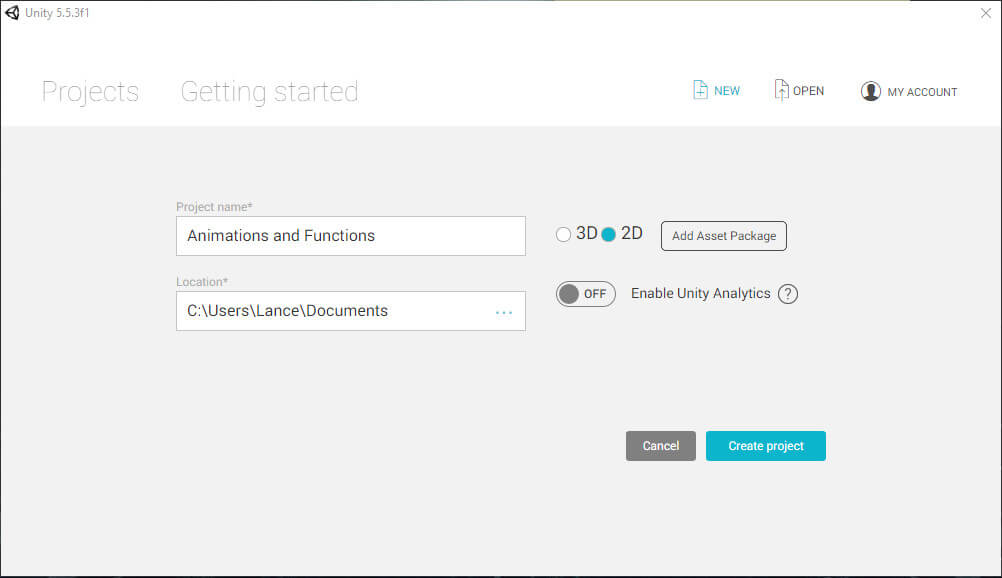
Figure 2: The final new project set up screen
Click Create Project near the bottom of the window and allow Unity a moment to create the project. Once it’s completed, you’ll be greeted with a blank project as shown in Figure 3.
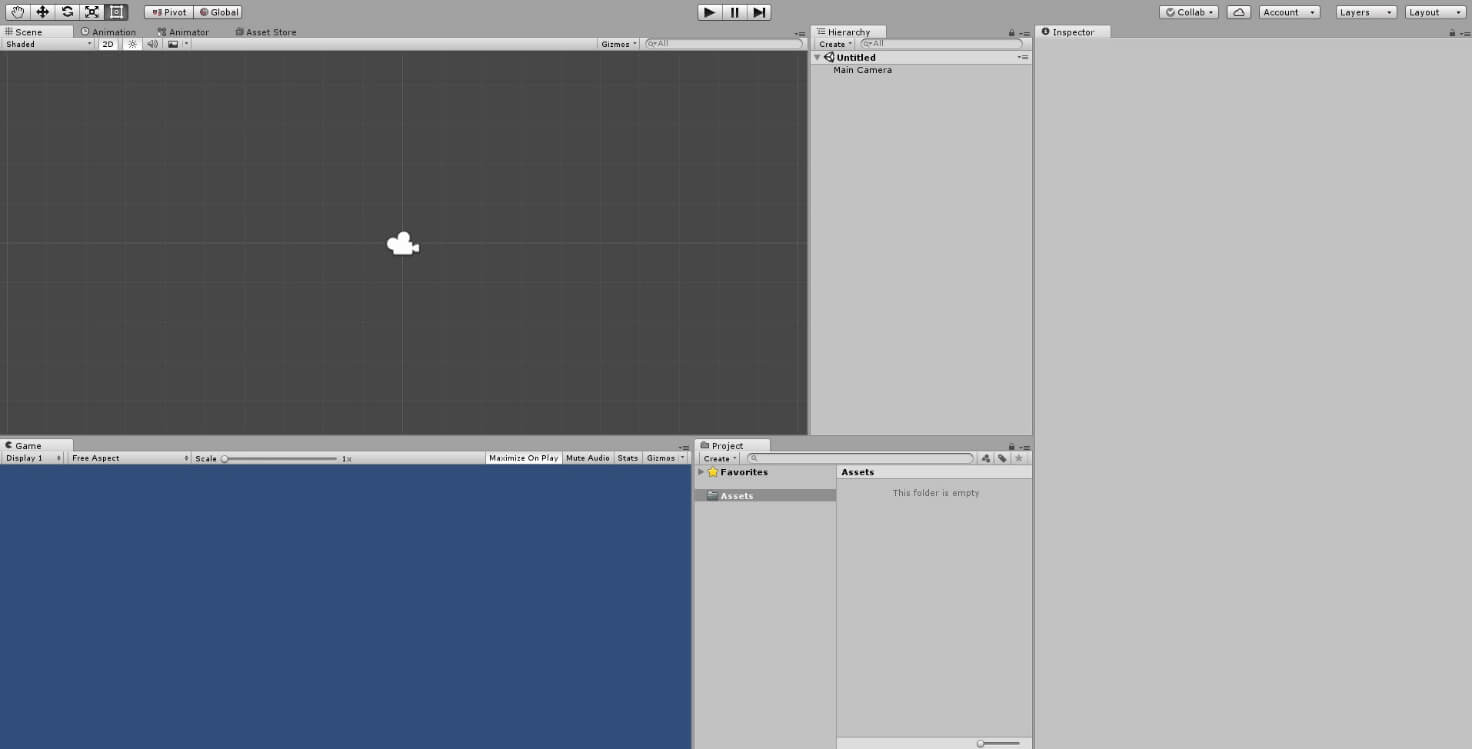
Figure 3: New 2D project
You’re going to borrow some assets created by Unity Technologies to make this project work. To do that, you’ll need to make a visit to Unity’s asset store. You can find the asset store by going to the top of the screen, selecting Window, and then selecting Asset Store. Figure 4 shows where to find this.
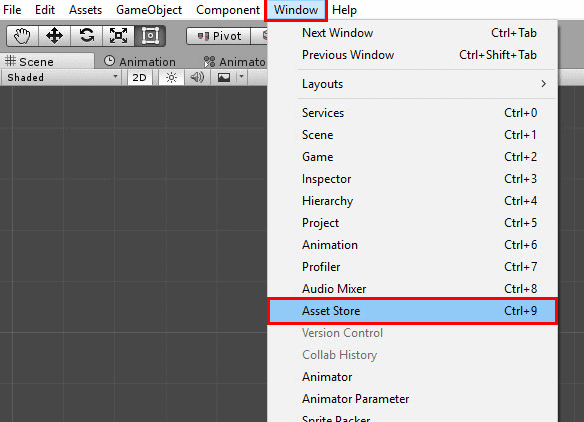
Figure 4: Accessing the Asset Store
Once this is done, you’ll be greeted by Unity’s asset store, a place where developers can purchase assets made by the community and use them as a base for their games. For this project, you won’t need to buy anything since Unity Technologies have provided these assets for free. Use the search box near the top of the asset store window to search 2D Roguelike as shown in Figure 5.
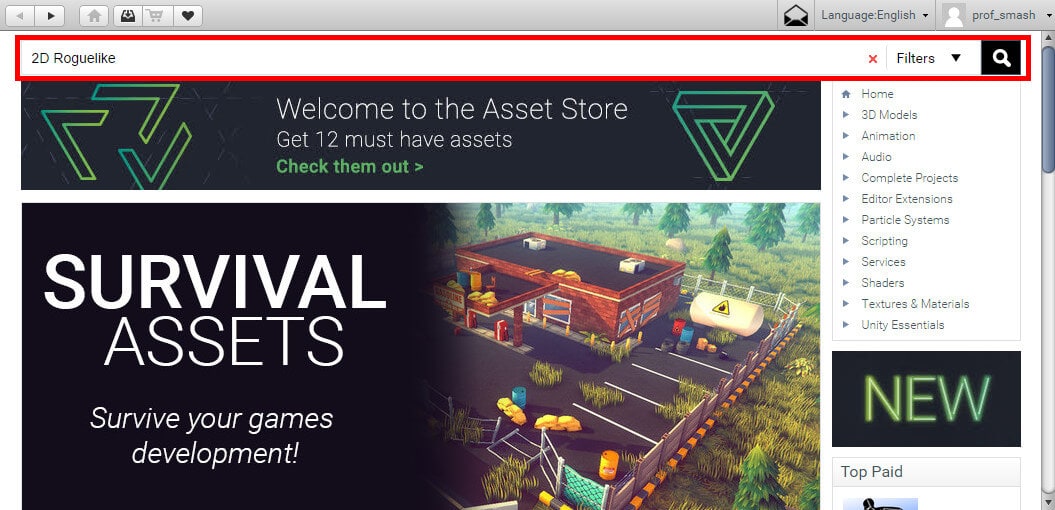
Figure 5: The asset store and what to search for.
Select the 2D Roguelike Unity Essentials at the top of the list. Figure 6 shows what to look for.
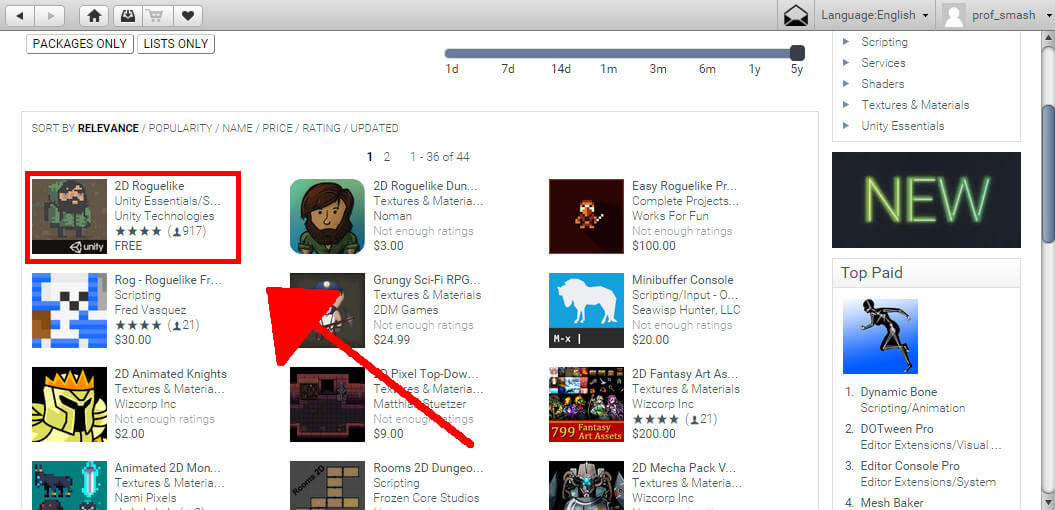
Figure 6: Where to find the ‘2D Roguelike Unity Essentials.’
Finally, select the Import button as shown in Figure 7 to import the 2D Roguelike assets into your current project. Note that it may say Download if this is the first time you’ve used this asset. Unity will most likely warn you that importing a complete project like 2D Roguelike will overwrite your current project settings. No project settings have been set at this point, so go ahead and continue with the import process.
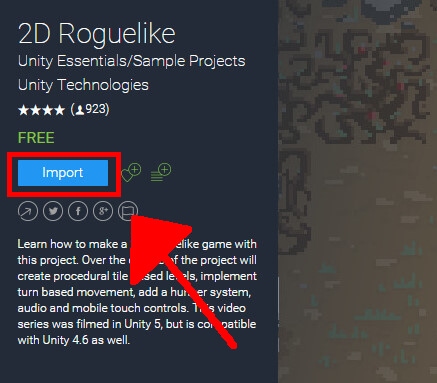
Figure 7: Click the ‘Import’ button.
Unity will then show you one more window showing a list of all the assets you’re about to import into your project. It should also show everything currently selected, which is what you want. Figure 8 shows what this window should look like.
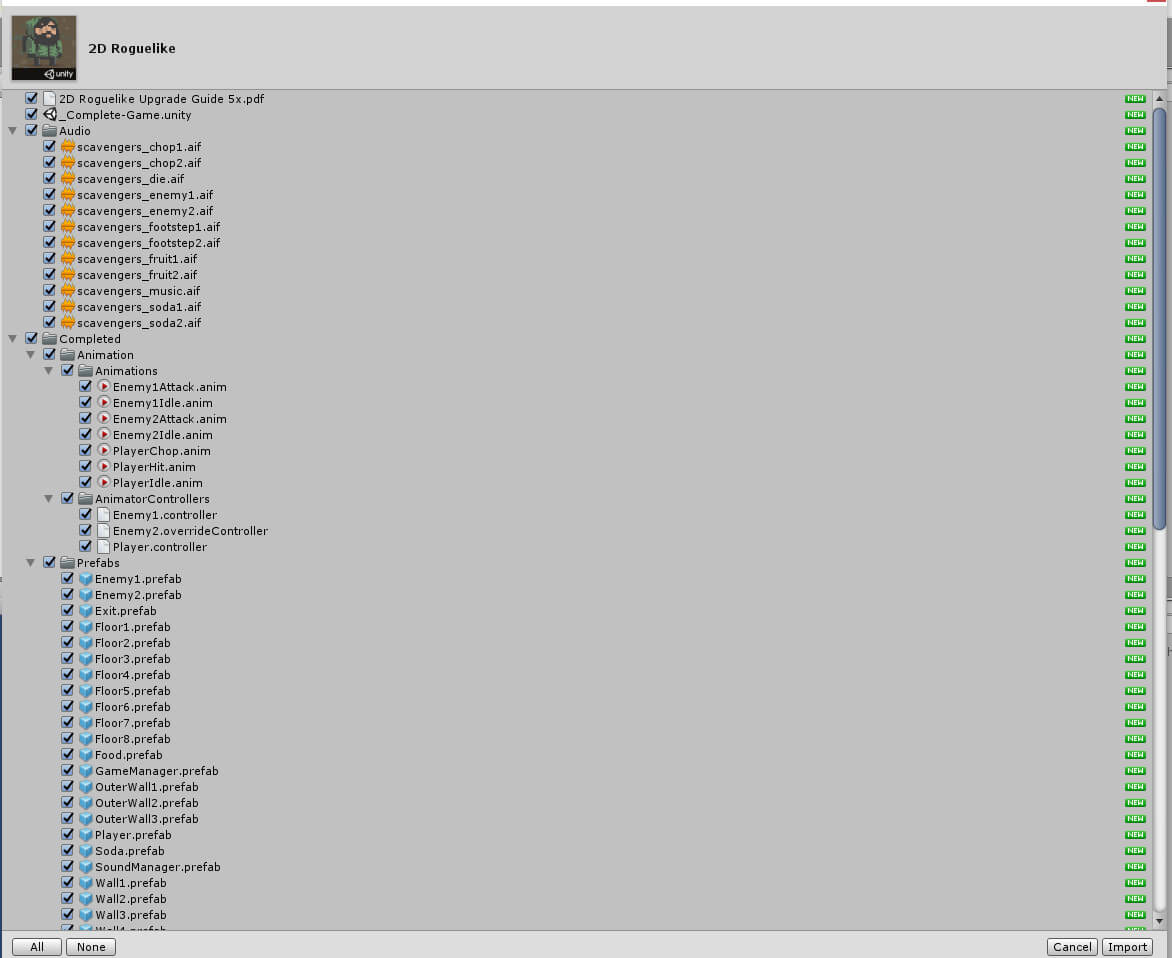
Figure 8: The import window. Everything should be selected for this project.
Import everything and allow Unity a moment to import the files into your project. Once it’s fininshed you’ll notice your Assets window near the bottom will have some new assets in it. Your assets window should look similar to the one as shown in Figure 9. Note that depending on your version of Unity, your Assets folder may look slightly different.
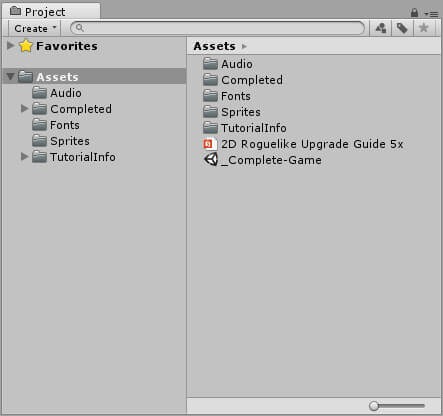
Figure 9: Your new assets window.
There are still a few items to complete before you can begin writing your code. Search for the Player object in the search box in the Assets window. Unity will pull up each asset with ‘player’ in the name, but you want the object with a blue cube icon in front of the name. Figure 10 shows what this object looks like.
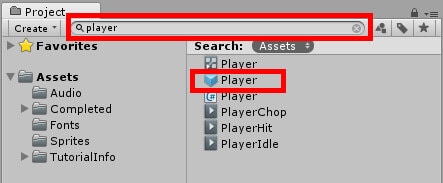
Figure 10: The player object needed for the project.
Drag this object into the hierarchy window just above the Assets window. This will place the Player object into the game world and automatically set both its X and Y coordinates to zero which is what you want. With the player object selected in the hierarchy, go to the Inspector window to the right and scroll down as far as you can. You should see a component called Player (Script) with several fields that should already be filled in. This component needs to be deleted, so right click on it and choose Remove Component. Figure 11 shows where to find this component.
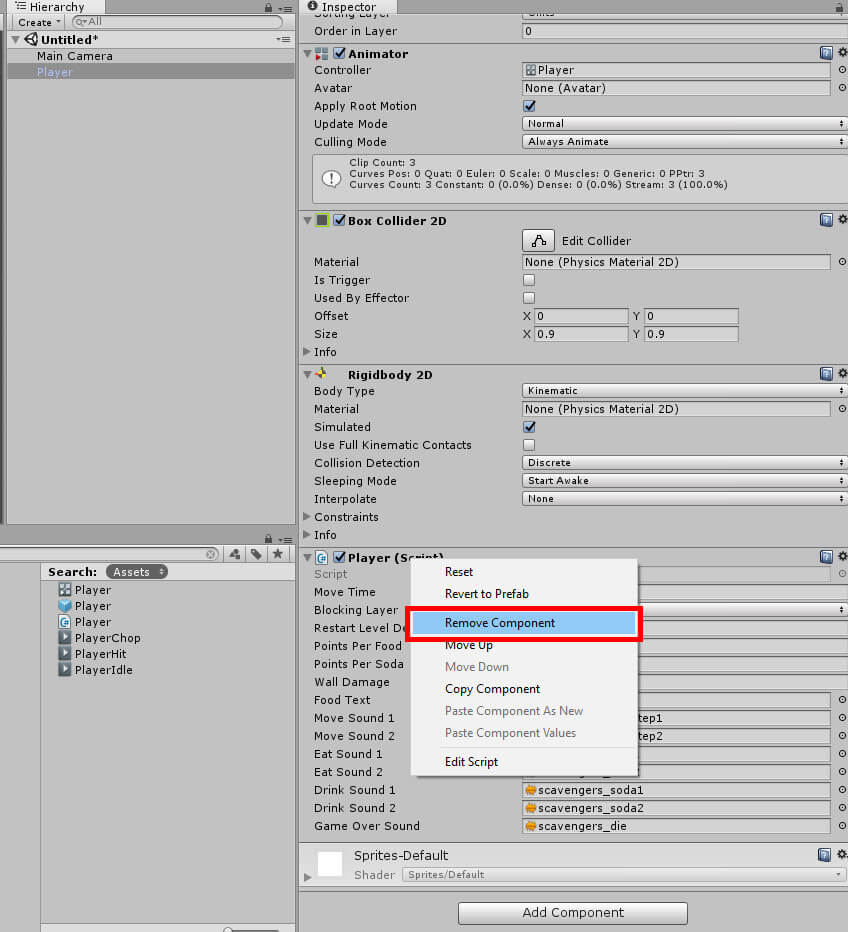
Figure 11: Removing the ‘Player’ script component from the player object.
Now you need a user interface (UI) for displaying the text. Go back to your Hierarchy window, select the Create button and then choose UI, then Text. Figure 12 shows where these options are.
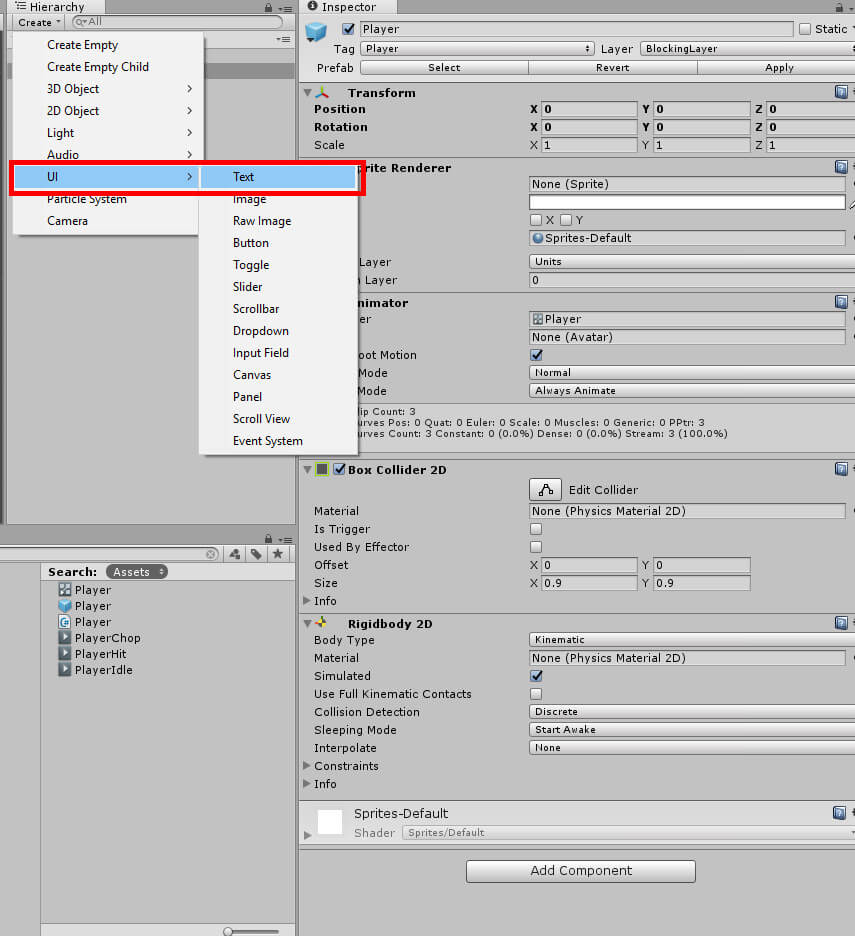
Figure 12: Setting up the UI.
Once you select Text, a canvas and text object will be created, shown in Figure 13.
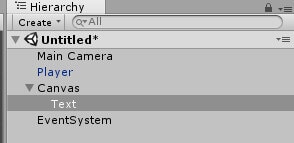
Figure 13: What your project’s hierarchy window should look like
Select the Text object in the hierarchy and press Ctrl+D twice to make two duplicates. Before continuing you should rename these objects. After selecting a text object, go to the inspector window and use the top most field to change the name. Figure 14 shows where this field is.
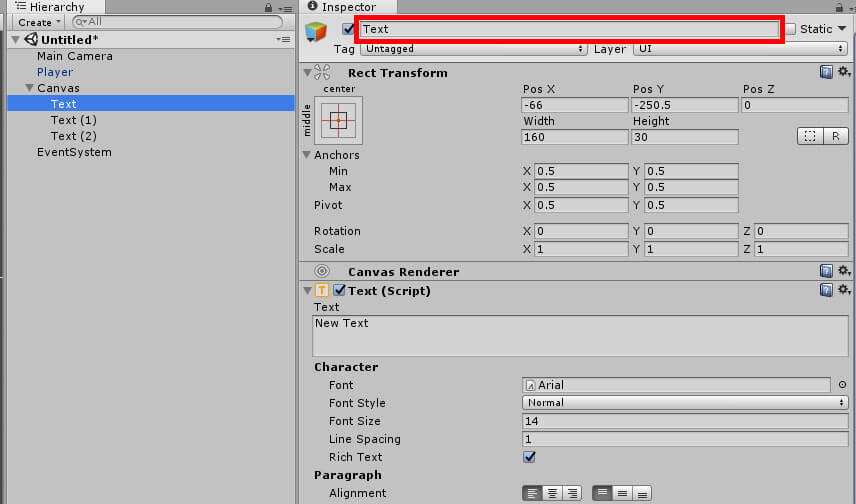
Figure 14: Where to change the name of an object.
Give each Text object one of the following names:
- Idle Count Text
- Hit Count Text
- Chop Count Text
When you’ve named your text objects your hierarchy should look like Figure 15.
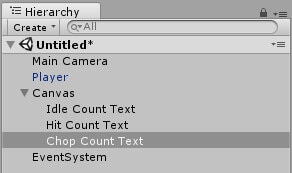
Figure 15: What your project’s hierarchy window should look like with the added text objects.
These text objects are going to keep track of how many times the corresponding animation is played. Now you have to set up some transitions in the animator. With the Player object selected, go to the top of the screen and select Window and this time choose Animator. Figure 16 shows where to find this.
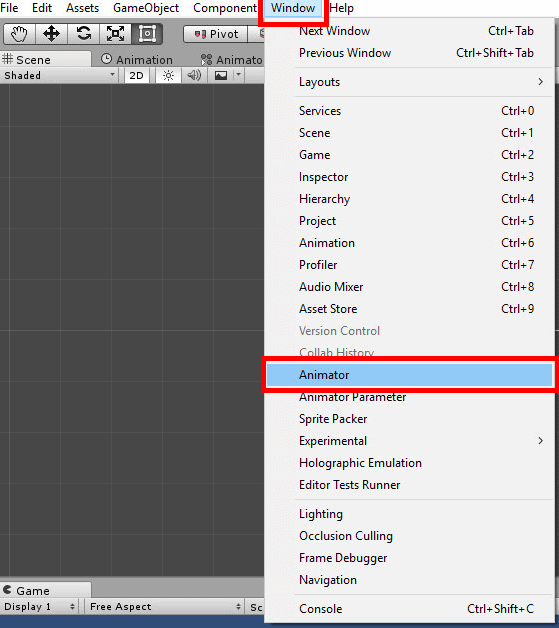
Figure 16: How to open the animator window.
Your Scene window should change to the Animator window shown in Figure 17. Make sure that the Parameters tab is also selected.
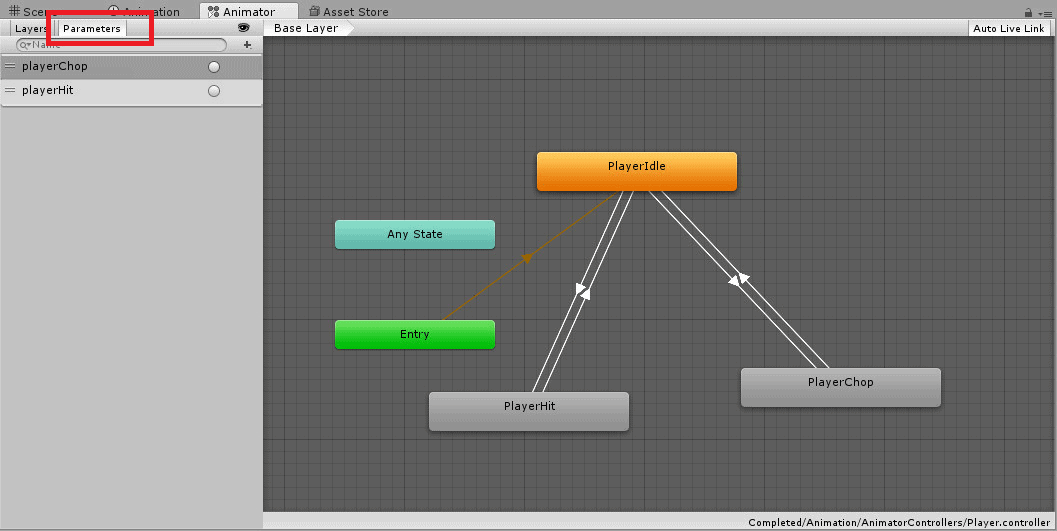
Figure 17: The Animator window.
First you need to add a new animation trigger to the triggers already included by the 2D Roguelike assets. Animation triggers in Unity are used to switch between an object’s animations, such as when an object is moving and when it’s standing still. Click the plus button shown in Figure 18 and select Trigger.
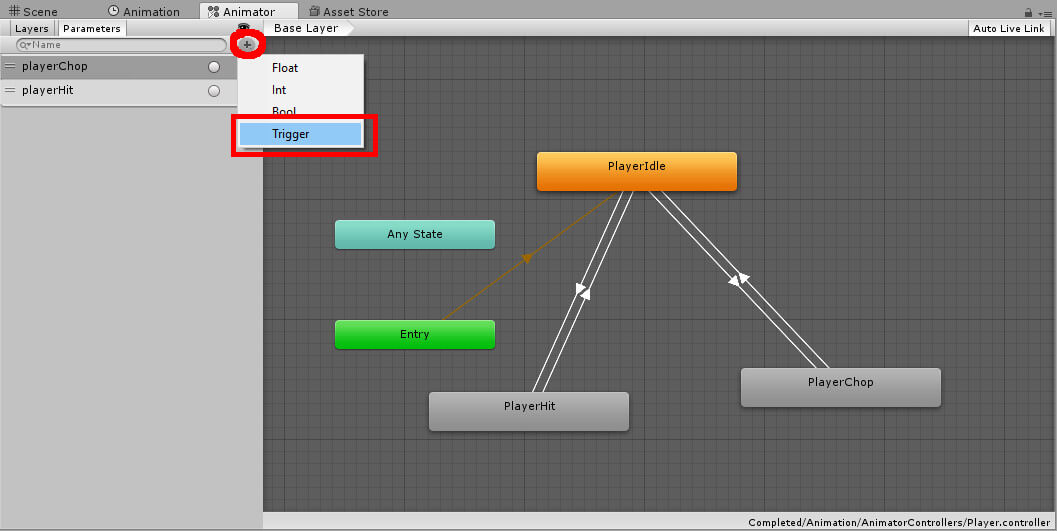
Figure 18: Adding a trigger.
Give your new animation trigger the name playerIdle as shown in Figure 19.
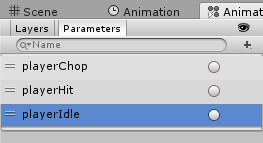
Figure 19: Full list of triggers.
To finish the setup you’ll need to create some new animation transitions as well as modify the existing transitions created by Unity Technologies. An animation transition is an item that allows an object to ‘transition’ between different animations. These transitions are represented by white arrows in the animator window and will activate by setting triggers in code, which is why you needed to make the PlayerIdle trigger. Without the triggers, you will be unable to transition between different animations, and if you can’t transition to different animations then the animation events you create later will never be called. To create a transition, you will right-click on an animation and select Make Transition and then connect it to another animation. With that in mind, right click the PlayerHit animation and select Make Transition as shown in Figure 20.
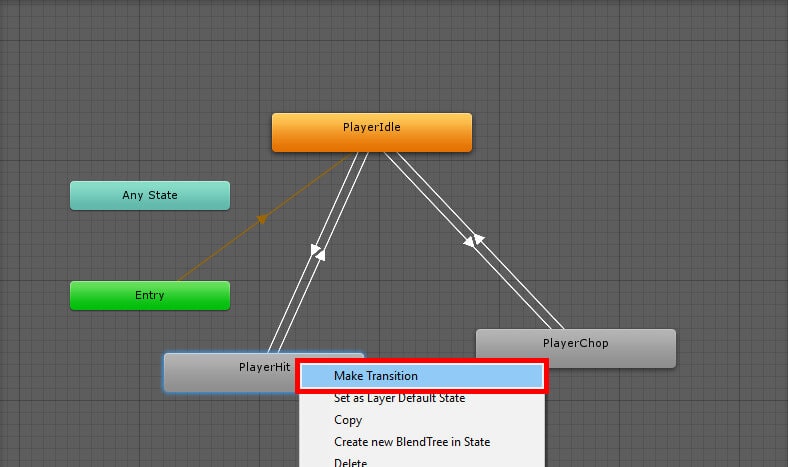
Figure 20: Creating a new transition.
Click on the PlayerChop animation in the animator to finish making the transition. Your animator window should look like the one in Figure 21.
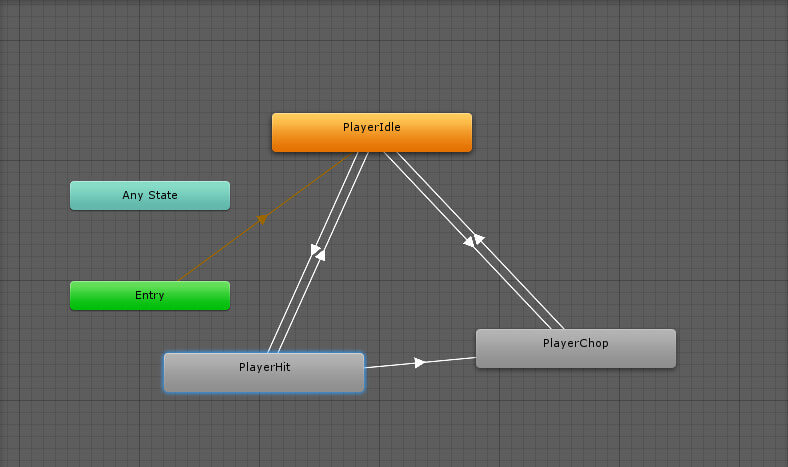
Figure 21: How your animator window should currently look.
You’ll need to do the same thing in reverse now. Right click the PlayerChop animation, select Make Transition and click on the PlayerHit animation. Once complete, your Animator window will look like Figure 22.
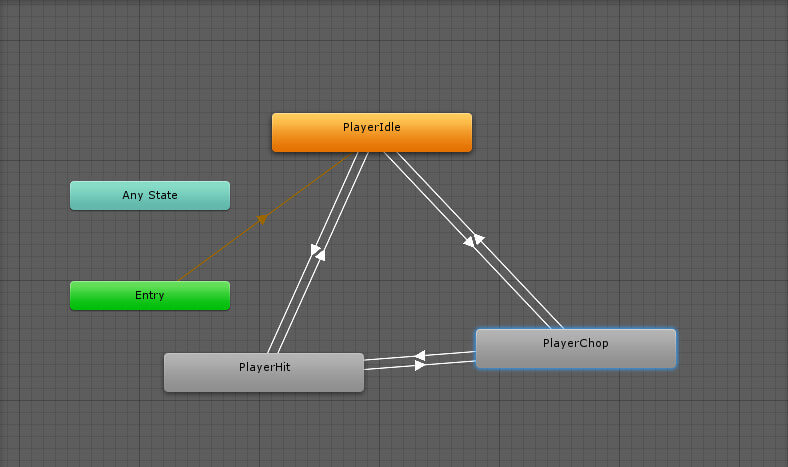
Figure 22: The animator window with all the transitions needed for the project.
As mentioned before, transitions only activate by assigning our triggers to these transitions. This is done by clicking on a transition arrow and setting the condition that will control when to transition to an object’s animation. Once this is complete, we will then be able to set the triggers in code and thus transition to different animations as desired. Since you imported the 2D Roguelike assets into your project, a couple of these transitions should already be done for you.
Start with the transition from PlayerHit to PlayerIdle by selecting it in the Animator window. Add the condition in the inspector window by clicking the plus button near the bottom right. Set this condition to playerIdle. Then be sure to uncheck the boxes that say Has Exit Time and Fixed Duration. Once complete, this transition should look like the one in Figure 23.
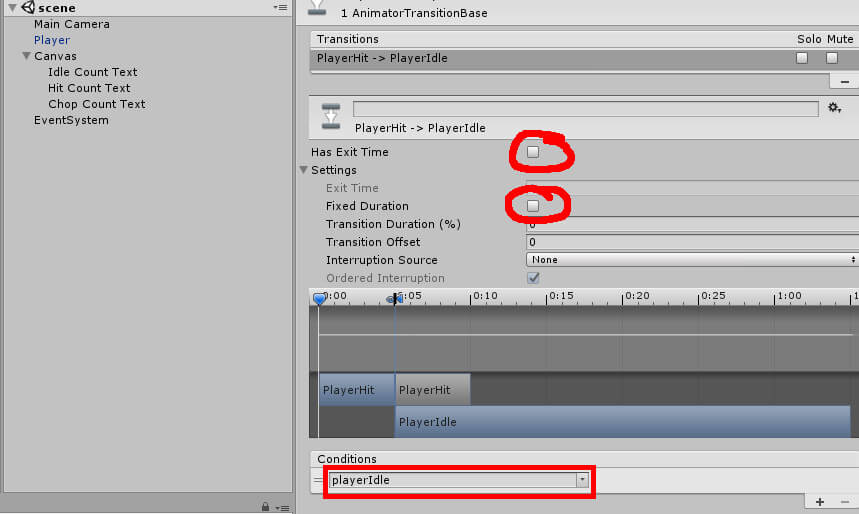
Figure 23: The PlayerHit to PlayerIdle transition condition.
The same thing must be done for all the other transitions, but different transitions will requre different conditions. Table 1 shows all the transitions for the project with the correct conditions.
Table 1: All animation transitions and the conditions to set for them
|
Transition |
Condition |
Has Exit Time? |
Fixed Duration? |
|
PlayerIdle -> PlayerHit |
playerHit |
FALSE |
FALSE |
|
PlayerIdle -> PlayerChop |
playerChop |
FALSE |
FALSE |
|
PlayerHit -> PlayerIdle |
playerIdle |
FALSE |
FALSE |
|
PlayerHit -> PlayerChop |
playerChop |
FALSE |
FALSE |
|
PlayerChop -> PlayerIdle |
playerIdle |
FALSE |
FALSE |
|
PlayerChop -> PlayerHit |
playerHit |
FALSE |
FALSE |
Once you have finished setting up all the transitions and their conditions, everything will be in place for coding, which means it’s time to create a new script and open Visual Studio. Go back to your scene window by clicking Window at the top and then Scene like in Figure 24.
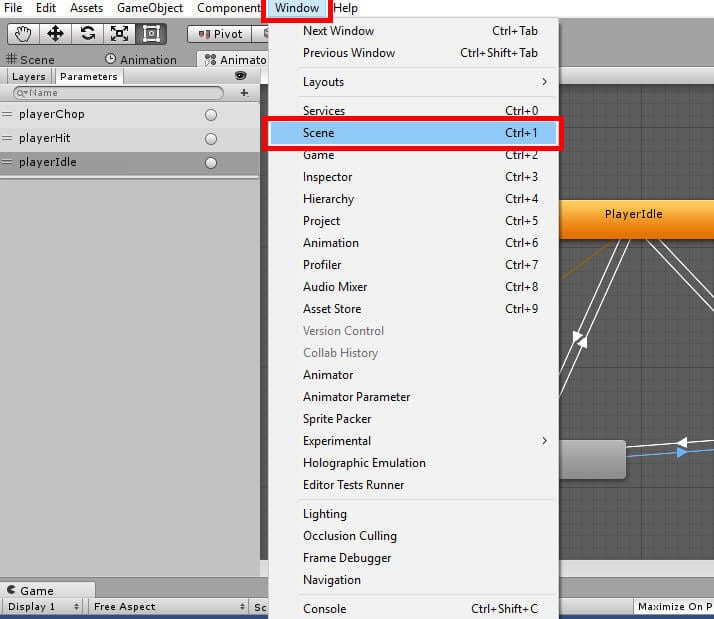
Figure 24: Going back to the scene window.
Select the Player object in the hierarchy, go to the Inspector window, and then scroll down to find the Add Component button. Select it and choose New Script. Then give the script the name AnimationCounter. Set your language as C Sharp (C#) and click Create and Add to create the script as shown in Figure 25.
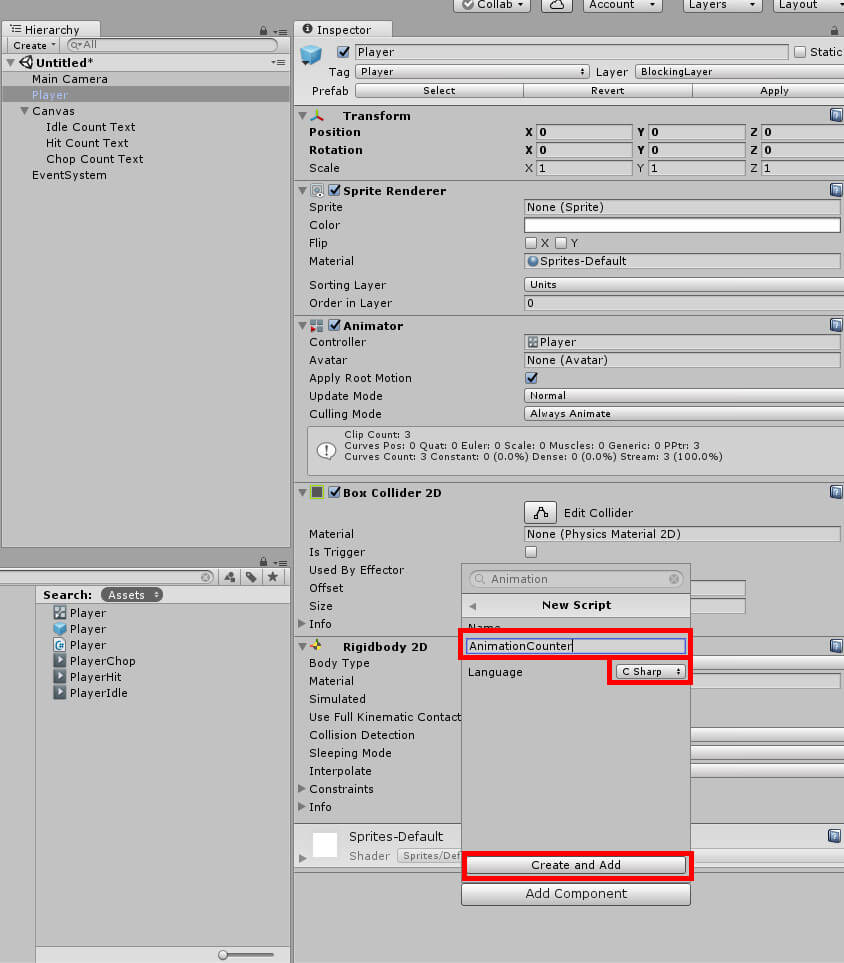
Figure 25: Creating the AnimationCounter script
When this is complete, your Player object should look like the one shown in Figure 26.
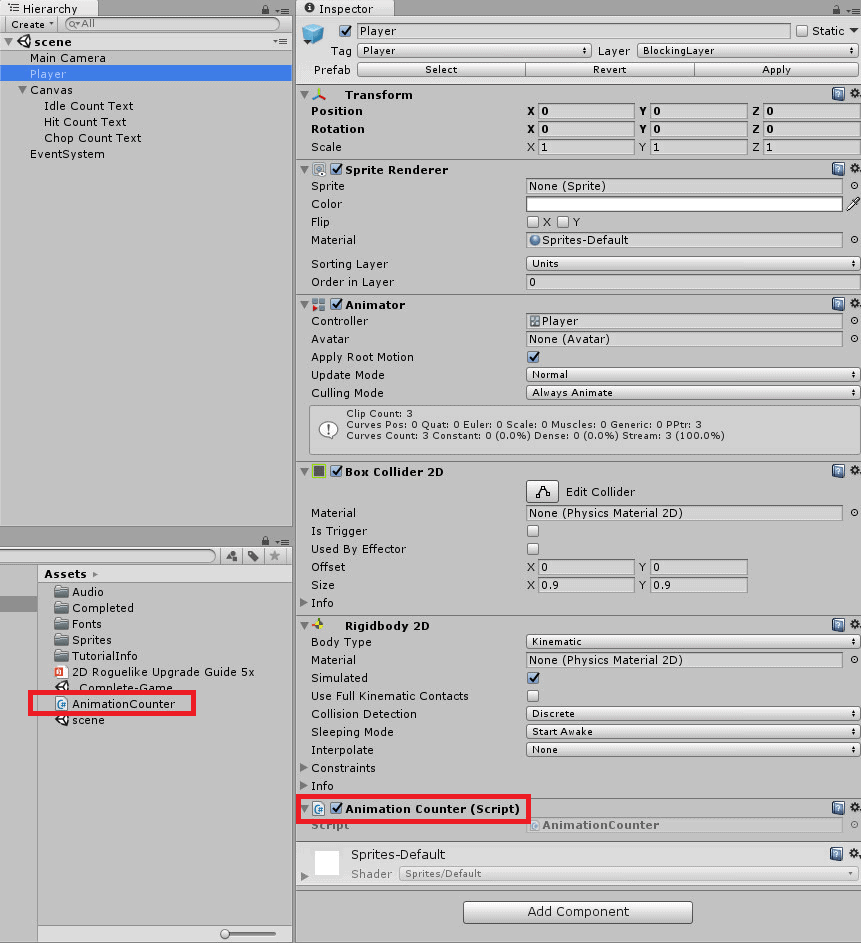
Figure 26: How the Player object should look at this stage.
Unity will then create the new script. Once complete, double click the script field in the Animation Counter component as shown in Figure 27 to open Visual Studio and begin coding.

Figure 27: Where to double click to open Visual Studio and the Animation Counter script.
The Code
Unity will have automatically created a Start and Update function for you upon creating the script, but you only want the Update function of these two. Since it’s not needed, go ahead and comment out the Start function. Once you have done this, it will be time to start adding your own code, beginning with using UnityEngine.UI; at line 4. After that has been entered you can then declare the variables you’ll need to make the project work as intended. Inside the AnimationCounter class, enter the following lines of code:
|
1 2 3 4 5 6 7 |
private int idleCount; private int chopCount; private int hitCount; public Animator anim; public Text idleCountText; public Text chopCountText; public Text hitCountText; |
Once you’ve entered these lines of code your project should look something like the code shown in Figure 28 excluding the comments.
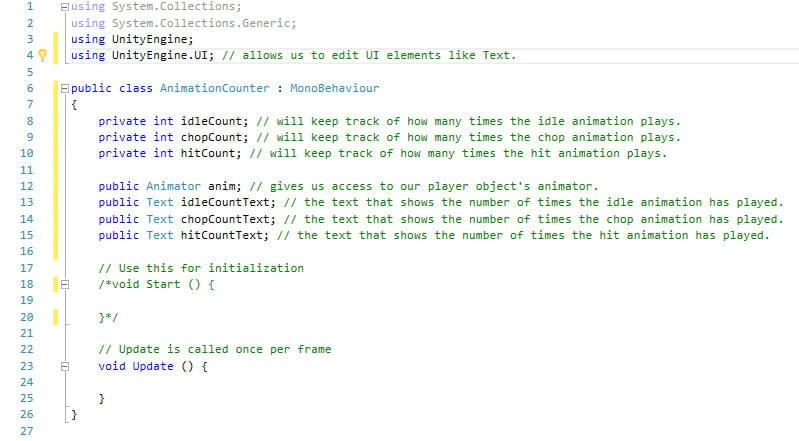
Figure 28: The declared variables.
Skip past the Update function for now and create some space for a new function. You’ll declare the first function needed to keep track of how many times an animation plays. This function will increment the idleCount variable and then update the idleCountText every time it is called. Within the AnimationCounter class after the Update function, enter the following:
|
1 2 3 4 |
public void UpdateIdleCount() { idleCount++; idleCountText.text = "Idle Animation played " + idleCount + " times."; } |
Now your code should look like the code shown in Figure 29.
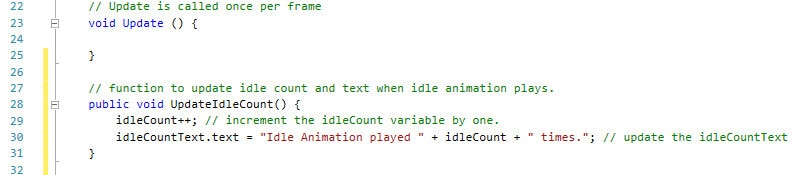
Figure 29: The UpdateIdleCount function.
The next two functions are similar to the UpdateIdleCount function with the main difference being you need to change the variables you’ll be using. Add the following code to create the additional functions:
|
1 2 3 4 5 6 7 8 |
public void UpdateChopCount() { chopCount++; chopCountText.text = "Chop Animation played " + chopCount + " times."; } public void UpdateHitCount() { hitCount++; hitCountText.text = "Hit animation played " + hitCount + " times."; } |
With these functions completed, your code should now look like the code shown in Figure 30.
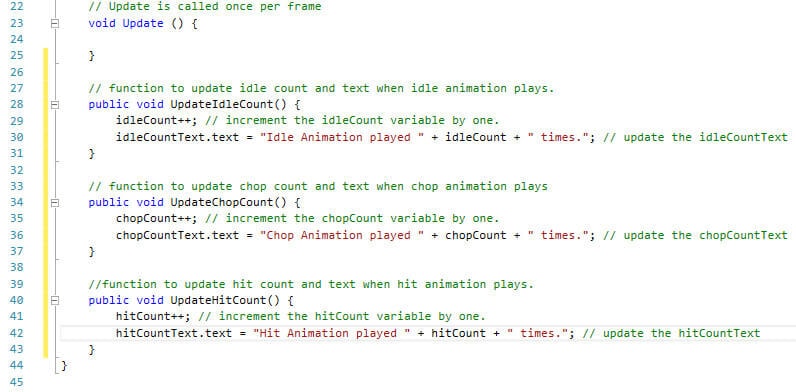
Figure 30: The completed functions.
By this point you have the variables and functions needed to keep track of how many times a certain animation plays. There’s one question remaining though; how are we going to switch between different animations? This is where animation triggers come into play. Go back to the Update function and add the following code.
|
1 2 3 |
if (Input.GetKeyDown(KeyCode.A)) { anim.SetTrigger("playerChop"); } |
Whenever the player presses the A key, the playerChop trigger we set up earlier will activate, allowing the user the switch to the chop animation. Figure 31 shows what this code looks like.

Figure 31: Activating the playerChop trigger if the A key is pressed.
Similar code needs to be added to the Update function for the other triggers. Inside the Update function, enter the following lines of code to complete the code section of your project.
|
1 2 3 4 5 6 |
if (Input.GetKeyDown(KeyCode.S)) { anim.SetTrigger("playerHit"); } if (Input.GetKeyDown(KeyCode.D)) { anim.SetTrigger("playerIdle"); } |
After this is finished, your Update function should look similar to Figure 32.
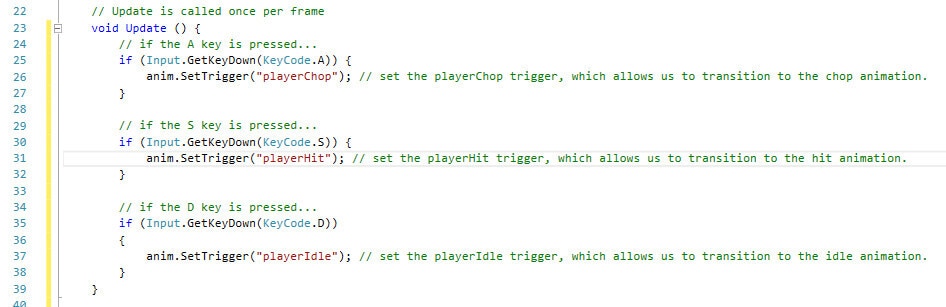
Figure 32: The completed Update function.
With the Update function complete, your code is now ready to work with your project. You have declared the necessary variables, created the functions needed to update the number of times an animation has played, and have checks in place for when the A, S, and D keys are pressed. When any of these keys are pressed, they’ll activate one of your animation triggers which will allow your player object to transition between different animations. The completed code should look similar to Figure 33. Be sure to save your code before continuing!
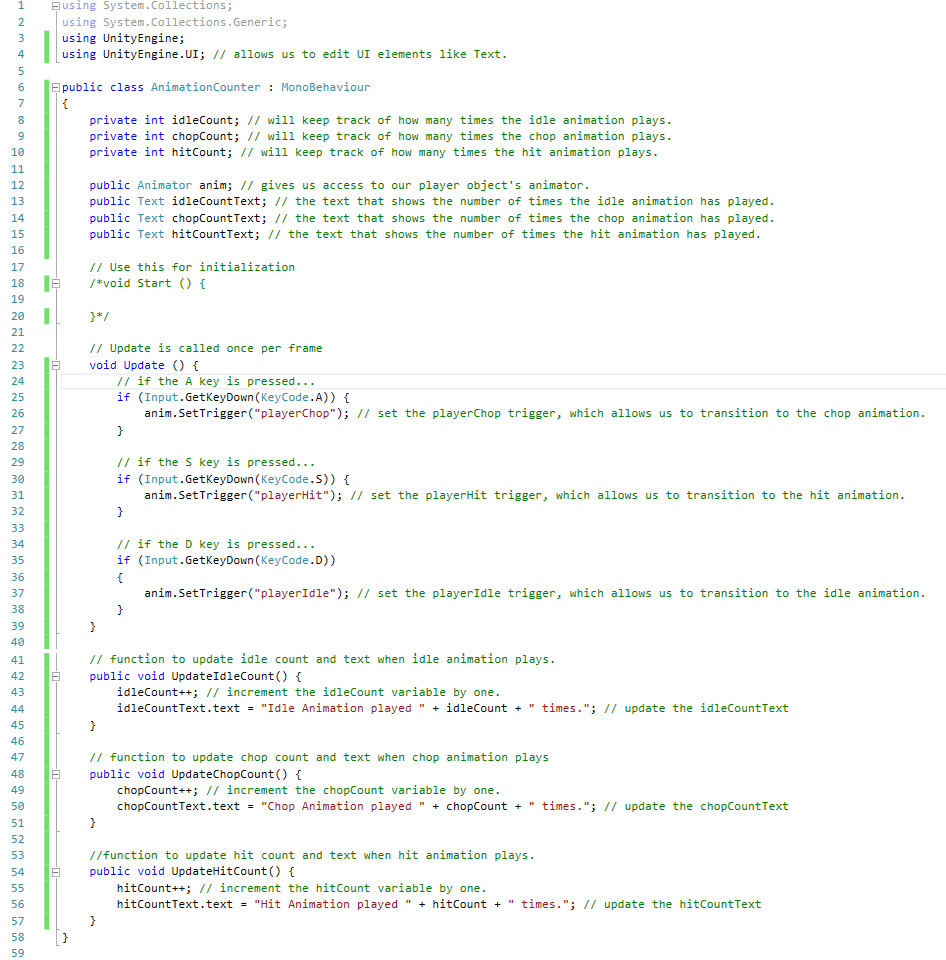
Figure 33: The completed code
Completing the Project
After saving the code in Visual Studio, switch back to the project in Unity. There are only a few tasks left to do before the project is complete. You’ll notice on your player object that some new fields will appear under the AnimationCounter component. All these fields will need to be filled in order for our project to do anything. Begin with the Anim field by dragging the Animator component on the Player object into that field. Figure 34 shows where this is.
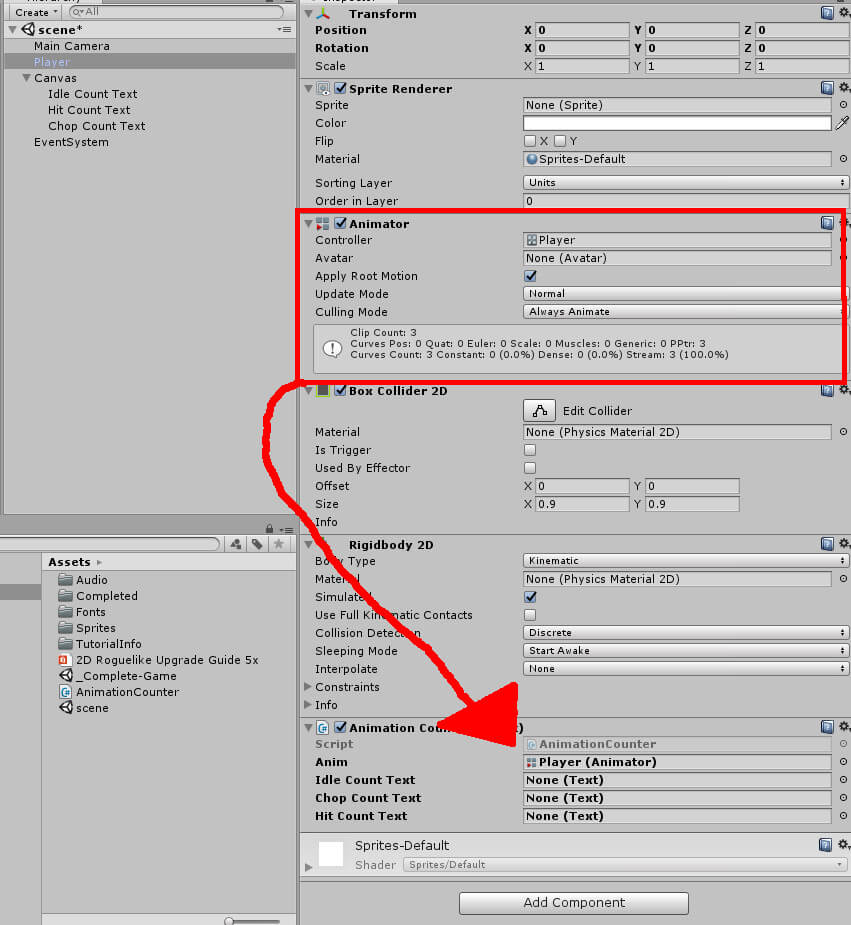
Figure 34: Setting the Player’s Animator component as the value of the Anim field.
Next you should fill in the text fields. All you need to do here is click and drag the Idle Count Text, Hit Count Text, and Chop Count Text into their respective fields. Figure 35 shows what your player object should look like now.
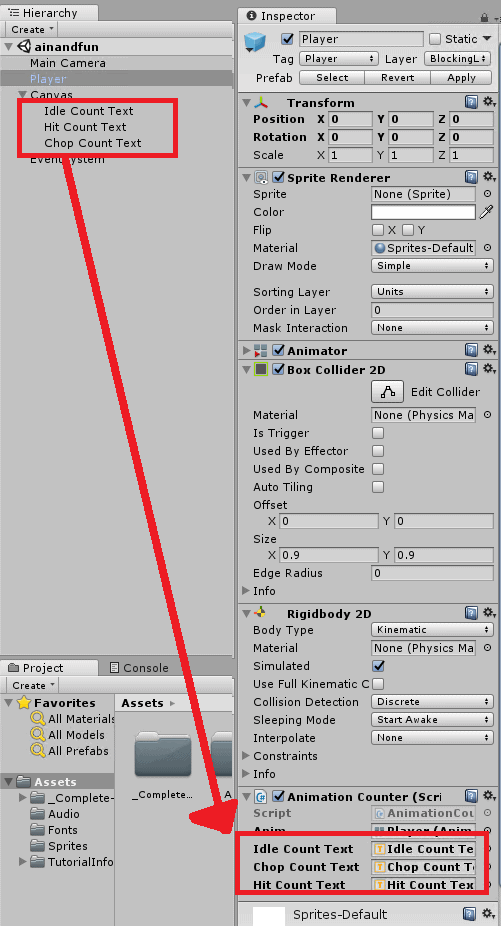
Figure 35: Where to place the Text objects in the AnimationCounter component.
Now the position and size of those text objects should be set. Select all three text objects and then go to the Rect Transform component in the Inspector window. Locate the Width field and set it to 250, then find the Height field and set that to 30. In addition, change the Pos X field to a value of 30. Since you have all text objects selected these changes will apply to all three text objects. Figure 36 shows where these fields are and what they should be.
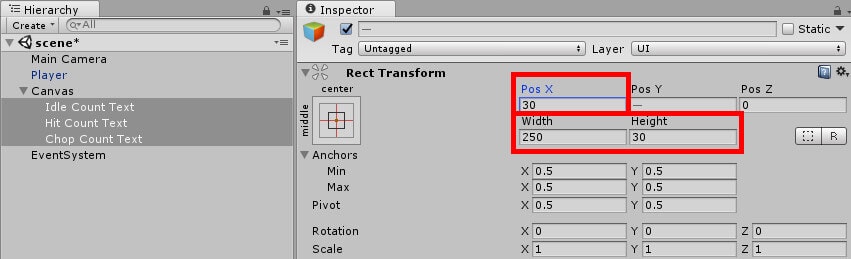
Figure 36: The Pos X, Width, and Height fields and their respective values.
Each text object needs to have its own Pos Y value, otherwise the text will all be sitting in the exact same location and will be illegible. Figure 37 shows where to locate the Pos Y field.
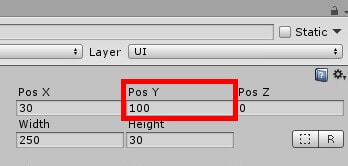
Figure 37: Where to find the Pos Y field
Once located, each text object will need a different value for their respective Pos Y fields. Table 2 shows what each text object’s Pos Y value should be.
Table 2: All text objects and the required value of each Pos Y field.
|
Text Object |
Pos Y Value |
|
Idle Count Text |
150 |
|
Hit Count Text |
125 |
|
Chop Count Text |
100 |
For the final step you’ll need to access the animations and set what’s called an ‘animation event’ in order to use the functions and keep track of how many times an animation plays. Select the Player object from the Hierarchy, then go to Window and select Animation to open the Animation window. Figure 38 will show where to find this option.
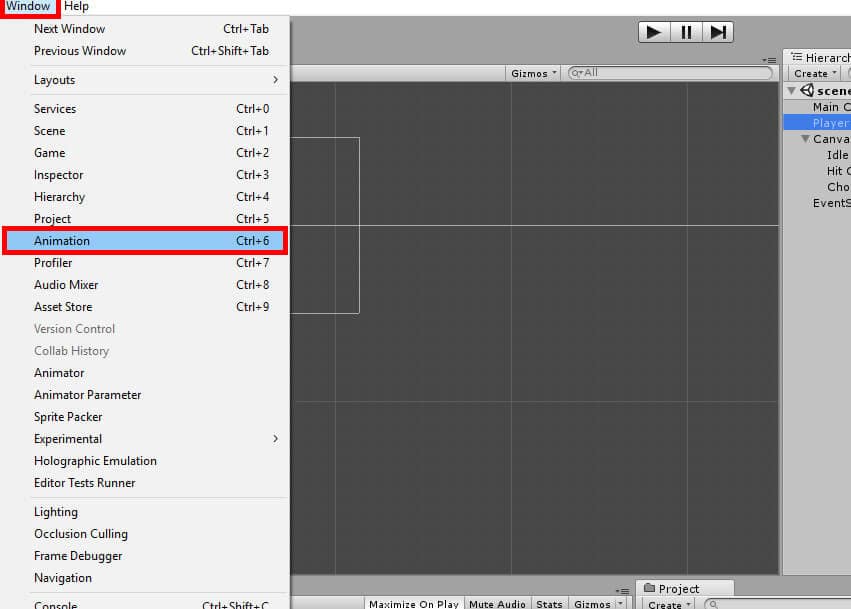
Figure 38: Locating the Animation window option.
Even though the names are similar, the Animation window and the Animator window have completely different uses. You’ve already used the Animator window to set animation transitions and make a new trigger. The Animation window is what you’ll use to edit an object’s animation and, more importantly for this project, set animation events. Around the top of the animation window and a little to the left you’ll see a button that looks like a white banner with a plus button next to it. Figure 39 shows where this button is.
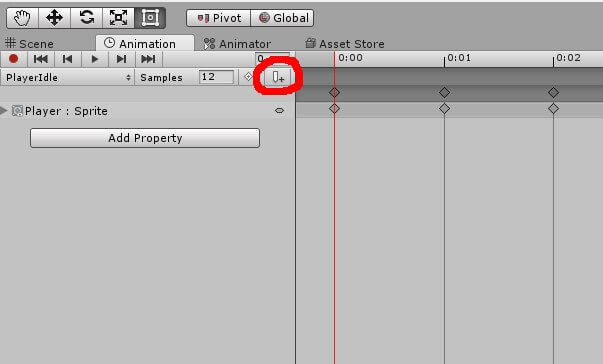
Figure 39: Locating the Add animation event button.
After clicking this button you’ll see the Inspector window change to show an animation event and a field that simply says Function. Move there and click on the drop-down menu to see the functions you made earlier in C#. You should be on the PlayerIdle animation by default, so you will want to select UpdateIdleCount() from the drop down menu. Figure 40 shows where this is.
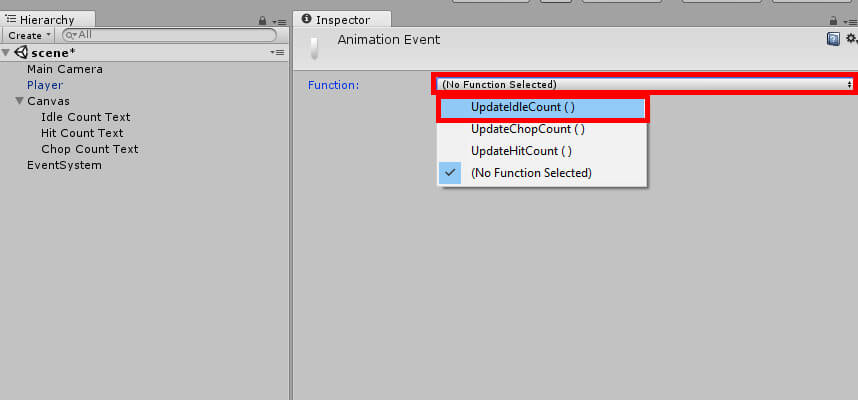
Figure 40: Selecting the UpdateIdleCount function for the animation event.
Animation events will call a function whenever the animation tells them to. In this case you have told Unity to call the UpdateIdleCount function at frame 0 (the beginning) of the PlayerIdle animation. Now all that’s left is to create an animation event for the other animations. Go back to the animation window and select the drop down menu in the upper left corner of the window. It will say PlayerIdle on it, revealing the current animation you’re on. Once the drop-down menu is open, select the PlayerHit animation. Figure 41 will show where this menu is and where the PlayerHit option should be.
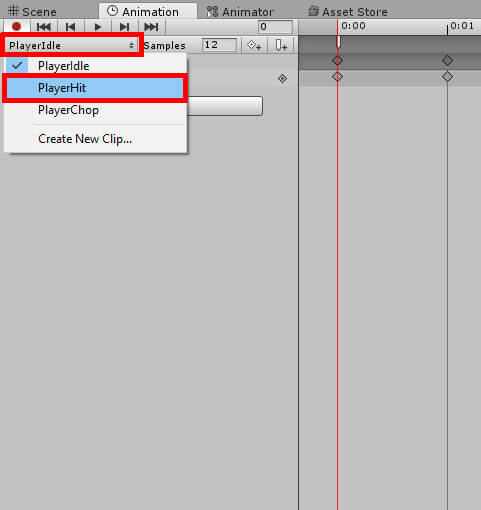
Figure 41: Changing the current animation you’re editing.
Now you must set an animation event to the beginning of the animation like you did before with the PlayerIdle animation. You will also need to do the same with the PlayerChop animation. Table 3 shows each animation and what function should be called with each animation event.
Table 3: The functions to assign to the animation events of each animation.
|
Animation |
Function to call |
|
PlayerIdle |
UpdateIdleCount() |
|
PlayerHit |
UpdateHitCount() |
|
PlayerChop |
UpdateChopCount() |
With all your animations set, go back to the scene window by clicking Window and then Scene as shown in Figure 42.
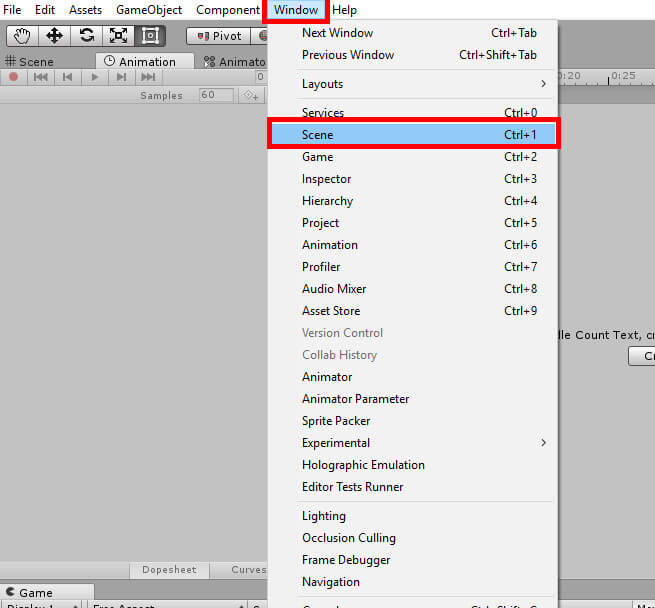
Figure 42: Switching to the scene window
One last task you should do is set some default text for the text objects. Select the Idle Count Text object from the hierarchy, go to the Text component and change the text field to say Idle Animation played 0 times. Figure 43 shows where to find this.
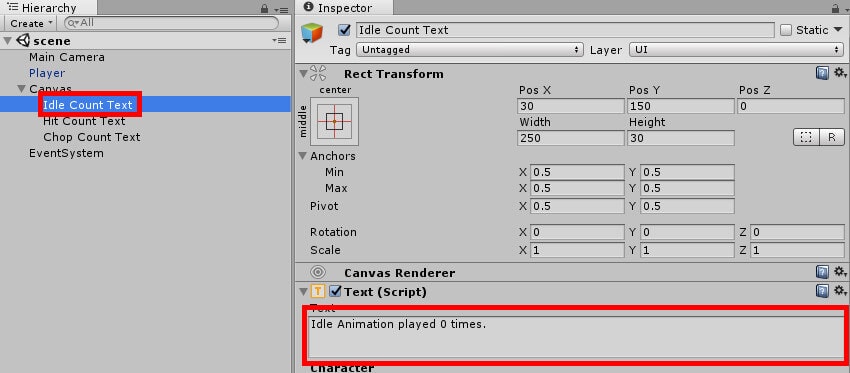
Figure 43: Changing the default text for Idle Count Text.
Do the same with the Hit Count Text and Chop Count Text objects. Table 4 will show each text object and what its default text should be.
Table 4: The default text for each text object.
|
Text Object |
Default text |
|
Idle Count Text |
Idle Animation played 0 times. |
|
Hit Count Text |
Hit animation played 0 times. |
|
Chop Count Text |
Chop animation played 0 times. |
Your project is now complete! Play your game by clicking the play button near the top of the Unity editor. As it plays, notice that whenever the animation reaches frame 0 the animation counter goes up. Press the A, S, and D keys to change animations. Figure 44 is an example of what the finished project will look like.
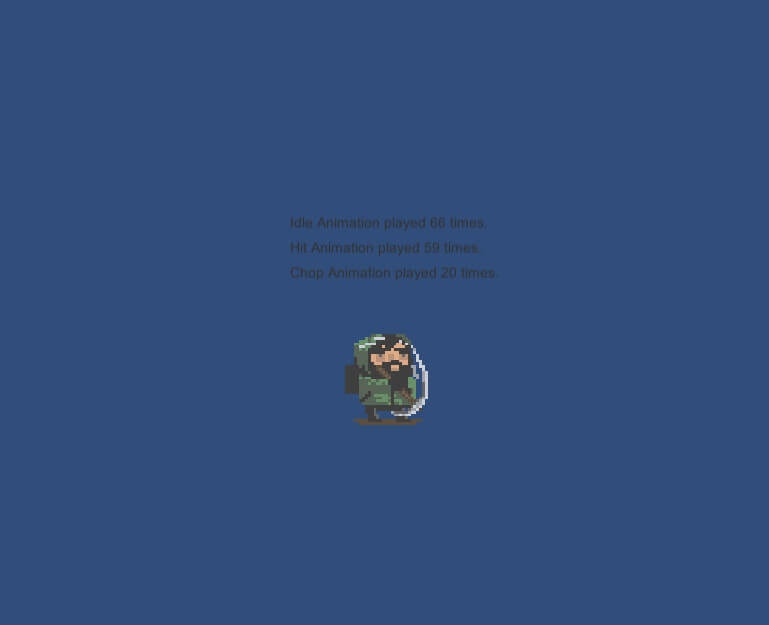
Figure 44: The completed project.
Conclusion
There’s a lot to digest after completing this project. You’ve been shown how to navigate the asset store, how to create animation events, and how to use the animator window. Using all these items together allowed you to create counter that tracks the number of times an animation plays, but they can be used for so much more than that. All it takes is a little creativity and thought and you can have animations and code do much more together than either one could accomplish by itself.
Load comments