
This is the thirteenth article in a series entitled Stairway to Integration Services. Previous articles in the series include:
- What is SSIS? Level 1 of the Stairway to Integration Services
- The SSIS Data Pump - Level 2 of the Stairway to Integration Services
- Adding Rows in Incremental Loads – Level 3 of the Stairway to Integration Services
- Updating Rows in Incremental Loads – Level 4 of the Stairway to Integration Services
- Deleting Rows in Incremental Loads – Level 5 of the Stairway to Integration Services
- Basic SSIS Workflow Management – Level 6 of the Stairway to Integration Services
- Intermediate SSIS Workflow Management – Level 7 of the Stairway to Integration Services
- Advanced SSIS Workflow Management – Level 8 of the Stairway to Integration Services
- Control Flow Task Errors – Level 9 of the Stairway to Integration Services
- Advanced Event Behavior – Level 10 of the Stairway to Integration Services
- Logging – Level 11 of the Stairway to Integration Services
- Advanced Logging – Level 12 of the Stairway to Integration Services
Introduction
In the previous installment we combined what we had learned about event bubbling, logging, and the Parent-Child pattern to create a custom SSIS package logging pattern.
In this article, we will upgrade our solution to SQL Server 2012 Integration Services and demonstrate several facets of SSIS variables, variable configuration, and dynamic value management via expressions. We have used SSIS Variables in many previous exercises, but we have not focused on them. In this article, we focus on SSIS Variables.
First, Take Control of Your Career
Steve Jones (blog | @way0utwest) and Andy Warren (blog | @sqlAndy) regularly post about managing your career. They offer sage advice and wisdom for professionals in data-related fields and for any profession, in my opinion.
Some readers contacted me to ask where they could obtain a copy of SQL Server Integration Services. I encourage readers without SQL Server to obtain access to a copy of SQL Server Developer Edition. I have three suggestions about where and how to obtain a copy for yourself:
- Your employer may have a license for SQL Server Developer Edition you can use. This assumes your current employer uses SQL Server and that you do not mind letting them know you are interested in learning more about SQL Server.
- If you have a small business, you may qualify for Microsoft BizSpark. One feature of BizSpark is access to Microsoft software. See the website for details.
- You can purchase a copy of SQL Server 2012 Developer Edition. It’s less than $50 USD at Amazon.com at the time of this writing.
Your career (or next career) is worth a $50 investment.
Getting Starting with the Visual Studio 2012 IDE for SSIS 2012 Development
You must have SQL Server 2012 Integration Services installed to use the Visual Studio 2012 Integrated Development Environment (IDE) with SSIS 2012. You can download the VS 2012 IDE and SSIS (and SSAS and SSRS) templates here (http://www.microsoft.com/en-us/download/details.aspx?id=36843).
Once installed, you can set the Color theme by clicking Tools -> Options, and then expanding Environment -> General (shown in figure 1):

Figure 1
You may wish to change some options. For example, [w1] [AL2] I set my IDE to use the Dark theme (probably because the first computer I used was connected to a 13-inch black-and-white television).
Creating a New SSIS Solution and Project
To begin creating a new SSIS solution and project, click File -> New Project. Wait, you can’t click File -> New Project because the File -> New Project doesn’t exist (shown in Figure 2):

Figure 2
I can hear you thinking, “How do I create a new project, Andy?” I’m glad you asked. There are two ways:
1. Do you remember the Visual Studio keyboard shortcut for creating a new project? If you do not it is OK. Many people do not know the keyboard shortcut. It was a multi-key shortcut: Ctrl + Shift + N. It still works.
Start with the Start Page. Click View -> Start Page to open the Start Page shown in Figure 3:

Figure 3
The Start Page is a great page for launching activity in any version of Visual Studio. It’s particularly useful if you don’t remember the keyboard shortcuts. The Start Page is shown in Figure 4.

Figure 4
Click the New Project link to begin creating a new SSIS project. If not expanded already, expand the Installed list item in the list on the left. Expand Templates, and then expand Business Intelligence. Select Integration Services from the list on the left and then select Integration Services Project from the templates (central box). Name the project My_Second_SSIS_Project as shown in Figure 5:

Figure 5
You may specify a location or accept the default location. Unless I have some reason to change the defaults, I leave the “Create directory for solution” checkbox checked and the “Add to source control” checkbox unchecked. (More about source control later...)
When you click the OK button, the new My_Second_SSIS_Project SSIS solution and project are created. The solution folder is created at the path in the Location textbox, the Project folder is created inside the solution folder as shown in Figure 6:

Figure 6
For more information about the folder contents of Visual Studio solutions, please refer to What is SSIS? Level 1 of the Stairway to Integration Services, the “Play Along at Home!” section.
A Brief Tour of SSIS 2012
There are differences between SSIS 2012 and previous versions. Big differences. The Visual Studio Integrated Development Environment (VS IDE) has changed significantly. There is a zoom “slider” on the development surface as shown in Figure 7. The left image of the slider is its normal appearance. Its appearance changes when the mouse hovers over it, as shown in the right image:

Figure 7
The button beneath the zoom slider is the “Fit view to window” button and it serves to “auto-zoom” to display all contents of the selected tab.
The SSIS toolbox has been decoupled from the .Net controls libraries. To display the SSIS toolbox, click the SSIS toolbox icon in the upper right corner of the package surface design area, second from the left, as shown in Figure 8:

Figure 8
You can still reach the SSIS Variables window by clicking SSIS -> Variables or right-clicking the whitespace of the Control Flow. There is a new button – the left-most button in Figure 9 – just to the left of the SSIS Toolbox button which will display the Variables window:

Figure 9
Perhaps the biggest change to SSIS 2012 centers on the new deployment model: Project Deployment Model. Project Deployment is new to SSIS 2012, but I am happy to report SSIS 2012 supports packages developed in previous versions via the Package Deployment Model.
I must pause here to express my gratitude to the SSIS 2012 Development Team at Microsoft. The Package Deployment Model supports SSIS packages developed in previous editions of SSIS, which enables pain-free upgrades from SSIS 2008 R2 to SSIS 2012. The SSIS Developer Team at Microsoft introduced the new model (Project Deployment) and made it the default to encourage future development using this model. But they also preserved the existing model by supporting the Package Deployment Model. This is an excellent way to introduce new functionality without breaking existing functionality. Kudos!
Before we begin working with variables, let’s rename the package from Package.dtsx to VariablesAndParameters.dtsx (shown in Figure 10):

Figure 10
Note there is no longer a prompt to rename the package object when you rename the dtsx file.
Beginning with Variables
As mentioned earlier, there are several ways to display the Variables window. Use your preferred method to open it. The first button is the Add Variable button (shown in the upper left in Figure 11):

Figure 11
Click the Add Variable button to create a new variable to the SSIS package. Rename it to MyVariable as shown in Figure 12:

Figure 12
Note the Scope of the variable is the name of the SSIS package: VariablesAndParameters. A good analogy for scope is containers. In Figure 13 we find three containers:
- Task
- Container
- Package

Figure 13
Tasks, Containers, and Packages are executables. Among other attributes, an executable is a type of object in SSIS that has properties and raises events. A task always resides within a Container. “Wait, Andy; what if I simply place an Execute SQL Task on the Control Flow?” Excellent question: the Package is also a container. SSIS exposes other containers, namely the Sequence Container, the For Loop Container, and the Foreach Loop Container. Each of these containers can also hold tasks, and each type of container is, like the package, also an executable.
SSIS provides other ways to visualize scope. To demonstrate, add a Sequence Container from the SSIS Toolbox to the Control Flow, and then add an Execute SQL Task from the SSIS Toolbox to the Sequence Container as shown in Figure 14:

Figure 14
The Package Explorer shown in Figure 15 depicts scope in a treeview control. The idea is identical to that represented in Figure 13: The package (VariablesAndParameters) contains a Container (Sequence Container) that, in turn, contains a Task (Execute SQL Task) (shown in Figure 15):

Figure 15
The treeview helps us visualize what I mean when I say “up” or “down” in scope. From the perspective of the Execute SQL Task, the Sequence Container is “above” it. If I begin at the Sequence Container, the Execute SQL Task is scoped “beneath” or “contained within” it. I am technically correct stating the Execute Package Task is contained within the VariablesAndParameters package, but the statement ignores the Sequence Container and provides an incomplete description of the relationship between the package and the task. To be more accurate I would state, “The VariablesAndParameters package contains a Sequence Container, which contains an Execute SQL Task.”
The scope of a variable is defined by the executable to which the variable is scoped. Our variable named MyVariable is scoped at the VariablesAndParameters, or package, scope. I sometimes refer to these variables as package-scoped variables.
One other point about the treeview in Package Explorer: I believe it is a fair representation of what I call the “Execution Stack.” I would rather use the term “Execution Tree,” but that term is used elsewhere in SSIS. Execution stack refers to the relationships between executables. Executable execution generally flows “down” the stack from package to container to task. Some messages – like the Events we observed in Advanced Logging – Step 12 of the Stairway to Integration Services – travel “up” the stack. As you can glean from these examples, one gets a lot of use from the Package Explorer.

Figure 16
Select the MyVariable variable and then click the Move Variable button to display the Select New Scope window shown in Figure 17:

Figure 17
We are presented with a treeview that displays available scopes – executables – in the VariablesAndParameters package. You can select the desired scope and click the OK button. For demonstration purposes, select the Sequence Container and click OK.
Note the Scope of MyVariable has changed to Sequence Container, as shown in Figure 18:

Figure 18
In the Control Flow, click on Sequence Container while observing the Variables window. MyVariable is visible in the Variables window as shown in Figure 19:

Figure 19
Observing the Variables window, now click in the white space of the Control Flow:

Figure 20
MyVariable is no longer visible in the Variables window. Why? The default behavior of SSIS is to only show variables at or above the current scope. I can hear you thinking, “Can I change this behavior?” Yes you can. By clicking the fourth button on the Variables window toolbar, Grid Options, you can change this behavior:

Figure 21
The Variable Grid Options window contains many options for the Variables window. We want to check the checkbox labeled “Show variables of all scopes” as shown in Figure 22:

Figure 22
Click the OK button and return to the Control Flow and Variables window. Click in the white space of the Control Flow and note that you can still see MyVariable in the Variables window, even though it remains scoped below the package (at the Sequence Container scope):

Figure 23
In previous versions of SSIS, variables were created at the scope of the Executable selected at the time of variable creation. The default behavior of an SSIS package was (and remains) to display only variables at the current scope or above. I agree with defaulting variables to package scope, but I disagree with hiding variables because of scope.
Why do I disagree with hiding variables that are beneath or outside the execution stack? If I accidentally create a variable at lower than package scope, I may create second variable to compensate. The two variables are allowed to have the same name at different scopes, but they are not the same variable.
To demonstrate, delete the Execute SQL Task and add a Script Task in its place. Create a new variable named MyVariable. It will be package-scoped automatically:

Figure 24
I intentionally supplied different default values for the variable for demonstration purposes.
Double-click the Script Task to open the editor and set the ScriptLanguage property to Microsoft Visual Basic 2012. Click the ellipsis inside the value textbox of the ReadOnlyVariables property. When the Select Variables window displays, note only one MyVariable variable is listed, as shown in Figure 25:

Figure 25
Select the MyVariable variable and click the OK button. The Script Task editor should appear as shown in Figure 26:
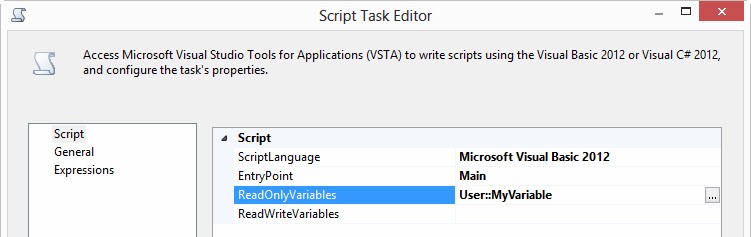
Figure 26
Click the Edit Script button to open the VSTAProjects Script Editor and navigate to the Public Sub Main() subroutine. Add a single line of code beneath the “Add your code here” comment:
MsgBox(Dts.Variables("User::MyVariable").Value.ToString)
Listing 1
Your script editor should appear as shown in Figure 27:

Figure 27
Close the VSTAProject Script Editor and click the OK button on the Script Task editor. Press the F5 key to execute the SSIS package in the debugger. A message box will display the value of the MyVariable variable. Which value displays?

Figure 28
If you are playing along at home, the default value supplied to MyVariable at the Sequence Container is displayed. Why does this variable win?
Think about the execution stack I mentioned earlier and consider how events traverse the stack from the originating executable (task, container, or package). Do you remember how this works? Events walk up the stack. I call this event bubbling.
Variables behave in a similar manner. Before the Script Task executes, SSIS attempts to lock the MyVariable variable. “Lock it, Andy?” Yes, lock it. “Why?” Excellent question. Consider what happens if two executables are trying to use the same variable at the same time. What if one of the executables is writing to the variable value while the other executable is merely reading the value? In all likelihood, I want the value of that variable to remain static while I’m reading it. To ensure the variable value does remain static (or deterministic), SSIS places a lock on the variable so its value cannot be unintentionally manipulated during use by the executable.
One way to think about how variables are locked in SSIS is to imagine the locking mechanism (a “keyholder” for the purposes of this analogy) polling the execution stack in search of the variable named MyVariable. The keyholder starts at the Script Task and asks it, “Script Task, do you have a variable named MyVariable?” The Script Task responds, “No.” So the keyholder takes a step up the execution stack and asks the Sequence Container, “Sequence Container, do you have a variable named MyVariable?” The Sequence Container responds, “Yes.” The keyholder stops looking. It has found the variable it sought. Or did it?
If my variables are hidden (the default in all versions of SSIS), I may not realize I have two variables named MyVariable at different scopes. I may have accidentally set the scope of MyVariable to the Sequence Container and forgotten about it, and then created a brand package-scoped MyVariable later (thinking “Didn’t I already create this variable?”).
In addition, the state of the “Show variables of all scopes” checkbox is not persisted as part of the solution or project attributes. When I close SQL Server Data Tools and re-open it, the setting returns to the default.
Here’s why I don’t like the default behavior of hiding the variables at different scopes: There’s no way for me to reach the package-scoped variable named MyVariable from the Script Task. It doesn’t appear in my list when I select ReadOnlyVariables. I cannot specify “VariablesAndParameters.User::MyVariable”. The option simply does not exist. And, I don’t know the variable exists unless I turn on “Show variables at all scopes” because it’s not the default. If the default behavior is to set all variables to package scope, the default should also be to show variables at all scopes.
Variable Data Types
There are several data types available for SSIS variables: various numeric data types, date, byte, Boolean, string, and character. Perhaps the most interesting is the Object data type:

Figure 29
An SSIS variable of Object data type can hold a variety of values including scalars such as individual integers, strings, and dates. Objects can also hold, well, objects; such as collections, arrays, recordsets and datasets. I won’t repeat the exercises here but I encourage you to read and work through the example in an article I wrote called SSIS 101: Object Variables, ResultSets, and Foreach Loop Containers.
Variable Values
The Variables window Value column displays the default value of the variable. As a best practice, I leave default values set to the values used to develop the SSIS package, even when I deploy the SSIS packages to Production environments. There are a few reasons for this decision and we will cover more in future articles; but the main reason is that if “something bad” occurs during Production package execution, or if someone makes a mistake, I would rather load my Development environment with Production data than load my Production environment with Development data. Figure 30 shows default values for the two variables we have used thus far:

Figure 30
Variable Expressions
The SSIS Expression Language is hard to learn. To me it looks like a hybrid between curly-brace-languages (C#, Java, etc.) and Transact-SQL. And that fits if you consider SSIS is positioned as an enterprise data integration platform.
We can use Expressions to manipulate the value of SSIS variables. To demonstrate, click the ellipsis in the Expression textbox for the MyVariable as shown in Figure 31:

Figure 31
The Expression Builder window displays and consists of four areas; Variables and Parameters, Expression Language functions and operators, Expression, and Evaluated Value as shown in Figure 32:
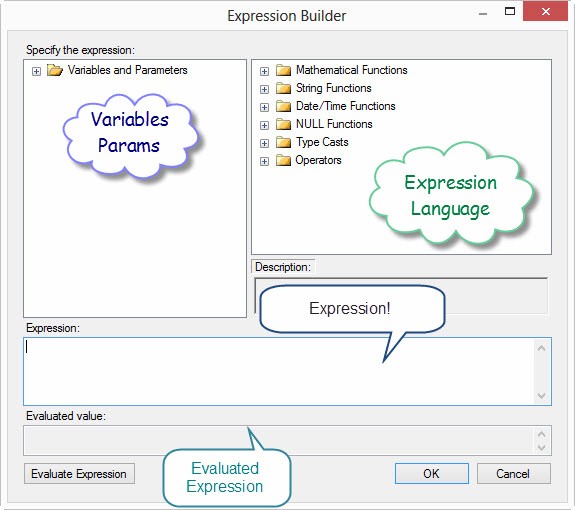
Figure 32
The Variables and Parameters treeview contains a list of all available variables and parameters for use in expressions. Because of the variables in our SSIS package, the only variable in the Variables and Parameters virtual folder is the package-scoped MyVariable as shown in Figure 33:

Figure 33
Why can’t we see the Sequence Container-scoped MyVariable? Because the Sequence Container-scoped MyVariable is the variable for which we are setting the expression. How can we be sure? We can drag the variable from the Variables and Parameters to the Expression textbox, and then click the Evaluate Expression button as shown in Figure 34:

Figure 34
Remember, the package-scoped variable named MyVariable has a default value of 0; the Sequence Container-scoped MyVariable’s default value is 42. This, therefore, is the package-scoped MyVariable.
The Expression Language treeview contains SSIS Expression Language operators and functions, as shown in Figure 35:

Figure 35
Delete “@[User::MyVariable]” from the Expression textbox and drag the DARTPART function from the Date / Time Functions tree node into the Expressions textbox. In the Expressions textbox, overwrite <<datepart>> with “ss” (double-quotes included). In the SSIS Expression Language treeview, click the GETDATE() function and drag it into the Expression textbox. Hover over the <<date>> placeholder and drop the GETDATE() function onto the <<date>> placeholder. The resulting expression should read DATEPART(“ss”, GETDATE()) as shown in Figure 36:

Figure 36
This expression will place the second of the current date and time into the Sequence Container-scoped MyVariable value. Close Expression Builder and note the Variables window as shown in Figure 37:

Figure 37
Note the fx (I pronounce this “function of x”, “f of x” or “f sub x”) icon to the left of the variable name. This indicates an expression is controlling the value of the variable.
The expression we configured appears in the Expression column of the Variables window. To demonstrate, press the F5 key to start the package in the SSIS debugger. The Script Task displays a message box with the value of MyVariable variable. It will be a number between 0 and 59, the second of the current date and time as shown in Figure 38:

Figure 38
Pretty cool stuff, but let’s get practical! Before we begin talking about other stuff, let’s clean up a bit. Stop the debugger if your SSIS package is running in SSDT. Delete the Script Task from the Sequence Container. Delete both MyVariable variables.
Building Connections Using Variables
Let’s put what we’ve learned to use. Variables can be used to build other variable values. Let’s demonstrate that by using a variable to create a path to a flat file containing some data.
Begin by creating the following flat file named Songs.csv:
Id,Artist,Song
"0","Waylon Jennings","Lonesome, On'ry, and Mean"
"1","Willie Nelson","Blue Eyes Cryin' in the Rain"
"2","Kris Kristofferson","Sunday Mornin', Coming Down"
Listing 2
In SQL Server Data Tools (SSDT), add a Data Flow Task to the Control Flow and connect a precedence constraint from the Sequence Container to the new data flow as shown in Figure 39:

Figure 39
Open the Data Flow Task and add a Flat File Source Adapter to the surface (shown in Figure 40):

Figure 40
Open the Flat File Source editor and create a new Flat File Connection Manager by clicking the New button to the right of the “Flat file connection manager” dropdown shown in Figure 41:

Figure 41
When the Flat File Connection Manager Editor displays, set the “Connection manager name” property to “Songs Flat File” and the “File name” property to the location where you saved the file above. Add a double-quote to the “Text qualifier” property as shown in Figure 42:

Figure 42
Click the OK button to close the Flat File Connection Manager Editor. Note the Songs Flat File now appears in the “Flat file connection manager” property dropdown:

Figure 43
Click the OK button to close the Flat File Source Editor.
If you don’t have a database named “TestDB” in your instance of Microsoft SQL Server, why not? You can use any database for testing or development, or you can use the T-SQL script in Listing 3 to create your own TestDB:
Use master
go
If Not Exists(Select name
              From sys.databases
              Where name = 'TestDB')
 begin
  print 'Creating TestDB'
  Create Database TestDB
  print 'TestDB created'
 end
Else
 print 'TestDB already exists'
go
Listing 3
Listing 3 is an example of an idempotent script. Now I have a confession: I didn’t know what that word meant. Like many things I know, I learned this word from Jamie Thomson (blog | @jamiet). But Jamie explained it means re-executable code. If you don’t already have a database named TestDB in your instance and SQL Server and run the script in Listing 3 twice, it will create the database the first time you execute the script and it will inform you the database already exists on the second (and subsequent) executions.
There are two lessons here:
- Idempotent scripts are safe and informative; and
- Jamie is really smart.
Returning to SSDT, drag an OLE DB Destination Adapter onto the Data Flow surface and connect a data flow path between the Flat File Source and OLE DB Destination as shown in Figure 44:

Figure 44
Open the OLE DB Destination editor and click the New button to the right of the “OLE DB connection manager” dropdown to create a new OLE DB Connection Manager and open the Configure OLE DB Connection Manager window shown in Figure 45:

Figure 45
I have previously configured a TestDB connection on this machine, you can see it listed as the second Data Connection in Figure 45. For demonstration purposes I am going to create a new one. To begin, click the New button to display the Connection Manager editor. Enter the name of your SQL Server instance in the “Server name” property dropdown and the name of your database in the “Connect to a database” dropdown shown in Figure 46:

Figure 46
Click the OK button to close the Connection Manager editor window. The Configure OLE DB Connection Manager window displays our new connection – mine is shown as “(local).TestDB” – as shown in Figure 47:

Figure 47
Make sure your new connection is selected in the Data connections list and click the OK button. The OLE DB Destination Editor displays showing the name of our connection manager in the “OLE DB connection manager” property dropdown.
Click the New button to the right of the “Name of the table or view” property dropdown to display the Create Table window. This window displays a Database Definition Language (DDL) statement built from metadata in the data flow (shown in Figure 48). The name of the table is derived from the name of the OLE DB Destination adapter – change it to “Songs”. The column definitions were derived from the data flow path between the Flat File Source and the OLE DB Destination:

Figure 48
After making the edit to the table name, click the OK button. Note that clicking the OK button executes this DDL statement against your database. That’s why the table shows up in the “Name of the table or view” property dropdown as shown in Figure 49:

Figure 49
In the lower portion of the OLE DB Destination Editor, note the warning message:

Figure 50
The warning message displayed in Figure 50 tells us our next step is to map the columns on the Mappings page, but note the OK button is enabled. This is new in SSIS 2012. It’s one example of something Microsoft calls Flexible Order of Authoring or FOA.
I have mixed emotions about FOA. I don’t like it for OLE DB Destinations. Why? It’s possible for me to click the OK button right now and leave a partially-configured OLE DB Destination on my data flow. In previous versions, this wasn’t possible because the OK button was disabled until after I performed the mapping (we’ll do that in a minute). However, I really like FOA when I am configuring Lookup transformations. The Lookup transformation has five pages, and I hate having to remember everything I’ve done in previous screens when something tragic happens (like a failed mapping due to Unicode and non-Unicode strings… don’t get me started…). FOA gives and FOA takes away.
Returning to SSDT, click the Mappings page on the OLE DB Destination Editor. When you do this, auto-mapping occurs as shown in Figure 51:

Figure 51
I can hear you thinking, “What is auto-mapping, Andy?” I’m glad you asked! Available Input Columns represent the schema of the data flowing into the OLE DB Destination from the data flow path connected to the OLE DB Destination’s input. Available Destination Columns represent the columns available in the table or view configured as the destination. In this case, we created the destination table earlier – remember? Where did the OLE DB Destination get the metadata to create that table?
To answer this question, first click the OK button to complete the configuration of the OLE DB Destination adapter. Next, right-click the data flow path connecting the Flat File Source adapter to the OLE DB Destination adapter, and then click Edit to open the Data Flow Path Editor. Click the Metadata page to display properties of the data flow path’s structure, as shown in Figure 52:

Figure 52
Look familiar? I think this looks like a table definition. We have column names, data types, and lengths. This metadata provided the schema information when we clicked the New button to create the new table in the OLE DB Destination Editor.
Since the columns in the Available Destination Columns (shown in Figure 51) were built from the metadata of the Available Input Columns, the columns match names and data types, and this alignment of field name and data type allows auto-mapping to occur.
Click the OK button to close the Data Flow Path Editor.
Variables in Expressions
Open the SSIS Variables window and add a new package-scoped String variable named FileDirectory. Set the Value property of the FileDirectory variable to the folder where you stored the Songs.csv file as shown in Figure 53:

Figure 53
Create another package-scoped String variable named FileName. Set the Value property of the FileName variable to “Songs.csv”:

Figure 54
Add one more package-scoped String variable named FilePath as shown in Figure 55:

Figure 55
Click the ellipsis in the Expression textbox for the FilePath variable to open the Expression Builder window. Expand the Variables and Parameters virtual folder in the upper left portion of the Expression Builder window. Click and drag User::FileDirectory from the Variables and Parameters treeview into the Expression textbox as shown in Figure 56:

Figure 56
After the variable name (“@[User::FileDirectory]”), add a space followed by the plus sign (“+”). The plus sign acts as a concatenation operator for strings. Click and drag the User::FileName variable into the Expression textbox as shown in Figure 57:

Figure 57
Click the Evaluate Expression button to view the value of this expression (shown at the bottom of Figure 58):

Figure 58
Oops. We are missing a backslash between the data folder and the Songs.csv file name. No worries, we can fix that by adding a concatenation operator (“+”) and the backslash in the Expression as shown in Figure 59:

Figure 59
Let’s click the Evaluate Expression button again now that we have made this edit. We see the result in Figure 60:

Figure 60
Oops v2.0. The expression failed to parse? The error indicates an issue with the 26th character – what is the 26th character? It’s the double-quoted backslash (“\”). Why is this breaking the expression? Because the backslash is an escape character. A backslash plus another character indicates some special text. So how do we get a simple backslash character into our string? By concatenating “\\”, as shown in Figure 61:

Figure 61
Click the OK button to close the Expression Builder.
Variables in Dynamic Property Expressions
We now have a variable – FilePath – that contains the full path to our source file. An expression on the FilePath variable constructs this path from two other variables: FileDirectory and FileName.
“Great. Now what, Andy?” Let’s use that full path to dynamically direct our Flat File Connection Manager (named “Songs Flat File”) to the file. Click the Songs Flat File flat file connection manager, and then press the F4 key to display the connection manager properties (shown in figure 62):

Figure 62
Click the ellipsis in the Expressions value textbox to display the Property Expressions Editor. Click the Property dropdown and select the ConnectionString property as shown in Figure 63:

Figure 63
Click the ellipsis in the Expression textbox beside the ConnectionString property to display the Expression Builder. Expand the Variable and Parameters virtual folder in the Variables and Parameters treeview. Drag the FilePath variable into the Expression textbox as shown in Figure 64:

Figure 64
Click the OK button to close the Expression Builder window, and then click the OK button to close the Property Expressions Editor. If you expand the Expressions property collection in the Properties window, you can view the ConnectionString property as shown in Figure 65:

Figure 65
Introducing Breakpoints and Variable State
Breakpoints are handy in troubleshooting – or merely viewing state – during SSIS debugger execution. As expressed in Control Flow Task Errors – Step 9 of the Stairway to Integration Services and Advanced Logging – Step 12 of the Stairway to Integration Services, SSIS uses an event / listener pattern. Event handlers, logging, the Progress / Execution Results tab, and breakpoints are examples of event listeners. In this section we set a breakpoint to pause execution when the Data Flow Task raises the PreExecute event.
Before we run a test execution, return to the Control Flow and right-click the Data Flow Task and click “Edit Breakpoints…” as shown in Figure 66:

Figure 66
When the Set Breakpoints – Data Flow Task window displays, click the “Break when the container receives the OnPreExecute event” Break Condition as shown in Figure 67:

Figure 67
Enabling a breakpoint when the Data Flow Task raises a PreExecute event will cause execution to pause just before the Data Flow Task executes.
Click the OK button to close the Set Breakpoints – Data Flow Task window.
A maroon-ish dot appears on the Data Flow Task to indicate a breakpoint has been set (shown in Figure 68):

Figure 68
Start the debugger by clicking the Play button or pressing F5. Note execution pauses at the Data Flow Task when it raises the PreExecute Event, as indicated by a yellow arrow appearing in the breakpoint indicator (the maroon-ish dot) as shown in Figure 69:

Figure 69
To view the state of the FilePath variable, click DEBUG on the menu, hover over Windows, and then click the Locals window as shown in Figure 70:

Figure 70
Note you can also hold the Ctrl and Alt keys, and then press V followed by L. Pressing multiple keys in this manner is sometimes called a chord. Once displayed, expand the Variables node in the Locals window. Scroll until you locate the User::FilePath variable as shown in Figure 71:

Figure 71
The Value field contains the values of the variables at this point in the debug execution of the SSIS package. Note the value represents the backslashes as double-backslashes in the FilePath and FileDirectory variable value fields.
To continue SSIS package execution in the debugger press the F5 key or click the Continue (Play) button. Package execution completes and we load the three rows from the Songs.csv file as shown in Figure 72:

Figure 72
Conclusion
In this article, we upgraded our solution to SQL Server 2012 Integration Services. We demonstrated several facets of SSIS variables, variable configuration, and dynamic value management via expressions.