
This is the twelfth article in a series entitled Stairway to Integration Services. Previous articles in the series include:
- What is SSIS? Level 1 of the Stairway to Integration Services
- The SSIS Data Pump - Level 2 of the Stairway to Integration Services
- Adding Rows in Incremental Loads – Level 3 of the Stairway to Integration Services
- Updating Rows in Incremental Loads – Level 4 of the Stairway to Integration Services
- Deleting Rows in Incremental Loads – Level 5 of the Stairway to Integration Services
- Basic SSIS Workflow Management – Level 6 of the Stairway to Integration Services
- Intermediate SSIS Workflow Management – Level 7 of the Stairway to Integration Services
- Advanced SSIS Workflow Management – Level 8 of the Stairway to Integration Services
- Control Flow Task Errors – Level 9 of the Stairway to Integration Services
- Advanced Event Behavior – Level 10 of the Stairway to Integration Services
- Logging – Level 11 of the Stairway to Integration Services
Introduction
In the previous installment we configured SSIS’ built-in logging. We demonstrated simple and advanced log configuration, exported and imported log configurations, and generated custom log messages using Script Tasks and the Dts.Events object. In Step 9 we discussed the behavior of bubbling events, shared methods for manipulating the default behavior of event bubbling, and introduced the Parent-Child pattern.
In this article, we will combine what we have learned about event bubbling, logging, and the Parent-Child pattern to create a custom SSIS package logging pattern.
Reviewing SSIS Task Events
Open the Precedence.dtsx package. Your Control Flow should appear as shown in Figure 1:

Figure 1
As in Steps 9 through 11, we focus on Sequence Container 1.
In Step 9 of this series, we created OnError event handlers – which we described as event “listeners” – on Script Task 4 and Sequence Container 1. In Step 10 of this series, we extended the pattern by adding an OnError event handler for the Precedence.dtsx SSIS package. To each OnError event handler, we added a Script Task that displays a message box containing the values of the following SSIS OnError event handler variables:
- System::ErrorCode
- System::ErrorDescription
- System::SourceName
Before we begin testing, let’s verify and/or change some settings from the previous build of the Precedence.dtsx SSIS package. First, click anywhere in the whitespace of the Precedence.dtsx SSIS package Control Flow and then press the F4 key to display Properties. Change the DisableEventHandlers
property to True as shown in Figure 2:
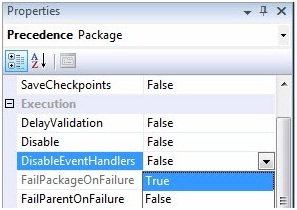
Figure 2
Before we make any more changes, execute the Precedence.dtsx SSIS package in the BIDS (Business Intelligence Development Studio) debugger by pressing the F5 key. Your response to the prompt “Succeed Script Task 2?” does not matter for the purposes of demonstration, but now and throughout this article we will opt to click the Yes button shown in Figure 3 to cause the Script Task to succeed:
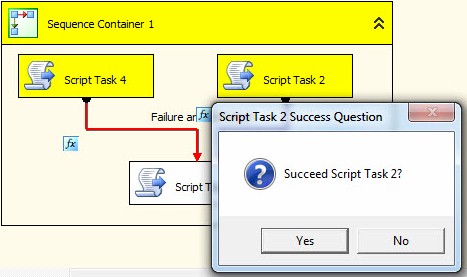
Figure 3
When prompted to “Succeed Script Task 4?” – as shown in Figure 3 – click the No button to raise an Error event from Script Task 4:
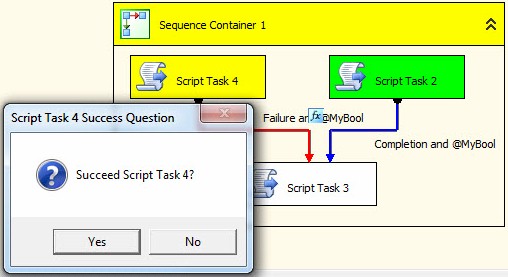
Figure 4
When Script Task 4 raises an Error event, the OnError event handler we configured in Step 9 is ignored due to disabling event handlers at the package level (shown in Figure 1). The next message box displayed informs us Script Task 3 has completed, as shown in Figure 5:
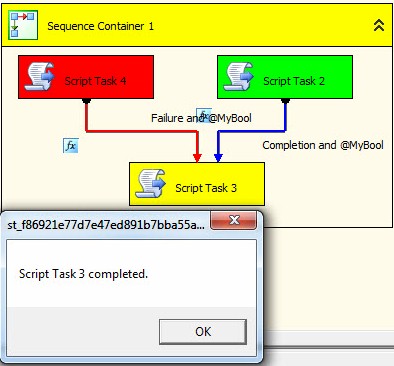
Figure 5
Acknowledging the Script Task 3 message box allows the Precedence.dtsx SSIS package to complete
execution in the BIDS debugger, and it appears as shown in Figure 6:
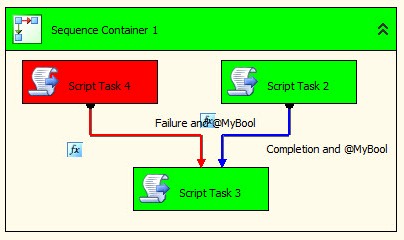
Figure 6
If your Precedence.dtsx SSIS package behaved as prescribed, we are ready to begin Level 12.
Disable Built-In Logging
The first thing we will do is remove the existing logging configuration from the SSIS package. To begin the process, click the SSIS dropdown menu and then click Logging as shown in Figure 7:
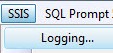
Figure 7
When the Configure SSIS Logs window displays, click the Delete button shown in Figure 8 to delete the existing text log file configuration.

Figure 8
Technically, this will stop logging in the Precedence.dtsx SSIS package. But I like to clean up SSIS packages, so I advocate un-checking the checkbox for the Precedence package in the Configure SSIS Logs
window, as shown in Figure 9:
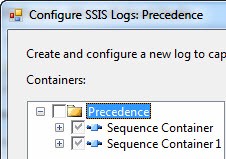
Figure 9
I also recommend deleting the log file connection manager shown in Figure 10:
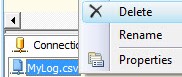
Figure 10
When prompted to Confirm Deletion of Connection, click the Yes button as shown in Figure 11:
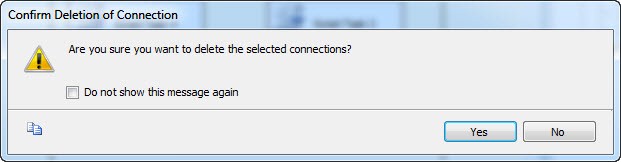
Figure 11
That cleans up the built-in logging we configured as part of Level 11. Execute the package in the BIDS debugger to make certain it performs as expected.
Event Bubbling, a Review
In Step 10 we introduced the Parent-Child SSIS design pattern. We created a new SSIS package named Parent.dtsx and added an Execute Package Task to the Control Flow of Parent.dtsx. We configured the Execute Package Task to “call” the Precedence.dtsx SSIS package. Near the end of Step 10, in the section titled “One Last Thing,” we disabled the event handlers in the Precedence.dtsx SSIS package – as we did earlier in this article. We then executed Parent.dtsx in the BIDS debugger and observed a message box displaying information about the error event raised by Script Task 4 in the Precedence.dtsx SSIS package. The observed behavior is a result of event bubbling.
To review event bubbling, open Parent.dtsx from Solution Explorer. I like configuring the BIDS environment to view Parent and Child packages so I can watch see as much as possible. Left-click and hold on the tab labeled “Precedence.dtsx” and drag it to the right a few pixels, and then release the left-mouse button. When you release the left mouse button, you are prompted to create a new Tab Group – Horizontal or
Vertical. Select New Vertical Tab Group as shown in Figure 12:

Figure 12
BIDS will arrange the packages as shown in Figure 13, which makes following Parent-Child executions much easier:
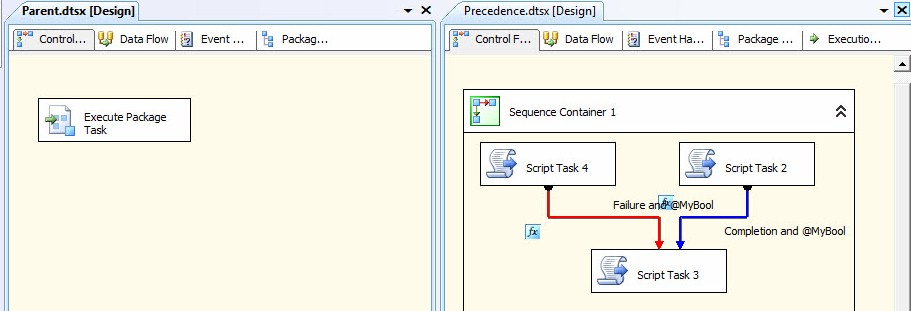
Figure 13
Click in the white space of the Parent.dtsx SSIS package’s Control Flow to make sure Parent.dtsx is selected. Press the F5 key to execute the Parent.dtsx SSIS package – which will call Precedence.dtsx – and when prompted to “Succeed Script Task 2,” click Yes; when prompted to “Succeed Script Task 4,” click No. Acknowledge the OnError event handler messages generated by Script Tasks on Script Task 4’s OnError event handler and Sequence Container 1’s OnError event handler. Acknowledge the message box informing you Script Task 3 has completed. Execution should complete and BIDS should appear as shown in Figure 14:
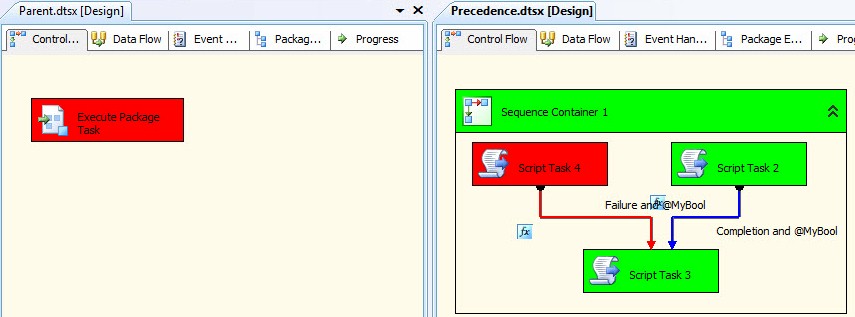
Figure 14
In Precedence.dtsx, note Script Task 4 failed and Sequence Container 1 succeeded. In Parent.dtsx, note the Execute Package Task failed. This condition exists because the ForceExecutionResult property of Sequence Container 1 remains set to “Success.” Note the Parent package’s OnError event handler executes next, as shown in Figure 15:
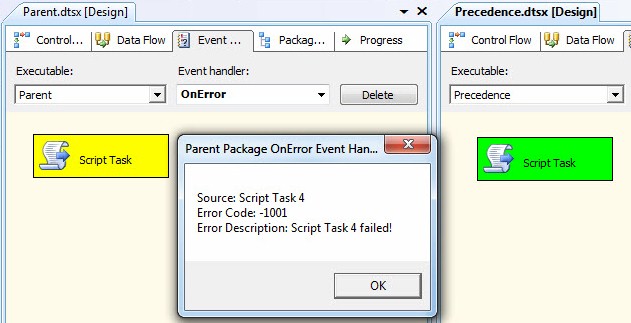
Figure 15
There are a couple interesting things I wish to point out here.
First, in the Parent-Child SSIS design pattern, the Error event bubbles from the “bottom” of the Precedence.dtsx SSIS package – Script Task 4 – to the “top” of the Parent.dtsx SSIS package. Figure 15 shows my “artist’s concept” of what is really and truly happening here. The Precedence.dtsx package acts as if it is “in scope” of the Parent.dtsx package’s Execute Package Task – like it is in an “Executables” virtual folder of the Execute Package Task. In real life, you will never view a Package Explorer diagram that displays the relationship I created in Figure 16. Execute Package Tasks do not have an Executables virtual folder, and if they did you would not see the Package Explorer from the child package included therein (at least not in a current version of SSIS at the time of this writing). But this represents the behavior of event bubbling in the Parent-Child SSIS design pattern:

Figure 16
Second, the Error event, originally generated at Script Task 4, is still configured with its original variable values. The ErrorCode, ErrorDescription, and SourceName SSIS variable values remain static as the Error event bubbles – even when it bubbles from the child package to the parent package, as shown in Figure
17:
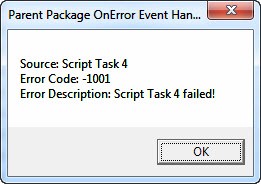
Figure 17
This behavior applies to all SSIS Task events, not just the OnError events. Let’s now put event bubbling to work for us.
Preparing for Parent-Child SSIS Design Pattern Logging
First, we need a database and table for logging. Let’s create a database named “SSISStairwayConfig”. I use the script shown in Listing 1 for creating this database:
Use master
go
/* SSISStairwayConfig database */If Not Exists(Select name
              From sys.databases
              Where name = 'SSISStairwayConfig')
 begin
  print 'Creating SSISStairwayConfig database'
  Create Database SSISStairwayConfig
  print 'SSISStairwayConfig database created'
 end
Else
 print 'SSISStairwayConfig database already exists.'
print ''
go
Listing 1
Next, I use the script in Listing 2 to build the “lg” schema and the “SSISErrors” table for logging:
Use SSISStairwayConfig
go
/* log schema */If Not Exists(Select name
              From sys.schemas
              Where name = 'lg')
 begin
  print 'Creating lg schema'
  declare @sql varchar(100) = 'Create Schema lg'
  exec(@sql)
  print 'Lg schema created'
 end
Else
 print 'Lg schema already exists.'
print ''
/* lg.SSISErrors table */If Not Exists(Select s.name + '.' + t.name
              From sys.tables t
              Join sys.schemas s
                On s.schema_id = t.schema_id
              Where s.name = 'lg'
                And t.name = 'SSISErrors')
 begin
  print 'Creating lg.SSISErrors table'
  Create Table lg.SSISErrors
  (
    ID int identity(1,1)
     Constraint PK_SSISErrors Primary Key Clustered
   ,ErrorDateTime datetime Not Null
     Constraint DF_logSSISErrors_ErrorDateTime
      Default(GetDate())
   ,ErrorDescription varchar(max) Null
   ,ErrorCode int Null
   ,SourceName varchar(255) Null
  )
  print 'Lg.SSISErrors created'
 end
Else
 print 'Lg.SSISErrors table already exists.'
print ''
Listing 2
We will land error data from our SSIS package in the lg.SSISErrors table in the SSISStairwayConfig database.
Applying the Parent-Child SSIS Design Pattern to Logging
Open the Event Handlers tab in the Parent.dtsx SSIS package and navigate to the Parent executable and the OnError event handler as shown in Figure 18:
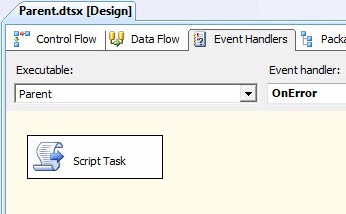
Figure 18
Drag an Execute SQL Task onto the OnError event handler surface and connect a Success precedence constraint from the Script Task to the new Execute SQL Task as shown in Figure 19:
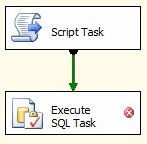
Figure 19
Open the Execute SQL Task Editor and change the ConnectionType property to ADO.NET as shown in Figure 20:
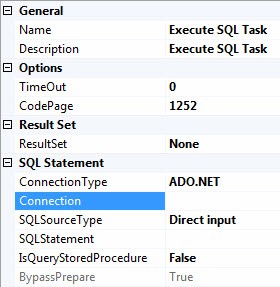
Figure 20
Click in the value dropdown of the Connection property and then click “<New connection…>” as shown in Figure 21:
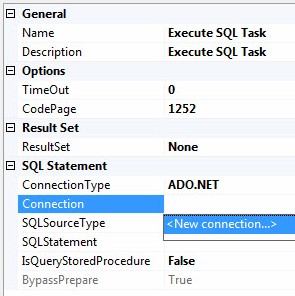
Figure 21
The New Connection option does three things for us. First, it selects the correct connection manager type: an ADO.NET Connection. Second, it creates a new ADO.NET Connection Manager in the Connection Managers tab at the bottom of the BIDS IDE as shown in Figure 22:

Figure 22
Third, the New Connection option opens the Configure ADO.NET Connection Manager editor as shown in Figure 23:
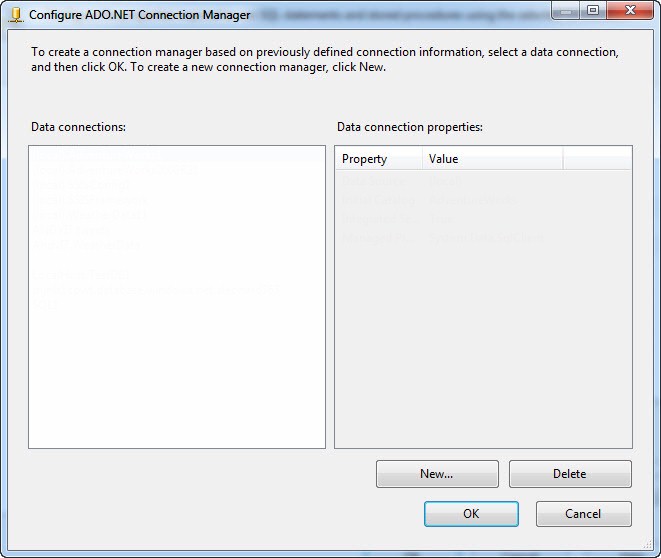
Figure 23
Click the New button to configure a new data connection. In the Server Name dropdown, select or enter the server and instance name of the SQL Server instance you used to create the SSISStairwayConfig database. Select or enter “SSISStairwayConfig” from the “Select or enter a database name” dropdown,
as show in Figure 24:

Figure 24
Click the Test Connection button to make sure you have access and permission to reach the SSISStairwayConfig database. If you cannot access the SSISStairwayConfig database for some reason you will see a dialog similar to that shown in Figure 25 (I simulated the error by deleting the last “g” from SSISStairwayConfig):
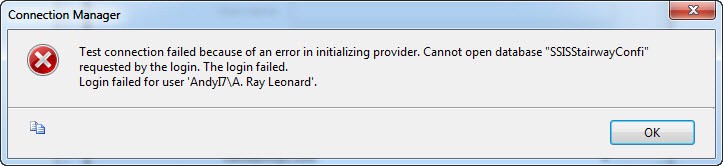
Figure 25
If the test succeeds, you will see a dialog similar to that shown in Figure 26:

Figure 26
Click the OK button to close the Connection Manager Editor and return to the Configure ADO.NET Connection Manager window as shown in Figure 27:
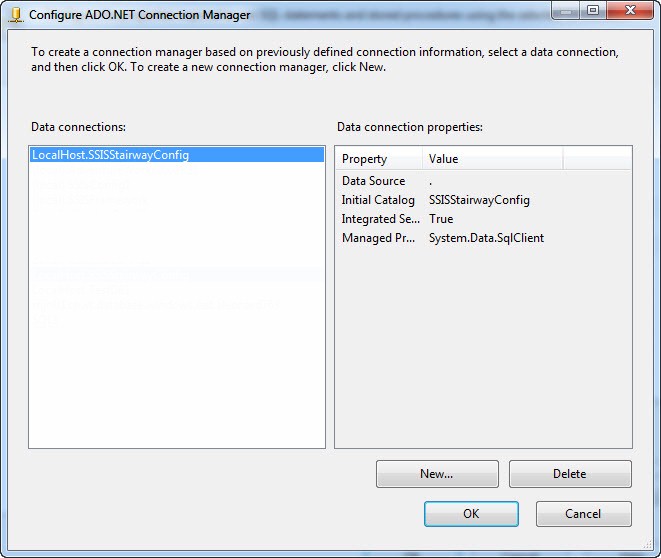
Figure 27
Data connections are stored in your Windows profile on your workstation. Data connection information will remain available on your workstation and be accessible when developing SSIS packages in the future. Click the OK button to close the Configure ADO.NET Connection Manager window.
SSIS has named the Connection Manager “LocalHost.SSISStairwayConfig” and placed that name in the Connection property of the Execute SQL Task. SSIS also named the actual connection manager “LocalHost.SSISStairwayConfig” as shown in Figure 28:
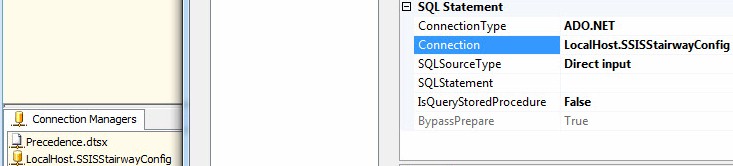
Figure 28
Next, click inside the value textbox of the SQLStatement property and then click the ellipsis to open the “Enter SQL Query” window. Enter the statement show in Listing 3 in the Enter SQL Query textbox:
Insert Into lg.SSISErrors
(ErrorCode
,ErrorDescription
,SourceName)
Values
(@ErrorCode
,@ErrorDescription
,@SourceName)
Listing 3
The Enter SQL Query window should appear similar to that shown in Figure 29:
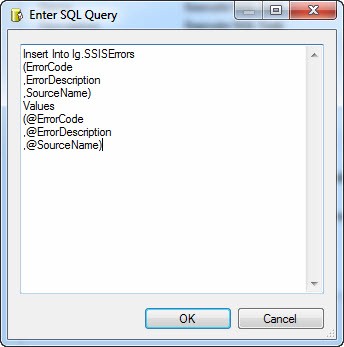
Figure 29
Click the OK button to close the Enter SQL Query window.
The Insert statement we created contains three parameters: ErrorCode, ErrorDescription, and SourceName. These parameters appear eerily similar to the SSIS variables we read in the Parent.dtsx SSIS package’s OnError event handler Script Task – the one we built way back in Control Flow Task Errors – Step 9 of the Stairway to Integration Services. Click Parameter Mapping in the list on the left side of the Execute SQL Task Editor to open the parameter mapping page, on which we will connect the SQL query parameters with the OnError event handler variables.
To begin, click the Add button. Change the Variable Name to “System::ErrorCode” by clicking the Variable Name dropdown. Change the Parameter Name to ErrorCode as shown in Figure 30:
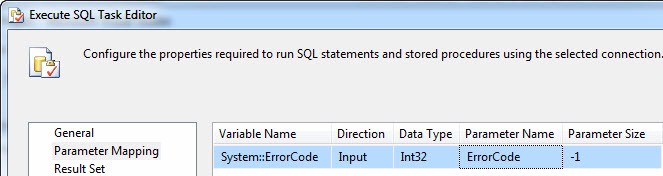
Figure 30
The System::ErrorCode SSIS variable is a Int32 (integer) data type and its value is replacing the @ErrorCode parameter in the Insert statement.
The options for Direction are Input, Output, and Return Value. The Data Type column contains a list of ADO.Net data types. Why ADO.Net data types? Because of the Connection Type we selected when we began configuring this Execute SQL Task (on the General page). Had we selected OLEDB for the Connection Type property, the Data Types here would be different. I can’t think of a single time I have changed the Parameter Size setting.
Another difference between ADO.Net and OLEDB connection types is: I can use the name of the parameter in both the SQL statement and the Parameter Name column when using ADO.Net. When using OLEDB I have to supply question marks in SQL statement and reference Parameter Names using numbers (0 for the first question mark, 1 for the second, etc.). I find the ADO.Net syntax to be more clean for Insert (and other) statements.
Click the Add button to add another parameter (ErrorDescription) as shown in Figure 31:

Figure 31
The System::ErrorDescription SSIS variable is a String data type and its value is replacing the @ErrorDescription parameter in the Insert statement.
Next, add another parameter mapping for the SourceName parameter:

Figure 32
The System::SourceName SSIS variable is a String data type and its value is replacing the @SourceName parameter in the Insert statement.
Execute the Parent.dtsx SSIS package in the BIDS debugger, observing the OnError event handler as shown in Figure 33:
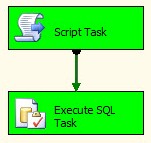
Figure 33
I clicked the No button when prompted to Succeed Script Task 4. The Parent.dtsx SSIS package’s OnError event handler responded, as did the Execute SQL Task. We can observe the results by opening SQL Server Management Studio (SSMS) and executing the statement shown in Listing 4:
Use SSISStairwayConfig
go
Select *
 From lg.SSISErrors
Listing 4
My results appear as shown in Figure 34:
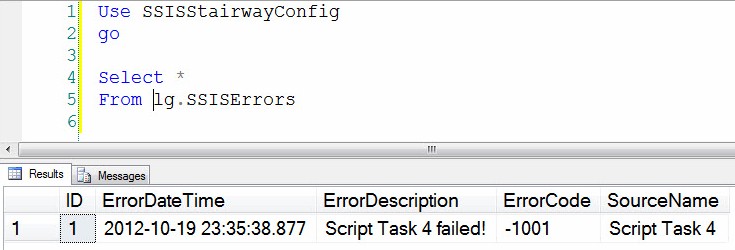
Figure 34
Pop quiz: in the Parent-Child pattern, how many lines of code or objects are required in the child package to log errors? (Answer: 0)
We get the additional benefit of consistency and collection: Each error message is logged in the same format and location.
Conclusion
In this article we combined what we have previously learned about event bubbling, logging, and the Parent-Child pattern to create a custom SSIS package logging pattern. We used the Parent.dtsx SSIS package’s OnError event handler and an Execute SQL Task to capture and store information about an error raised in the child package (Precedence.dtsx). We accomplished this without adding additional logic to the child package and we achieved a consistent format and location for storing SSIS error information.
:{>
