One of the many best practices for SQL Server’s table partitioning feature is to create “extra” empty partitions around your data. This is explained in SQL Server Books Online in the page on altering a Partition Function:
Always keep empty partitions at both ends of the partition range to guarantee that the partition split (before loading new data) and partition merge (after unloading old data) do not incur any data movement.
Ever wondered why that’s the case, and what might happen if you don’t follow it? Check out this sample case to learn the nitty gritty.
A Quick Summary of Partition Switching
One of the biggest benefits to table partitioning is the ability to move a lot of data in or out of the table very quickly. You can write a bunch of new data into a table, index it, and put some constraints on it without your users ever being the wiser. Then, you can “switch” the data into the table as a new partition super quickly.
Similarly, you can create an empty table, add minimum indexes to match the partitioned table, and “switch” a whole partition of data out into the empty table. SHAZAM! That data is now out of sight of your applications and users and you haven’t run a single delete.
This is called “partition switching”.
(Need more of a general refresher on table partitioning? Check out our reference page on partitioning, or our article, “How to Decide if You Should Use Table Partitioning“.)
When You Switch Out, Will SQL Server Always Remove the Filegroup You Want?
Splitting and merging boundary points can be complicated business. Today, we’re going to focus on merging. Here’s our sample scenario. (Want to see this hands-on? Scripts that do this are available for download at the end of this article.)
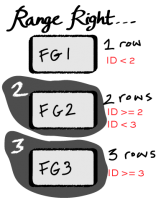
- Create a Partition Function (Range RIGHT) with two boundary points: 2 and 3
- Map three filegroups to the Partition Function using a Partition Scheme. The filegroups are named: FG1, FG2, and FG3
- Create a clustered table on the partition scheme, partitioned by ID
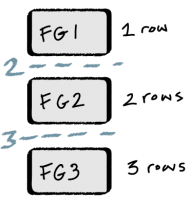
- Add one row with ID=1. Based on the boundary points, it’ll automatically go into Partition 1 on FG1
- Add two rows with ID=2. Those two rows automatically go into Partition 2 on FG2
- Add three rows with ID=3. Those three row automatically are put into Partition 3 on FG3
So we’ve got 1 row in FG1, two rows in FG2, and three rows in FG3.
Now, the data in Partition 1 on FG1 is old and we don’t need it anymore. We decide to switch out the data, and then we want to remove FG1 from the partition function. So here’s what we do:
- Create a new table for switching out with the same definition and clustered index as our partitioned table
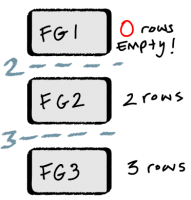
- Switch partition 1 out to the other table (magic!)
After the magical swtich out, we now have 0 rows in Partition 1 on FG1, 2 rows in FG2 and three rows in FG3. We’re halfway there!
We want to remove FG1 altogether, but it is still mapped to our Partition Function with our Partition Scheme. We need to tell SQL Server to just get rid of one of the partitions altogether, and to do this we have to alter our Partition Function.
We have no rows “below” the boundary point of 2 — those are all gone. So we merge the boundary point of 2. That command is successful, but to get things done SQL Server may not do exactly what you would think.
What SQL Server Actually Does in this Case
You might assume that SQL Server would see that FG1 has 0 rows on it, and remove that filegroup. After all, FG2 has rows in it, so why not just keep that one? It’s less work, right?
Well, it might be less work, but SQL Server doesn’t stop to figure that out. Instead, SQL Server decides to move the two rows from FG2 onto FG1, and then it un-maps FG2 from the partition scheme. It doesn’t ask before it does this– there’s no warning that “data movement” is going to happen. When you issue the command to merge the boundary point, you don’t have the option to CHOOSE where you want the data to go.
Whoops! Not such a big deal when it comes to two rows, but in production you’re going to have a lot more than two rows, and moving them around between filegroups can be pretty painful. It’s literally copying all the data from one filegroup into another. And if you do this by accident, by the time you figure it out, well, you may not have a lot of great options!
The fix for this is simple– follow the best practice of having extra boundary points at both ends of your partition range. Just like Books Online says, this prevents unexpected data movement. (We’ve got a demo code for that as well– check it out in the download at the end of this article.)
Why Did This Happen?
This happened because the rules of this game are complicated. We defined the partition function as RANGE RIGHT. That means that our boundary points are “lower” boundaries– the boundary point of 2 in this case is tied to all the rows with the value of 2.

Here’s how MERGE RANGE works. When you merge a range, you provide a boundary point. SQL Server then does the following (the emphasis on the last paragraph is mine):
Drops a partition and merges any values that exist in the partition into one of the remaining partitions. RANGE (boundary_value) must be an existing boundary value, into which the values from the dropped partition are merged. The filegroup that originally held boundary_value is removed from the partition scheme unless it is used by a remaining partition, or is marked with the NEXT USED property. The merged partition resides in the filegroup that originally did not hold boundary_value.
Clear as mud, right? (I’m pretty sure that paragraph was written by a German Philosopher.)
Unpacking/ decoding those sentences, essentially when you MERGE a boundary point, you are telling SQL Server to get rid of the partition associated with that boundary point. This will vary depending on whether the partition function was defined with RANGE RIGHT or RANGE LEFT.
In this case, boundary point 2 is a lower boundary point (RANGE RIGHT), and it’s associated with FG2. When we merged boundary point 2, we directly told SQL Server “ditch FG2!”. And it directly did as we asked.
But even though it had to get rid of FG2, it knew better than to lose the data on it. So based on our Partition Function, it had no choice but to move it into FG1.
How to Stay Sane with Table Partitioning
The way to stay sane with table partitioning is to always start out with the belief that your memory is imperfect. Whenever you ask a “how do I…” or “what happens if I…” question, build a quick script using a small amount of data and work out your issue in a development environment.
While you’re testing changes, go beyond just memorizing the best practices. Make sure you’re looking at details about how much data lies in each partition and where each partition is mapped. Always check your end state and make sure that what happened is actually what you expected!
Scripts!
Get the scripts here: Table Partitioning Tutorial – Unexpected Data Movement.
The scripts show two examples:
- The initial scenario where merging the boundary point causes “unplanned data movement”
- A second scenario where the best practice of using empty partitions at the end of your partition range makes this much simpler, and merging the boundary point goes just like you’d think.
More SQL Server Table Partitioning Resources
Before you start designing a table partitioning strategy, or if you’re trying to troubleshoot why your partitioned tables aren’t working as fast as you expect, check out our SQL Server table partitioning resources page.

