

Recently, one of my favorite customers asked me some very thought-provoking questions about using database partitioning to move transactional data around. Their current process undergoes a pretty large delete operation nightly, and they want to improve the speed and efficiency of the processes. So, being a tad rusty on partitioning, I whipped up a demo script that uses table-level partitioning to divide up inbound data based on a monthly date range and move the data to a new table for the delete processing. The new table can be truncated instantly, rather than the current process of batch deleting, which is less efficient.
OK – let’s create a junk 2012 database to tinker with.
CREATE DATABASE [PartitionTest1]
CONTAINMENT = NONE
ON PRIMARY
( NAME = N'PartitionTest', FILENAME = N'E:\Program Files\Microsoft SQL Server\MSSQL11.MSSQLSERVER\MSSQL\DATA\PartitionTest.mdf' , SIZE = 4096KB , FILEGROWTH = 1024KB )
LOG ON
( NAME = N'PartitionTest_log', FILENAME = N'E:\Program Files\Microsoft SQL Server\MSSQL11.MSSQLSERVER\MSSQL\DATA\PartitionTest_log.ldf' , SIZE = 1024KB , FILEGROWTH = 10%)
GO
For SQL Server 2008R2 and below, remove the ‘Containment = NONE’ bit of code.
Now, we’ll add file groups to ensure data file placement flexibility. I’m adding one per month of data.
--add file groups for future data placement flexibility
ALTER DATABASE PartitionTest1 ADD FILEGROUP FGMonth01
ALTER DATABASE PartitionTest1 ADD FILEGROUP FGMonth02
ALTER DATABASE PartitionTest1 ADD FILEGROUP FGMonth03
ALTER DATABASE PartitionTest1 ADD FILEGROUP FGMonth04
ALTER DATABASE PartitionTest1 ADD FILEGROUP FGMonth05
ALTER DATABASE PartitionTest1 ADD FILEGROUP FGMonth06
ALTER DATABASE PartitionTest1 ADD FILEGROUP FGMonth07
ALTER DATABASE PartitionTest1 ADD FILEGROUP FGMonth08
ALTER DATABASE PartitionTest1 ADD FILEGROUP FGMonth09
ALTER DATABASE PartitionTest1 ADD FILEGROUP FGMonth10
ALTER DATABASE PartitionTest1 ADD FILEGROUP FGMonth11
ALTER DATABASE PartitionTest1 ADD FILEGROUP FGMonth12
go
Next, add data files corresponding to the new file groups. The files are on my laptop, so they all go to the same place, but they can be placed almost anywhere.
--add new database data files corresponding to the new file groups
ALTER DATABASE PartitionTest1
ADD FILE (NAME = N'Month01',
FILENAME = N'E:\Program Files\Microsoft SQL Server\MSSQL11.MSSQLSERVER\MSSQL\DATA\PartitionTestMonth01.ndf',
SIZE = 5MB, FILEGROWTH = 5MB) TO FILEGROUP [FGMonth01]
go
ALTER DATABASE PartitionTest1
ADD FILE (NAME = N'Month02',
FILENAME = N'E:\Program Files\Microsoft SQL Server\MSSQL11.MSSQLSERVER\MSSQL\DATA\PartitionTestMonth02.ndf',
SIZE = 5MB, FILEGROWTH = 5MB) TO FILEGROUP [FGMonth02]
go
ALTER DATABASE PartitionTest1
ADD FILE (NAME = N'Month03',
FILENAME = N'E:\Program Files\Microsoft SQL Server\MSSQL11.MSSQLSERVER\MSSQL\DATA\PartitionTestMonth03.ndf',
SIZE = 5MB, FILEGROWTH = 5MB) TO FILEGROUP [FGMonth03]
go
ALTER DATABASE PartitionTest1
ADD FILE (NAME = N'Month04',
FILENAME = N'E:\Program Files\Microsoft SQL Server\MSSQL11.MSSQLSERVER\MSSQL\DATA\PartitionTestMonth04.ndf',
SIZE = 5MB, FILEGROWTH = 5MB) TO FILEGROUP [FGMonth04]
go
ALTER DATABASE PartitionTest1
ADD FILE (NAME = N'Month05',
FILENAME = N'E:\Program Files\Microsoft SQL Server\MSSQL11.MSSQLSERVER\MSSQL\DATA\PartitionTestMonth05.ndf',
SIZE = 5MB, FILEGROWTH = 5MB) TO FILEGROUP [FGMonth05]
go
ALTER DATABASE PartitionTest1
ADD FILE (NAME = N'Month06',
FILENAME = N'E:\Program Files\Microsoft SQL Server\MSSQL11.MSSQLSERVER\MSSQL\DATA\PartitionTestMonth06.ndf',
SIZE = 5MB, FILEGROWTH = 5MB) TO FILEGROUP [FGMonth06]
go
ALTER DATABASE PartitionTest1
ADD FILE (NAME = N'Month07',
FILENAME = N'E:\Program Files\Microsoft SQL Server\MSSQL11.MSSQLSERVER\MSSQL\DATA\PartitionTestMonth07.ndf',
SIZE = 5MB, FILEGROWTH = 5MB) TO FILEGROUP [FGMonth07]
go
ALTER DATABASE PartitionTest1
ADD FILE (NAME = N'Month08',
FILENAME = N'E:\Program Files\Microsoft SQL Server\MSSQL11.MSSQLSERVER\MSSQL\DATA\PartitionTestMonth08.ndf',
SIZE = 5MB, FILEGROWTH = 5MB) TO FILEGROUP [FGMonth08]
go
ALTER DATABASE PartitionTest1
ADD FILE (NAME = N'Month09',
FILENAME = N'E:\Program Files\Microsoft SQL Server\MSSQL11.MSSQLSERVER\MSSQL\DATA\PartitionTestMonth09.ndf',
SIZE = 5MB, FILEGROWTH = 5MB) TO FILEGROUP [FGMonth09]
go
ALTER DATABASE PartitionTest1
ADD FILE (NAME = N'Month10',
FILENAME = N'E:\Program Files\Microsoft SQL Server\MSSQL11.MSSQLSERVER\MSSQL\DATA\PartitionTestMonth10.ndf',
SIZE = 5MB, FILEGROWTH = 5MB) TO FILEGROUP [FGMonth10]
go
ALTER DATABASE PartitionTest1
ADD FILE (NAME = N'Month11',
FILENAME = N'E:\Program Files\Microsoft SQL Server\MSSQL11.MSSQLSERVER\MSSQL\DATA\PartitionTestMonth11.ndf',
SIZE = 5MB, FILEGROWTH = 5MB) TO FILEGROUP [FGMonth11]
go
ALTER DATABASE PartitionTest1
ADD FILE (NAME = N'Month12',
FILENAME = N'E:\Program Files\Microsoft SQL Server\MSSQL11.MSSQLSERVER\MSSQL\DATA\PartitionTestMonth12.ndf',
SIZE = 5MB, FILEGROWTH = 5MB) TO FILEGROUP [FGMonth12]
go
Next, we’ll use the new database and start on the partitioning details. A function is created that will return the integer corresponding to the month of the data’s date. A partition function is created that gives us our possible value map. A partition scheme is built so that these values are mapped to the partitions and corresponding file groups, based on the function’s return value.
use PartitionTest1
go
--create function for getting correct partition number from month of date
CREATE FUNCTION [dbo].[fnGetPartition](@Dt Date)
RETURNS TINYINT
WITH SCHEMABINDING
AS
BEGIN
DECLARE @RetVal TINYINT
SET @RetVal = datepart(mm, @dt)
RETURN @RetVal
END
GO
--create possible values for the partitioning function
--notice that 12 will be bundled with the right side of the upcoming partitioning scheme
CREATE PARTITION FUNCTION [pfPartition](TINYINT)
AS RANGE LEFT FOR VALUES
(
1,2,3,4,5,6,7,8,9,10,11
)
GO
--create the partition scheme that lines up with the new file groups
CREATE PARTITION SCHEME psPartitionTable
AS PARTITION pfPartition
TO (FGMonth01,FGMonth02,FGMonth03,FGMonth04,FGMonth05,FGMonth06,FGMonth07,FGMonth08,FGMonth09,FGMonth10,FGMonth11,FGMonth12)
GO
Now, we’ll create two tables. The first is for the yearly storage of the transactional data. The second table is the staging table where the monthly data would be moved into, processed, and then deleted. For the partitioning transfer to work, these tables should be nearly identical. The tables must have the same column structure and order. The destination table does not need to be explicitly partitioned, however. I like to keep things the same so that you do not see a warning informing you of this difference.
--create the new test table
CREATE TABLE [dbo].[TestTable1](
[PartitionNum] AS dbo.fnGetPartition(GeneratedDate) PERSISTED,
[GeneratedDate] [date] NOT NULL
) ON psPartitionTable(PartitionNum)
GO
--create the staging table to be used for the data deletes. Note: it must be the same
--structure as the source table.
CREATE TABLE [dbo].[StagingTable1](
[PartitionNum] AS dbo.fnGetPartition(GeneratedDate) PERSISTED,
[GeneratedDate] [date] NOT NULL
) ON psPartitionTable(PartitionNum)
go
Now, we’ll insert some randomly generated date values into this table. Thanks to Latif Khan for a cool script to generate random dates.
--insert 5000 randomly generated dates.
--thanks http://www.latifkhan.co.uk/index.php/select-random-date-time-in-sql-server/ for the cool query!
insert into dbo.TestTable1 (GeneratedDate)
select cast(
cast( getdate() as int )
-5555 * rand( cast( cast( newid() as binary(8) ) as int ) )
as datetime )
go 5000 --do this 5000 times.
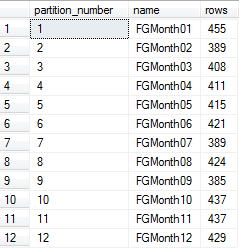
Let’s see just what this looks like. The following query will give us all of the partitions inside the table, and the row counts per partition.
SELECT
p.partition_number, fg.name, p.rows
FROM
sys.partitions p
INNER JOIN sys.allocation_units au ON au.container_id = p.hobt_id
INNER JOIN sys.filegroups fg ON fg.data_space_id = au.data_space_id
WHERE
p.object_id = OBJECT_ID('dbo.TestTable1')
go
Results:
In the following bits of code, the partition that I wish to relocate corresponds to the month of April (month number 4). We’ll switch the partition to the new StagingTable1′s partition number four. Ensure that this partition is empty or else this command will fail. Only metadata is updated to make this switch, so it’s very quick and very efficient.
--random month = april (month number 4)
alter table dbo.TestTable1
switch partition 4 to dbo.[StagingTable1] partition 4
go
Sweet. Rerun the check query to look at row counts.
SELECT
p.partition_number, fg.name, p.rows
FROM sys.partitions p
INNER JOIN sys.allocation_units au ON au.container_id = p.hobt_id
INNER JOIN sys.filegroups fg ON fg.data_space_id = au.data_space_id
WHERE
p.object_id = OBJECT_ID('dbo.TestTable1')
go
Results:

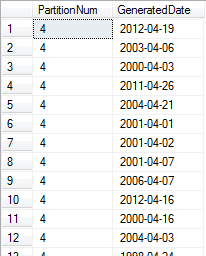
And, now the staging table contains our data!
select * from dbo.stagingtable1
Finally, our transactional data can be deleted with a table truncate, which is very quick instead of a delete operation, which can take a while and potentially introduce some table locking.
truncate table dbo.stagingtable1
Now, keep in mind that this example does not factor any indexes, primary keys, etc., so when you apply this to your environment, maintain your PK and indexing strategies accordingly.
You can download the full demo script here.
