In Part Two of this series, I covered the key steps that were necessary in order to properly install and configure an instance of SQL Server 2012. In this installment, I will discuss the next set of steps that are required after you have already completed the steps in Part Two. The idea here is to make sure that your new instance is completely ready to be used and that you have done everything necessary to help keep your instance running smoothly in the future.
Confirming Network Connectivity
The first order of business is to ensure that you have network connectivity to your new instance of SQL Server. You need to make sure that the appropriate network protocols are enabled on the SQL server instance. You can do this by going to the Start Menu, then going to SQL Server 2012, and then Configuration Tools, and selecting SQL Server Configuration Manager. This will open up the SQL Server Configuration Manager application. Next, you need to click on SQL Server Network Configuration in the left-hand pane, and then click on Protocols for MSSQLSERVER (for a default instance of SQL Server). This will display the available network protocols in the right pane of the window, as shown in Figure 1.
In most cases your applications are going to be using the TCP/IP protocol, so you need to make sure that TCP/IP is enabled so that other machines can communicate with your database server over the network. Depending on what edition of SQL Server you have installed, it may already be enabled, but it is always a good idea to confirm that it is enabled.
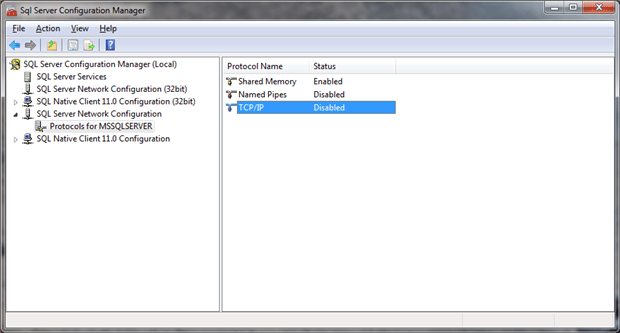
Figure 1: SQL Server Configuration Manager Network Protocols
If you see that it is disabled in SQL Server Configuration Manager (like you see in Figure 1), you are going to need to enable it by right-clicking on it and selecting Enable. After you do this, you will get a warning message that tells you that you will have to restart the appropriate SQL Server Service before the change will take effect, as seen in Figure 2.
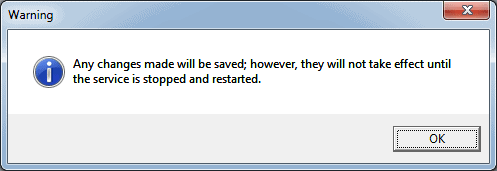
Figure 2: Service Change Warning Message
This warning message is true, so you will need to restart the SQL Server Service for the correct instance of SQL Server that you are working on before TCP/IP will be enabled.
You can do this from SQL Server Configuration Manager by clicking on SQL Server Services in the left-hand pane of the SQL Server Configuration Manager window. This will display all of the installed SQL Server related services for all of the SQL Server instances on the machine in the right-hand-pane of the window. Then you can right-click on the correct service (which should be called SQL Server (MSSQLSERVER) for a default instance) and select Restart to restart the SQL Server Service. Make sure you select the correct service and make sure you are aware that any connections that might exist (which should be none in this case) will be dropped when you do this. After enabling TCP/IP you will want to confirm that you can connect to your instance from a remote machine, such as your workstation or a web server. You can quickly and easily do this on any Windows machine using an old DBA technique with a Microsoft Data Link file.
Confirming SQL Server Connectivity
You simply can right-click on the desktop and select New – Text Document to create an empty text file. Then, you need to right-click on the file and select Rename, and change the file extension from .txt to .udl to create an empty Microsoft Data Link file. If you don’t see any file extensions on your files, you can go into Folder and Search options in Windows Explorer and disable the option to hide file extensions.
After you have created a Microsoft Data Link File, simply double-click on it to open up the Data Link Properties dialog as shown in Figure 3.
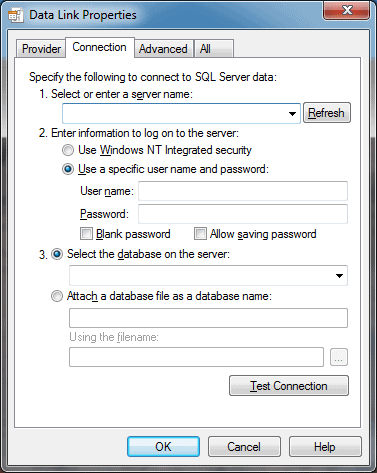
Figure 3: Data Link Properties – Connection Tab
For some reason known only to Microsoft, this dialog always opens on the Connection tab (as shown in Figure 3), but you actually need to click on the Provider tab to get to what you see in Figure 4.
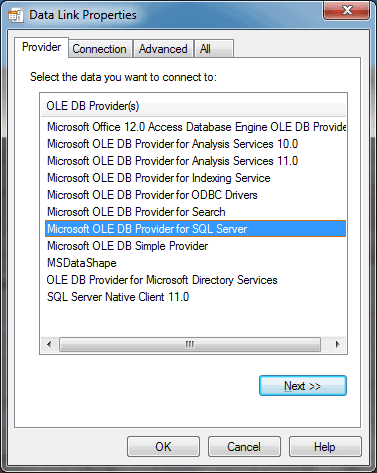
Figure 4: Data Link Properties – Provider Tab
Depending on what OLE DB Providers are installed on the machine that you want to test, you may see a different list than what is shown in Figure 4. For this test, you should select the Microsoft OLE DB Provider for SQL Server, and then go back to the Connection tab. You need to enter a server name (or IP address), and then a set of valid credentials with either Windows NT Integrated security (which will use your Windows credentials) or a User name and password using SQL Server authentication as you see in Figure 5.
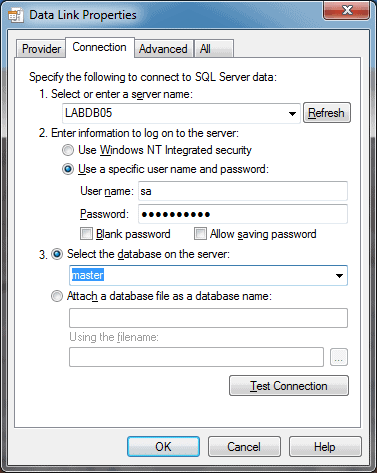
Figure 5: Data Link Properties – Provider Tab with Connection Information
After you have done this, you should be able to select a database on the server and then click on the Test Connection button to make a connection to that database on that server. If all is well, you should be rewarded by the success dialog as shown in Figure 6.
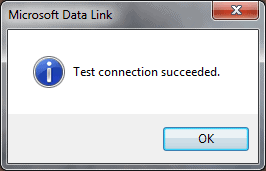
Figure 6: Microsoft Data Link – Test connection succeeded dialog
This quick, simple test lets you confirm that the remote machine you tested can connect to the SQL Server instance and database. It proves that the SQL Server service is running and has an appropriate network protocol enabled. It also proves that you have network connectivity that is not being blocked by a firewall and that the credentials that you used have rights to connect to the instance and database. This quick technique is very useful for verifying connectivity and basic functionality from any machine, whether or not it has SQL Server Management Studio or any other development tools installed.
Setting Up Monitoring and Automation
In order to make your SQL Server instance more resilient and reliable, you need to take advantage of the built-in features for detecting problems and notifying someone that something is wrong in an automated fashion. One of the first steps in this effort should be to setup Database Mail, so that you can have SQL Server send email notifications when problems occur. You can use the Database Mail Configuration Wizard in SSMS to do this.
You also should make sure that the SQL Server Agent service is configured with its Start Mode set to Automatic, so that it will automatically start whenever Windows starts. You can do this using SQL Server Configuration Manager, as shown in Figure 7.
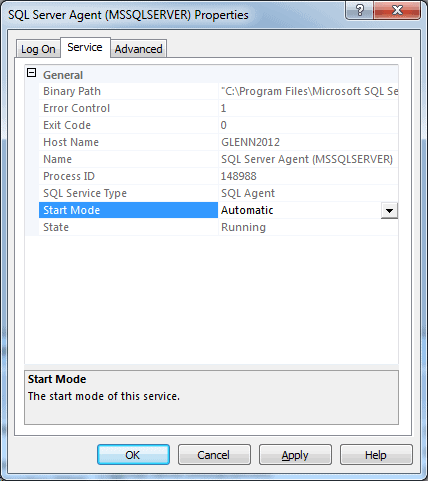
Figure 7: SQL Server Agent Properties
The next important step is to create an Operator in the Operators folder under SQL Server Agent in Object Explorer in SSMS. You can go to the Operators folder, right-click, and select New Operator… to open the New Operator dialog as shown in Figure 8. Before you do this, you should make sure that you have your email administrator create an email distribution group that you can use as an email address for your operator instead of using a single real person’s email address. This will let multiple people see the email notifications that go out to this Operator. You can also setup Pager information for this operator which can send text messages to smart phones or actually activate an on-duty pager.
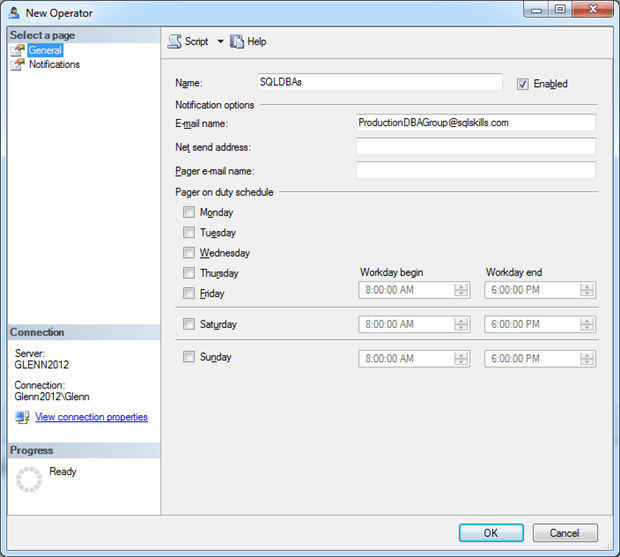
Figure 8: New Operator dialog
Setting Up SQL Server Agent Alerts
Now that you have SQL Server Agent running, Database Mail setup, and a SQL Server Agent Operator created, it is time to create some SQL Server Agent Alerts for some of the most critical errors that require fast notification and action. These include Severity 19 through Severity 25 errors and Error 825. An example T-SQL script to create these SQL Server Agent Alerts is shown in Listing 1.
|
1 2 3 4 5 6 7 8 9 10 11 12 13 14 15 16 17 18 19 20 21 22 23 24 25 26 27 28 29 30 31 32 33 34 35 36 37 38 39 40 41 42 43 44 45 46 47 48 49 50 51 52 53 54 55 56 57 58 59 60 61 62 63 64 65 66 67 68 69 70 71 72 73 74 75 76 77 78 79 80 81 82 83 84 85 86 87 88 89 90 91 92 93 94 95 96 97 98 99 100 101 102 103 104 105 106 107 108 109 110 111 112 113 114 115 116 117 118 119 120 121 122 123 124 125 126 127 128 |
-- Add important SQL Agent Alerts -- Change Alert names and operator_name as needed -- Glenn Berry -- SQLskills -- 9-10-2012 USE [msdb]; GO -- Change @OperatorName as needed -- Alert Names start with the name of the server DECLARE @OperatorName SYSNAME = N'SQLDBAs'; DECLARE @Sev19AlertName SYSNAME = N'Glenn2012 Alert - Sev 19 Error: Fatal Error in Resource'; DECLARE @Sev20AlertName SYSNAME = N'Glenn2012 Alert - Sev 20 Error: Fatal Error in Current Process'; DECLARE @Sev21AlertName SYSNAME = N'Glenn2012 Alert - Sev 21 Error: Fatal Error in Database Process'; DECLARE @Sev22AlertName SYSNAME = N'Glenn2012 Alert - Sev 22 Error Fatal Error: Table Integrity Suspect'; DECLARE @Sev23AlertName SYSNAME = N'Glenn2012 Alert - Sev 23 Error: Fatal Error Database Integrity Suspect'; DECLARE @Sev24AlertName SYSNAME = N'Glenn2012 Alert - Sev 24 Error: Fatal Hardware Error'; DECLARE @Sev25AlertName SYSNAME = N'Glenn2012 Alert - Sev 25 Error: Fatal Error'; DECLARE @Error825AlertName SYSNAME = N'Glenn2012 Alert - Error 825: Read-Retry Required'; -- Sev 19 Error: Fatal Error in Resource EXEC msdb.dbo.sp_add_alert @name = @Sev19AlertName, @message_id=0, @Severity=19, @enabled=1, @delay_between_responses=900, @include_event_description_in=1, @job_id=N'00000000-0000-0000-0000-000000000000'; EXEC msdb.dbo.sp_add_notification @alert_name = @Sev19AlertName, @operator_name=@OperatorName, @notification_method = 1; -- Sev 20 Error: Fatal Error in Current Process EXEC msdb.dbo.sp_add_alert @name = @Sev20AlertName, @message_id=0, @Severity=20, @enabled=1, @delay_between_responses=900, @include_event_description_in=1, @job_id=N'00000000-0000-0000-0000-000000000000' EXEC msdb.dbo.sp_add_notification @alert_name = @Sev20AlertName, @operator_name=@OperatorName, @notification_method = 1; -- Sev 21 Error: Fatal Error in Database Process EXEC msdb.dbo.sp_add_alert @name = @Sev21AlertName, @message_id=0, @Severity=21, @enabled=1, @delay_between_responses=900, @include_event_description_in=1, @job_id=N'00000000-0000-0000-0000-000000000000' EXEC msdb.dbo.sp_add_notification @alert_name = @Sev21AlertName, @operator_name=@OperatorName, @notification_method = 1; -- Sev 22 Error: Fatal Error Table Integrity Suspect EXEC msdb.dbo.sp_add_alert @name = @Sev22AlertName, @message_id=0, @Severity=22, @enabled=1, @delay_between_responses=900, @include_event_description_in=1, @job_id=N'00000000-0000-0000-0000-000000000000' EXEC msdb.dbo.sp_add_notification @alert_name = @Sev22AlertName, @operator_name=@OperatorName, @notification_method = 1; -- Sev 23 Error: Fatal Error Database Integrity Suspect EXEC msdb.dbo.sp_add_alert @name = @Sev23AlertName, @message_id=0, @Severity=23, @enabled=1, @delay_between_responses=900, @include_event_description_in=1, @job_id=N'00000000-0000-0000-0000-000000000000' EXEC msdb.dbo.sp_add_notification @alert_name = @Sev23AlertName, @operator_name=@OperatorName, @notification_method = 1; -- Sev 24 Error: Fatal Hardware Error EXEC msdb.dbo.sp_add_alert @name = @Sev24AlertName, @message_id=0, @Severity=24, @enabled=1, @delay_between_responses=900, @include_event_description_in=1, @job_id=N'00000000-0000-0000-0000-000000000000' EXEC msdb.dbo.sp_add_notification @alert_name = @Sev24AlertName, @operator_name=@OperatorName, @notification_method = 1; -- Sev 25 Error: Fatal Error EXEC msdb.dbo.sp_add_aalert @name = @Sev25AlertName, @message_id=0, @Severity=25, @enabled=1, @delay_between_responses=900, @include_event_description_in=1, @job_id=N'00000000-0000-0000-0000-000000000000' EXEC msdb.dbo.sp_add_notification @alert_name = @Sev25AlertName, @operator_name=@OperatorName, @notification_method = 1; -- Error 825: Read-Retry Required EXEC msdb.dbo.sp_add_alert @name = @Error825AlertName, @message_id=825, @Severity=0, @enabled=1, @delay_between_responses=900, @include_event_description_in=1, @category_name=N'[Uncategorized]', @job_id=N'00000000-0000-0000-0000-000000000000'; EXEC msdb.dbo.sp_add_notification @alert_name = @Error825AlertName, @operator_name=@OperatorName, @notification_method = 1; GO |
Listing 1: Creating Important SQL Server Agent Alerts
Adding Ola Hallengren’s Maintenance Solution
Rather than using the built-in SQL Server Maintenance Plan Wizard to create a number of different SQL Server Maintenance Plans that are hard to understand and troubleshoot, as well as being inefficient, you should strongly consider using Ola Hallengren’s free Maintenance Solution scripts, which are available at http://ola.hallengren.com/.
These scripts are very well tested and have been available since January 2008, with steady updates and improvements over the past nearly five years. Ola’s scripts have won multiple awards, are used by tens of thousands of people across the globe, and SQLskills has many clients using them in production.
These scripts cover database backups (Full, Differential and Transaction Log) for user databases, and full backups for your system databases. They also handle index maintenance for all of your databases. Finally they handle database integrity checking for your user and system databases by running DBCC CHECKDB. They are configurable so you can change backup locations, exclude databases, etc.
You can simply download the MaintenanceSolution.sql script from Ola’s website, change the parameter values as needed, and then run the script to create eleven new SQL Server Agent jobs on your instance. After you create these jobs, you will want to add email notifications to each job so that your Operator is notified if a job fails, as shown in Figure 9.
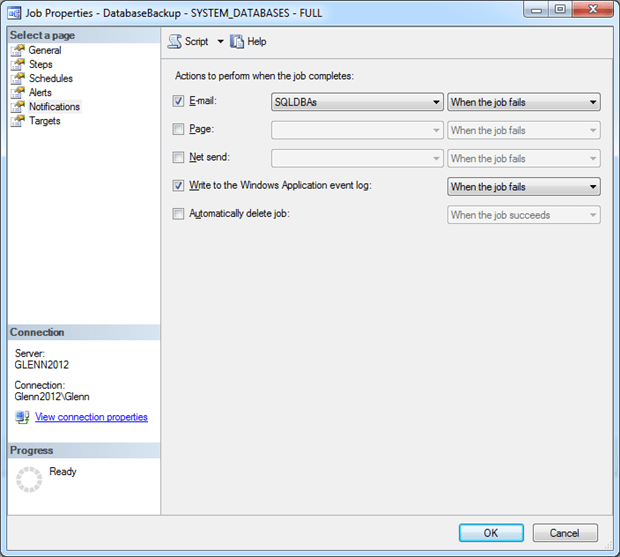
Figure 9: Adding an email Notification to a SQL Server Agent Job
You also need to add a job schedule to each of these eleven SQL Server Agent Jobs, based on your business requirements, infrastructure, and recovery point objective (RPO) and recovery time objective (RTO) goals. An example of this is shown in Figure 10.
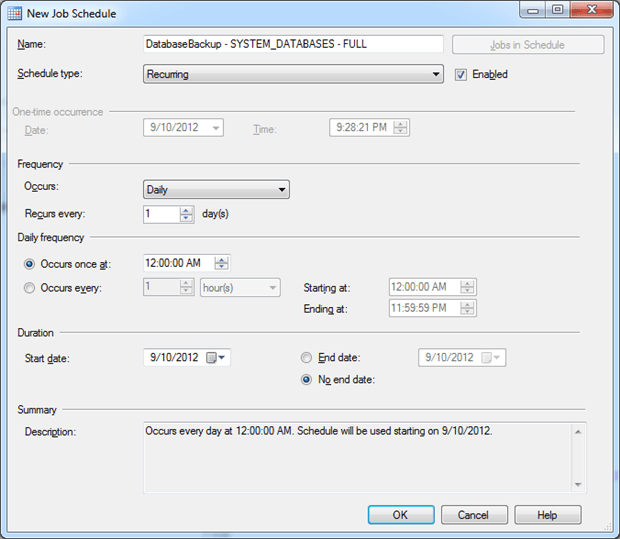
Figure 10: Adding a Job Schedule to a SQL Server Agent Job
If you don’t have clear RPO/RTO requirements from your business, you might start out with a job schedule like this:
| Job Name | Run Schedule |
| CommandLog Cleanup | Every Sunday at 12:00AM |
| DatabaseBackup – SYSTEM_DATABASES – FULL | Every day at 11:55PM |
| DatabaseBackup – USER_DATABASES – DIFF | Every day at 12:00PM |
| DatabaseBackup – USER_DATABASES – FULL | Every day at 12:00AM |
| DatabaseBackup – USER_DATABASES – LOG | Every 30 minutes |
| DatabaseIntegrityCheck – SYSTEM_DATABASES | Every Saturday at 8:00AM |
| DatabaseIntegrityCheck – USER_DATABASES | Every Saturday at 9:00AM |
| IndexOptimize – USER_DATABASES | Every Monday at 3:00AM |
| Output File Cleanup | Every Sunday at 12:01AM |
| sp_delete_backuphistory | Every Sunday at 12:02AM |
| sp_purge_jobhistory | Every Sunday at 12:03AM |
Summary
The third installment of this series has laid out a number steps that are required in order to ensure that your new instance of SQL Server is completely ready for use. It has also covered a number of steps that will make your instance easier to monitor and maintain. These include making sure you have Database Mail configured, making sure that SQL Server Agent is running and set to autostart, and making sure that you have an Agent Operator configured. Finally, we showed how to create SQL Server Agent Alerts and how to configure Ola Hallengren’s Maintenance Solution scripts.
Load comments