
At this point, if you’ve followed all the examples in the previous two levels of this Stairway, you have configured PowerShell and loaded SMO as well as the PowerShell Provider for SQL Server. This level will cover some of the Input/Output operations you can use with PowerShell. In most cases, you will want to use one or more input or output cmdlets when developing your PowerShell scripts. In Table 3.1 are some native cmdlets that interact with PowerShell Input and Output that will be discussed in this level, minus the last 3 in the list (indicated by the *). As this level is not meant to be an exhaustive illustration of every Input/Output cmdlet available in PowerShell; there are more to discover for yourself. However, this list will give you a pretty good start.
| CmdLet Name | Function |
| Out-Host | Sends output to the Host screen |
| Out-File | Sends output to the file designated after the cmdlet |
| Out-Null | Sends output to NUL device (output not seen) |
| Out-GridView | Special output that pops up an interactive GridView (has requirements to use but cool) |
| Add-Content | Allows you to add data to the end of a file |
| Get-Content | Gets the content of a file into a collection of lines |
| Set-Content | Replaces content of a file if it exists or creates one if it does not exist |
| Export-CSV | Exports data to a CSV format into a file specified |
| Import-CSV | Imports data from a CSV file into a variable |
| Read-Host | Allows entry of text from a prompt into a variable |
| Clear-Host | Clears the host screen (like CLS in DOS) |
| Write-Host | Outputs the text specified to the Host screen |
| Write-Output | Outputs the text specified to the Output stream |
| Write-Error | Outputs the text in an Error format (Red, like an exception that PowerShell would display) |
| Write-Warning | Outputs the text in a Warning format (Yellow, like a warning that PowerShell would display) |
| Write-Progress | Creates and displays a Progress Bar in a PowerShell window to show how complete things are |
| Write-Debug * | Writes to a Debug stream and only gets displayed when you are in debug mode for the script and use the -debug switch |
| Write-EventLog * | Writes to an Eventlog specified (Windows EventLog) |
| Write-Verbose * | Writes the output to the console when the -Verbose switch is specified when running a cmdlet, or function or script |
| * These cmdlets are left for you to try them out. You can find out how to use them by using Get-Help and the cmdlet name. These are not often used but have their use in certain scenarios. I will not cover them in the scope of this article, but wanted to call them out as they are part of the Input/Output family of cmdlets. | |
Table 3.1 Partial list of Native Cmdlets used for Input/Output operations in PowerShell
There are cmdlets that you will use more than others in Table 3.1, but most of them will be useful at some point in your adventures with PowerShell. Let’s look at the first four cmdlets that begin with “Out”. Out-File, Out-Null, Out-Grid and Out-Host can be used in 2 ways. The first use is with the Pipeline. You have seen this type of operation in the first two levels. Listing 3.1, shows how each of these four cmdlets can be used with the Pipeline, and Figure 3.1 illustrates the output from the first three cmdlets in Listing 3.1.
  “DBAduck” | Out-Host
  “DBAduck” | Out-File c:\temp\file.txt
  “DBAduck” | Out-Null
  “DBAduck” | Out-GridView
Listing 3.1 Script for Out-* PowerShell Output cmdlets
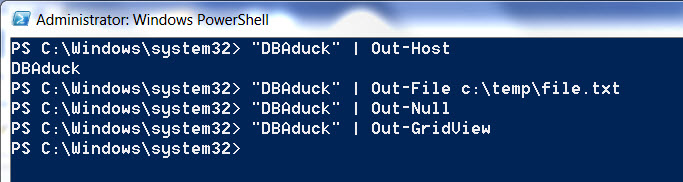
Figure 3.1 Use of the Out-* PowerShell Output cmdlets
Note
Out-GridView requires the .NET Framework 3.51 and the PowerShell ISE to be installed. These components are not always installed by default, especially on Windows Servers. You can see more details at this : Out-GridView Requirements.
Looking at the output in Figure 3.1, you can see that 2 of these cmdlets don’t appear to do anything in the PowerShell window, but if you look in Figure 3.2, it shows that a new window opens from the Out-GridView cmdlet.
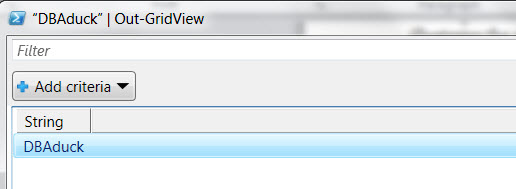
Figure 3.2 Partial view of the window that opens from the Out-GridView cmdlet
This window takes some time to open because it is generating a graphical display and the first time it opens, it has to create and execute the .NET classes to show this window. This is a special output mechanism and has some requirements to use as mentioned in the note above. The important thing to learn here is that there are many different ways to output information to files, graphical interfaces and to the screen.
The second method for using these four cmdlets allows you to specify parameters directly or with variables, instead of using the Pipeline. This is illustrated in Listing 3.2, and Figure 3.3. The output of the Out-GridView cmdlet is the same as in Figure 3.2. The difference between these two sets of commands it that the first is specifying the data values first and then passing that data through the pipeline to a cmdlet, and the second is specifying a cmdlet first and passing in data using the parameters by name or position without the pipeline. For now, it might not seem there is much difference between these two methods, but there are performance and efficiency differences that we’ll explore in future levels. .
$name = “DBAduck”
Out-Host –InputObject $name
Out-File –FilePath c:\temp\file.txt –InputObject $name
Out-Null –InputObject $name
Out-GridView –InputObject $name
Listing 3.2 Using Out-* cmdlets without the Pipeline
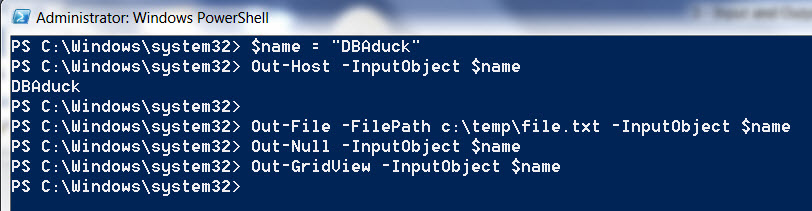
Figure 3.3 Output from Listing 3.2
Out-File –FilePath c:\temp\file.txt –InputObject $name –Append
Out-File –FilePath c:\temp\file.txt –InputObject $name –NoClobber
Listing 3.3 Using switches for Out-File
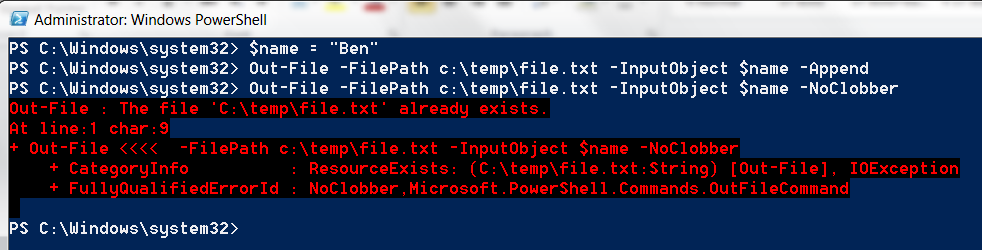
Figure 3.4 Out-File using -Append and -NoClobber
Explanation of the Out-* cmdlets
Now let’s take a look at these cmdlets in a bit more detail.
Out-Host: This cmdlet is used to send output to the host screen to be seen on the screen and only the screen. This type of output cannot be redirected to a file by using something like “DBAduck” | Out-Host > c:\temp\file.txt. Host means your current PowerShell window in in which you are executing this cmdlet, which simply means that it is not a formal output stream, it is simply the screen. The same will apply to the other commands that use the Host in their cmdlet name.
Out-File: This cmdlet is used to take whatever is passed as input to the cmdlet, and redirect it as output to a file. Using the code in Listing 3.2, and looking at Figure 3.3, it appears that it does nothing, but indeed if you were to open that file in Notepad, you would see the word “DBAduck”. This redirection is handy for many things. This cmdlet may not provide optimal performance as the file gets larger, and I’ll be discussing performance in an upcoming level in this Stairway. What is important to remember about this cmdlet, is that by default as it sends its output to a file, it will overwrite an existing file. You can use the -Append switch to keep from overwriting the file you specify, and append to the existing file instead. You can also use the -NoClobber switch to keep from overwriting the file and to generate an error if the file exists. This can be seen in Listing 3.3 and Figure 3.4.
Out-Null: This cmdlet is used to discard the output so that it is not seen. Anyone who has used DOS before (I know that dates me) and used something like “> NUL” can remember that it is just sent off to nowhere. Similarly for this cmdlet, the output is just sent to nowhere and you will not see it.
Out-GridView: This is a special output, as it generates graphical results and opens a graphical window with the results outside the PowerShell window.
Explanation of the *-Content cmdlets
Add-Content: This cmdlet is used to Add content to the end of a file or to create a file if it does not exist and output content to it. This cmdlet is useful when executed directly using parameters, as well as when passing the values to the cmdlet through the Pipeline.
Get-Content: This cmdlet is used to Get content from a file into variable or is commonly used in a ForEach loop. Get-Content retrieves the content from a file by line into a collection of objects, typically strings. Iteration through the results or just retrieving the content all at once is how this is used.
Set-Content: This cmdlet is used to Set content to a file and if the file exists, it will replace the contents of the file. If the file is Read-Only, you can use the -Force switch to overwrite the file. In listing 3.4, this cmdlet uses a parameter called LiteralPath which means that there can be no wildcard characters in the path name.. (There is another parameter called Path and it allows characters to be interpreted as wildcards.)
In Listing 3.4, you can notice a ForEach construct that allows iterating through a list of items one by one. ForEach will be seen many times throughout this Stairway. Figures 3.5, 3.6 and 3.7 will illustrate the output of each of the cmdlets executed in Listing 3.4.
Add-Content -LiteralPath c:\temp\addcontent.txt -Value “This is a test”
“This is another test” | Add-Content –LiteralPath c:\temp\addcontent.txt
Get-Content c:\temp\addcontent.txt
ForEach($var in (Get-Content c:\temp\addcontent.txt)) { $var }
Set-Content -LiteralPath c:\temp\setcontent.txt -Value “Setting Content”
Get-Content c:\temp\setcontent.txt
Set-Content -LiteralPath c:\temp\setcontent.txt -Value “Other Content”
Get-Content c:\temp\setcontent.txt
Listing 3.4 Using Add-Content, Get-Content and Set-Content

Figure 3.5 Using Add-Content to output content to a file

Figure 3.6 Using Get-Content to get content from a file

Figure 3.7 Using Set-Content to replace contents of a file
Import-CSV and Export-CSV
Import-CSV and Export-CSV are interesting because they deal with formatted data in files instead of just pulling or pushing data to/from files. The Export-CSV cmdlet exports data from any PowerShell object and inserts the type of object in the header of the file. Import-CSV takes advantage of this information and forms these objects with the data from the CSV file. For example, if I used Get-Process to get the processes on my computer, and wanted to export them to a CSV file to save, I could use Get-Process | Export-Csv c:\temp\process.csv. Figure 3.8 shows a portion of what is found inside the CSV file. Notice that in the top of the file there is a #TYPE header. This tells PowerShell on import what object type it is dealing with. The values after this header are the column names or field names of the object that was exported. You can omit the type information by using the parameter -NoTypeInformation as one of the parameters to Export-CSV.

Figure 3.8 Output of Export-Csv cmdlet
When using the Import-Csv cmdlet with this file, I will get back objects of the type specified in the header. Figure 3.9 illustrates the output of Listing 3.5 by using Get-Member, as we did in previous levels, to see which type of object we have on import. You can see in Figure 3.8 that there are fields in the header that we see in Figure 3.9 showing that Company is a field that was exported, and now it is in the Process object that was imported. As part of this level, you should experiment with getting various objects using some cmdlets like Get-Process, Get-Service and Get-History then export them with Export-Csv to see what you get in the output file. By using these cmdlets, you will become more familiar with how you can use them for something like cold-storage of objects that can be rehydrated later. Use Get-Command to find cmdlets that may be of interest to you and experiment.
$processes = Import-Csv c:\temp\process.csv
$processes | Get-Member
Listing 3.5 Using Import-Csv to import Process list

Figure 3.9 Using Import-Csv to import CSV to a variable produces objects
The Rest of the Story
The rest of the cmdlets in Table 3.1 are explained below. I am not be providing a lot of detail as these cmdlets are not necessarily related directly to SQL Server PowerShell, but they may be of use to you as you write automation scripts and need output to various places. Examples of these cmdlets can be seen in Listing 3.6 and the output is in Figure 3.10.
Read-Host: Read-Host is used to to prompt a user for input. This enables you to ask for input when none is provided. It is also a mechanism that allows you to list a menu of items, and capture the user’s choice with a Read-Host command.
Write-Host: This cmdlet is a way for a script to write to the screen of the PowerShell window. It allows status or other informational messages to be output to the user.
Write-Output: This is a little more useful than other Write-* commands. Write-Output can be used to return values from a Function (which we’ll see in a later level) as well as to write data to the output of your script. For example, the following code writes the FullName property of each file in your c:/temp directory to the Output stream:
ForEach($item in (Get-ChildItem c:\temp)) { Write-Output $item.FullName }Alternatively, instead of writing directly to the host, the output can be captured with a redirection (>) to a file, unlike Write-Host. We can see this by creating two scripts to compare the behavior between Write-Host and Write-Output.
Save the following to a file called c:\temp\testhost.ps1
ForEach($item in (Get-ChildItem c:\temp)) {
               Write-Host $item.FullName
}
Save the following to another file called c:\temp\testoutput.ps1
ForEach($item in (Get-ChildItem c:\temp)) {
               Write-Output $item.FullName
}
Once you have created these two scripts, go to the PowerShell prompt, make sure you are in the C:\temp directory, and type the following:
.\testhost.ps1 > testhost.txt
Then examine the output file:
notepad testhost.txt
You should notice that the file is empty, as Write-Host wrote the filenames to the Host screen but not the Output stream. Now run the other script the same way:
.\testoutput.ps1 > testoutput.txt
When you examine the second file in notepad, you should see the names of all the files in your C:\temp directory.
notepad testoutput.txt
Take a look at other possibilities for this cmdlet with Get-Help Write-Output -full.
Write-Error: This is a cmdlet that recreates what you have probably seen when there has been an error in the script or command that you have run. This cmdlet basically outputs the specified text in a red foreground and indicates that it is an error. This keeps the errors you your script generates consistent with the look and feel of errors produced by PowerShell itself.
Write-Warning: Like the Write-Error cmdlet, this cmdlet writes to the screen but it does so in a yellow foreground.
$age = Read-Host "Please enter your age "
Write-Host “Thank you for playing. You are $age years old.”
Write-Output “This is output”
Write-Error “This is an error”
Write-Warning “This is a warning”
Listing 3.6 Code examples of Write-* cmdlets

Figure 3.10 Output from Write-* cmdlets
for($i = 1; $i -lt 101; $i++ ) {
     Write-Progress -activity Updating -status Progress-> -percentcomplete $i `
         -currentOperation OuterLoop;
}
Listing 3.7 Using Write-Progress to show the status of a loop
 Figure 3.11 Write-Progress example screen
As you can see, there are many input and output functions that you have access to, and this is not an entire list or an exhaustive illustration of them. You will find that those listed here are fairly common cmdlets that get used often in PowerShell scripts. Have fun with them, be creative and flex those PowerShell muscles you are developing. Until next time.