Backing up databases is one of the most important jobs of a DBA. If your data is not safe, your job is not safe. Data is the lifeblood of a DBA. That said, there are so many products out on the market that will help with backing up transactional databases in SQL Server, but when it comes to Analysis Services (SSAS), you are on your own. That’s what I discovered when I became responsible for a SSAS database.
The good thing, is that there’s a very simple way to back up your SSAS databases. SQL Server Management Studio (SSMS) has this great feature that allows you to script just about anything you need to do, including backing up a SSAS database.
Here’s how:
- Open up SSMS and select the Analysis Services server type in the Registered Servers window.
- Double-click your server name, so that it appears in the object explorer, then expand the databases folder. Right click on the database you want to backup and select Back Up…
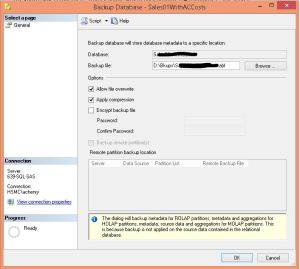
- The Backup Database dialog opens. Fill out the values appropriate for your environment. I highly recommend encrypting your backup files, just don’t forget what the password is otherwise you will never be able to restore your database.
- Instead of clicking the OK button when you are done, click the little arrow next to the Script button at the top of the screen and select Script Action to New Query Window. Click the Cancel button to cancel the Backup Database dialog.
- You should now have an XMLAQuery window in SSMS that contains the commands to back up your database.
Wow, that was easy. Now you can create a SQL Agent job and just paste this XMLA query in the job step (be sure to select SQL Server Analysis Services Command as the job step type) and call it a day. But you probably shouldn’t. As you will notice, I selected the Allow file overwrite option in the Backup Database dialog and that is reflected in my XMLA script with the AllowOverWrite tag set to true. So, if I created a SQL Agent job to run every day and used this as my job step, I would never have any backup history, I would only have the most current backup. For some shops, this will be okay, for others, it won’t. In my shop it wasn’t enough. Policy dictated that I keep one week of backups, regardless of whether it was a transactional database or an OLAP database.
Luckily, PowerShell and I have become good friends. I was able to quickly create two additional steps in my SQL Agent job that utilized PowerShell commands to achieve my goal of maintaining one week of backups. I created one step to rename the backup file by appending the current date to the file name and the other step I created to clean up any old backup files, so that I didn’t fill up my hard drive with backup files. Here are my scripts.
Rename file:
cd c:$today = get-date -uformat "%Y%m%d"$oldname = "\\uncfilepath\Databasename.abf"$filepath = "\\uncfilepath\"$newname = $filepath + "Databasename_" + $today + ".abf"rename-item $oldname $newname
Clean up old files:
cd c:$RetentionDate = (Get-Date).AddDays(-6)$FilePath = "\\uncfilepath"Get-ChildItem $FilePath -recurse -include "*.abf" | Where {($_.CreationTime -le $RetentionDate)} | Remove-Item –Force
I won’t go into detail about my PowerShell script here, it’s mostly self-explanatory, with the exception of the first line in each, cd c:. I discovered that since I was using a UNC path, I needed to add this little tidbit to the beginning of each script otherwise the steps would fail. This is because the version of PowerShell that is being invoked inside a SQL Agent job is not EXACTLY the same version that is invoked outside of SQL Server.


