

The first part of this series introduced the free SQL Server Partition Management Utility. We explained how the use the utility will reduce development time in the partition switching process. In this post I want to show you how to execute the utility from SSIS. In our example we are going to load a new set of data into a partition table.
Here is how the overall SSIS package design will flow:
- Check for and drop the Auxiliary table
- Create the Auxiliary table and switch out the data
- Truncate the Auxiliary table
- Load the Auxiliary table
- Merge the data into the Partitioned table
- Drop the Auxiliary table
Figure 1 shows a screenshot of the corresponding package in SSIS with each of the items above listed as a separate task:
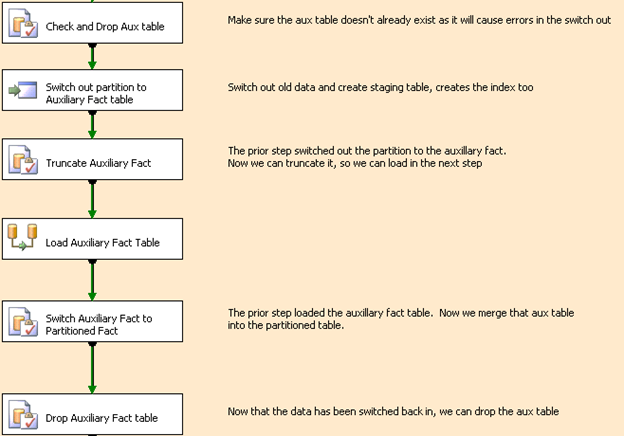
Figure1: Control flow view of the package
This package is duplicated multiple times and then configured for each partition table accordingly in each task.
Now, let’s examine each step in more detail.
Step 1 – Check for and drop the Auxiliary table
Our first step is to make sure the auxiliary table doesn’t already exist in the database. If it does, we drop the table. This is important because if the auxiliary table exists it will cause errors in the next step.
The syntax for the T-SQL statement is:
IF OBJECT_ID(<AuxiliaryTableName>) IS NOT NULL
 Drop table [<AuxiliaryTableName>]
In our implementation we use a separate SSIS package for each table and in the package a variable is used to identify the AuxiliaryTableName (see below). This allows us to the same expression in the Execute SQL Task and we just set the variable accordingly. Our code looks like this:
"IF OBJECT_ID('" + @[User::vAuxFactTable] + "') IS NOT NULL Drop table " + @[User::vAuxFactTable]Step 2 - Create the Auxiliary table and switch out the data
In the second step, some configuration is necessary. We will create variables to make the process configurable.
Create Variables
The variables will store the arguments to pass to the ManagePartition executable. We’ll need to pass the database, schema, and table names of the destination partitioned table. Also, we’ll need the name of the auxiliary table, and the partition identifier value which will be used to create the auxiliary table on the correct filegroup.
varDBServerName | Database server name |
vDatabaseName | The Database name |
varDWSchema | The name of the schema |
vAuxFactTable | The name of auxiliary table |
vFactTable | The name of the partitioned table |
vCustIDStr | The partition identifier |
varCustID | The multi-tenant customer identifier for the partition |
vManagePartitionPath | The path of the executable |
Using ManagePartition
To call the ManagePartition executable from SSIS, we’ll use the Execute Process Task. On the Expressions page there are two expressions, one for the executable to be called and one for the arguments to be passed to the executable (shown in Figure 2). The Executable expression simply uses the vManagePartitionPath variable. Figure 3 shows the expression used for the arguments which relies purely on the variables that we’ve already defined.

Figure 2: Expressions for the Execute Process Task

Figure 3: Arguments detail for the Execute Process Task (Switch out partition to Auxiliary fact table)
In this example we are using the ClearPartition command
ClearPartition – Empties a partition of all rows by creating a staging table and calling SWITCH. There is the option to keep or drop the staging table (/K), and the name of the staging table is optional (/A)
(A Readme.htm file can be found on http://sqlpartitionmgmt.codeplex.com/ for all COMMAND descriptions)
With the following arguments:
- /C switch is the command to be executed
- /S switch is the server name
- /d switch is the database name of the partitioned table
- /s switch is the schema of the partitioned table
- /A switch is the name of the auxiliary table
- /t switch is the table name of the partitioned table
- /v switch is the value to input to partition function to specify partition number
- /K indicates Keep Auxiliary Table if ClearPartition is being used
Debugging
For troubleshooting inside an SSIS package, you can capture the detailed error message to a text file by using the following in the Execute Task command:
Managepartition ... > errorfileN.txt (In our example above we are including the full path)
The files will contain the specific error messages to aid debugging and show you the failure causes for the failing packages.
Step 3 - Truncate the Auxiliary table
Now that we’ve created and switched out the data to the auxiliary table for the partition value of 1, we can safely truncate it. The syntax for the T-SQL statement is:
truncate table <AuxiliaryTableName>
Step 4 - Load the Auxiliary table
In this step, the auxiliary table is loaded with a data flow task. In the source query we want to retrieve data for the particular customer partition. In Figure 4, notice the use of a parameter to identify the customer partition (a customer identifier has been added to every multi-tenant table; the varCustID variable will store this identifier).

Figure 4: Expression for the SQL in Source task of the Data Flow task
Step 5 - Merge the data into the Partitioned table
In the second to last step of the process, we switch the auxiliary table into the destination partitioned table using the ALTER TABLE...SWITCH statement. The syntax for the T-SQL statement is:
ALTER TABLE <AuxiliaryTableName> SWITCH TO <DestinationPartitionedTable> PARTITION <PartitionNbr>

Figure 5: Expression for ALTER table SWITCH TO command of the Execute SQL task
Rather than just passing in the partition number, we use the $PARTITION function (http://msdn.microsoft.com/en-us/library/ms188071.aspx) to determine the correct partition to use. We don’t want to assume that CustID 1 goes to partition 1, CustID 2 goes to partition2, etc. (There might be customer id of 15 that goes to partition 2 for example). The $PARTITION is used to determine that the value of CustID 1 in this example would be put in partition 1 of the table.
Step 6 - Drop the Auxiliary table
For the final step, the auxiliary is dropped as it is no longer needed. The syntax for the T-SQL statement is:
IF OBJECT_ID(<AuxiliaryTableName>) IS NOT NULL
  Drop table [<AuxiliaryTableName>]
As mentioned in Step 1, a separate SSIS package is used for each table and in the package a variable is used to identify the AuxiliaryTableName so we replace <AuxiliaryTableName> with the variable name.
"IF OBJECT_ID('" + @[User::vAuxFactTable] + "') IS NOT NULL Drop table " + @[User::vAuxFactTable]Lessons Learned
In our implementation we are using a Master package to call 17 child packages with partition switching. We were getting intermittent errors (The process exit code was "2") using this approach. In addition, this occasionally caused a deadlock error as well. This is where the error logs described in Step 2 came in handy. Reviewing the logs gave us the error details:
“System.Data.SqlClient.SqlException: Transaction (Process ID 147) was deadlocked on lock resources”
Our debugging efforts revealed that the number of packages running in parallel (which in turn run the ManagePartition.exe) should be limited depending on the number of core processors in your server configuration (our server has 8 core processors). In order to resolve the intermittent errors and the deadlock issue, we split the child package execution into 2 stages with the first stage having 9 child packages and the second one having the remaining 8 child packages. After doing this we no longer experienced these issues.
Another lesson learned with the sporadic deadlocking was with Transaction Isolation levels. Further debugging efforts led us to discover that the Transaction Isolation Level within the clear partition method should be set to read uncommitted. We had our developers modify the code and compile a new EXE which we then implemented in place of the stock version we got from the codeplex site. We ran a trace and verified the partition switch out done by the exe uses the read uncommitted isolation level. This helped reduce some of the sporadic deadlocking issues we were experiencing with the utility.
Recap
In this post we have demonstrated how to execute the SQL Server Partition Management Utility from SSIS. Hopefully, you now have a better understanding of the utility so that you can incorporate it into your SSIS ETL processes. Have fun designing!
For more information and to download the SQL Server Partition Management Utility, visit:
