
In this Level, we will review building the ideal VMware-based virtual machine for your SQL Server workloads. Our next article will feature a similar set of instructions based on Microsoft Hyper-V environments. Review and incorporate your own corporate standards and policies into these recommendations, and build the VM that best matches your organization’s needs.
Now, as a DBA you might not have the access to create a new virtual machine to use for SQL Server. These directions can be handed to your VM admin and they can incorporate them into their build policies to build the best possible VM for you and your organization.
The following details are geared for SQL Server 2014 on a Windows Server 2012R2 operating system and a VMware vSphere 5.5 platform, using the vSphere Web Client. The VMware environment is assumed to be configured, powered on, and healthy. Other versions of SQL Server, Windows, and VMware can be easily adapted from these instructions.
Virtual Machine Specifications and Placement
VMware’s management system is called vCenter Server. It watches and orchestrates access and actions in the VMware environment. Access into this system is provided by administrators and is accessed through either a legacy desktop client or the vCenter Server Web Client. Work with your VMware administrator to get access into the environment, and the management URL will be provided to you. The login screen resembles Figure 1.

Figure 1
Once you are logged in to the Web client, usually with your Active Directory credentials, you will see either folders containing your virtual machines, or just a list of your VMs.
To start the process of creating a new virtual machine, select the target virtualization host cluster (provided by your VMware administrator) or the target folder (also provided), right click on the object, and select the option to create a new virtual machine (Figure 2).

Figure 2
Enter the machine name and a destination folder for the new virtual machine. Name the virtual machine according to your organization’s standards.
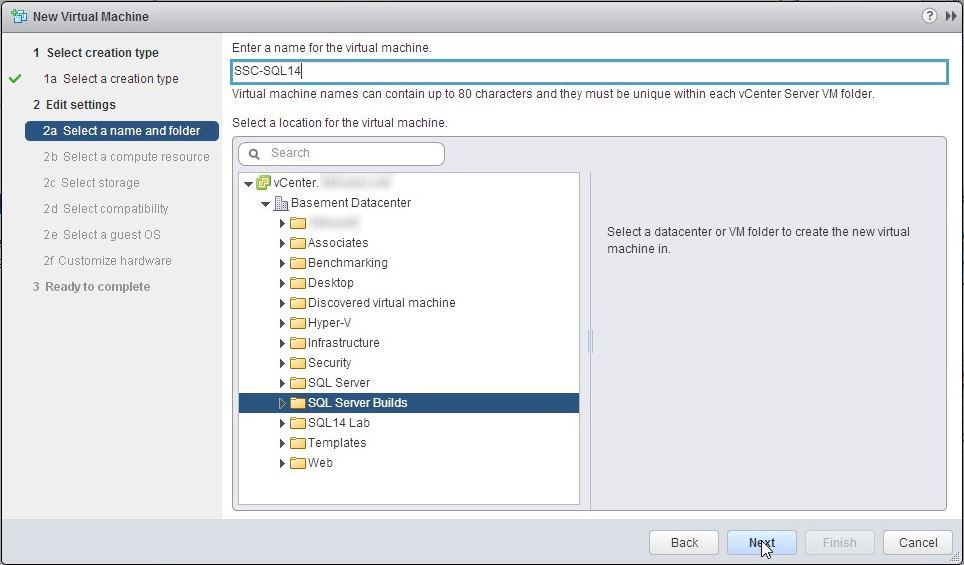
Figure 3
Next, select the destination VMware host cluster (Figure 4). Your VMware administrator will provide the proper cluster name or names for you.

Figure 4
Once the host cluster is chosen, you will need to select a target storage location (Figure 5). VMware refers to these locations as datastores. A datastore is one of the mapped storage device that is presented and shared between all hosts in the cluster. Your VMware administrator will have these configured, and should instruct you where to place the new VM.

Figure 5
Now that the storage location has been selected, the virtual machine compatibility level must be set. The compatibility level is used to ensure that the VM can be configured with an up-to-date feature set, such as application latency sensitivity, etc. This should be set according to the different versions of vSphere that this VM might possibly reside upon.
For example, a disaster recovery facility might be using an older version of vSphere than the production version, and the solution would be to set it to the lowest version of hardware compatibility between the two environments. Usually, your VM administrator will tell you the correct setting at this point. If no guidance has been given, select the highest version.

Figure 6
In Figure 7, the operating system type is selected. You might notice that Windows Server 2012R2 has not yet been added to the list. VMware has documentation that states to set both Windows Server 2012 and 2012R2 to the Windows Server 2012 entry. We have selected this option below.

Figure 7
After selecting the appropriate operating system, you will be presented with the virtual hardware configuration screen, shown below in Figure 8.
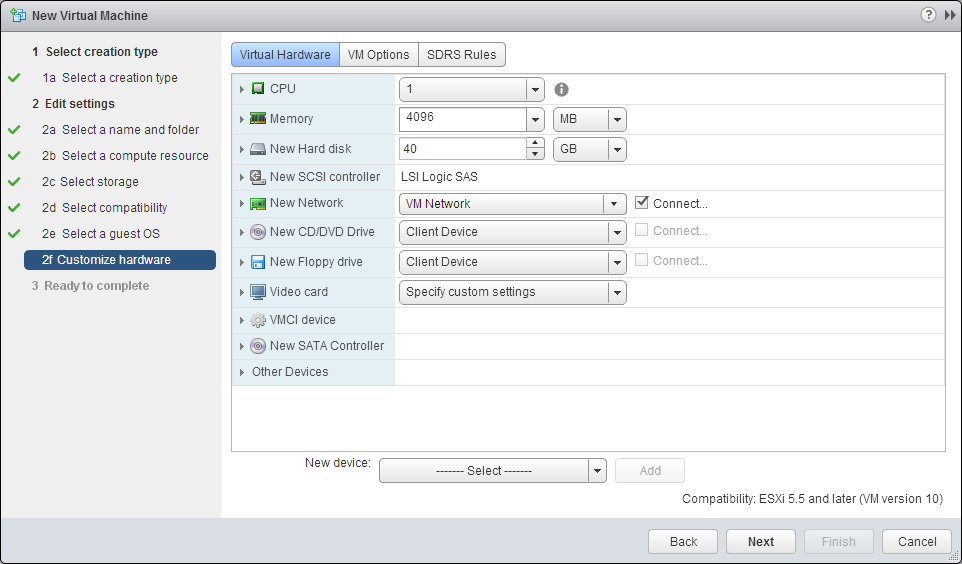
Figure 8
By default, the wizard presents a very basic set of options. These default settings might be suitable for a simple application server, but a production-ready SQL Server requires a number of custom selections at this point for maximizing the performance and agility of the instance. You can get to the advanced configuration for each item by clicking on the little arrow to the left of each item.
VM Configuration
The virtual machine contains most of the components that traditional physical servers have possessed for years – CPUs, memory, network adapters, and storage. Virtualization just changes the way these items are configured and allocated, but these resources must be present so the operating system can function as designed.
Virtual CPU Configuration
Expand the CPU portion of the screen. Configure the number of virtual CPU sockets and cores per socket. Choosing the appropriate settings here requires knowing not only the configuration of the server where these databases are coming from, but also their resource consumption levels and workload patterns. The review of “right-sizing” the target VM resources was addressed in Level 2.
Select the appropriate number of CPU cores (Figure 9). Keep in mind that when eight or less virtual cores (vCPUs) are entered, physical NUMA is not extended into the VM without overriding a configuration parameter. After eight vCPUs, NUMA is extended, and configuring the VM appropriately for the physical machine’s architecture does matter. For example, if the target number of cores is 16, and you have a four socket physical machine, a good starting point is configuring the VM with four vCPU sockets, each with four vCPU cores. Do not configure a VM with more cores per socket than exists in the physical server’s socket.
In this sample, the goal is to configure an example VM that requires four vCPUs for the workload. To "right-size" the CPU configuration for efficiency and performance, we will configure the server for two vCPU sockets, each with two vCPU cores.

Figure 9
Do not enable “CPU Hot Add”, as this disables vCPU vNUMA extension entirely.
Virtual Memory
Configuring memory for a virtual machine is a much more straightforward process. Configure the virtual machine for the amount of memory appropriately sized for the target workload, just as you would with a physical machine. In this sample, 16GB is allocated based on the source server workload consumption. As DBAs, sizing memory for an instance is a common task. Weigh your memory pressure of the existing workload and balance storage performance with memory buffering, and select the appropriate amount of memory for your workload.
Checking the box to “Reserve all guest memory (All locked)” gives you two benefits. First, the VM will no longer be subjected to memory reclamation processes (such as memory ballooning) if the physical machine ever encounters memory pressure situations. Secondly, it removes a VM-level swap file from the underlying shared disk underneath, which can save you space on the SAN.
Do not enable “Memory Hot Plug”, as this allows memory to be hot-added to the virtual machine but removes vNUMA presentation, just like vCPU Hot Add.

Figure 10
Virtual Networking
VM admins will have virtual networks that can be assigned to virtual machines already mapped and available to assign . The networks align with VLANs or network segments, and are as simple as selecting a virtual network adapter and selecting the target network from a drop down list (Figure 11). Your VM administrator will tell you the right virtual network to assign to the network adapter.

Figure 11
If you expand the ‘New Network’ option, ensure that the ‘Connect at Power On’ checkbox is checked, and that the type ‘VMXNET 3’ is selected. The other types of virtual network adapters available for Windows Server 2012 and above (E1000E and E1000) are present for backwards compatibility, as they are built into the operating system. VMware created the VMXNET3 custom virtual network adapter and driver for their virtual machines that provides a more stable and performant connection to the physical network.
This driver is installed for free with the VMware Tools package. Once the VMware Tools package is installed, just after the operating system is installed, any virtual hardware tied to VMware-specific drivers in this package will appear and become usable. This network adapter type should be used for all Windows VMs, regardless of version.
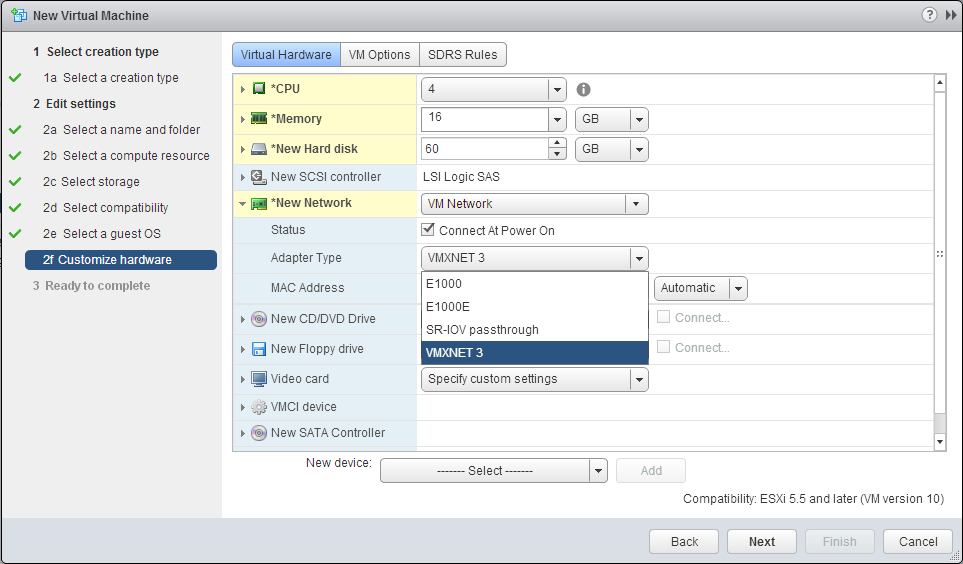
Figure 12
Add a network adapter for each virtual network segment that this virtual machine should have access to. Assign each adapter to the appropriate virtual network, shown above in Figure 12.
Virtual Disks
This sample SQL Server virtual machine will be assigned eight virtual disks, representative of the workload to be placed on this example VM.
| Drive | SCSI ID | Size (GB) | Purpose |
| C: | (0:0) | 60 | Operating System |
| D: | (1:0) | 20 | SQL Server Instance Home |
| E: | (1:1) | 20 | SQL Server System Databases (master, model, msdb) |
| F: | (2:0) | 100 | User Database Data Files (1 of X) |
| L: | (3:0) | 40 | User Database Log Files (1 of Y) |
| T: | (1:2) | 50 | TempDB Data and Log Files (1 of Z) |
| Y: | (0:1) | 50 | Windows Page File |
| Z: | (1:3) | 100 | Local Database Backup Target |
Did you notice the SCSI ID column in the chart above? The SCSI ID represented an assignment to a virtual SCSI disk controller. A SCSI ID of (1:2) means that VMware will assign that virtual disk to the second virtual SCSI controller, third disk slot, as both counters start at zero.
By default, the Windows Server 2008 and above virtual SCSI controller type for virtual disks used by the setup wizard is the LSI SAS driver. This driver is built into the operating system, and works great for many situations. But, for heavy I/O workloads such as a SQL Server VM, VMware also incorporated a custom driver, called the Paravirtual SCSI driver (PVSCSI), into the VMware Tools package. This virtual SCSI controller driver provides better I/O throughput, lower latencies to disk, and lower CPU associated with I/O activity. This driver should be used for all non C: drive volumes to improve the overall performance of the storage presented to that virtual machine.
If you have existing VMware-based SQL Servers that are not utilizing the PVSCSI driver today, you can retrofit an existing VM quite quickly and painlessly in a matter of minutes. If you need to retrofit an existing VM, I have provided a how-to guide available on my blog.
In the virtual machine example, three PVSCSI controllers should be added before we add additional virtual disks. The virtual disks are created and assigned to these new controllers in a manner to help distribute the workload between the controllers and their respective queues. Configure your virtual disks in a similar manner, based on your needs and workload requirements. In a physical world, disks are configured in a similarly distributed manner. This paradigm of spreading out the workload extends directly in the virtual world, and a similar methodology should be applied here.
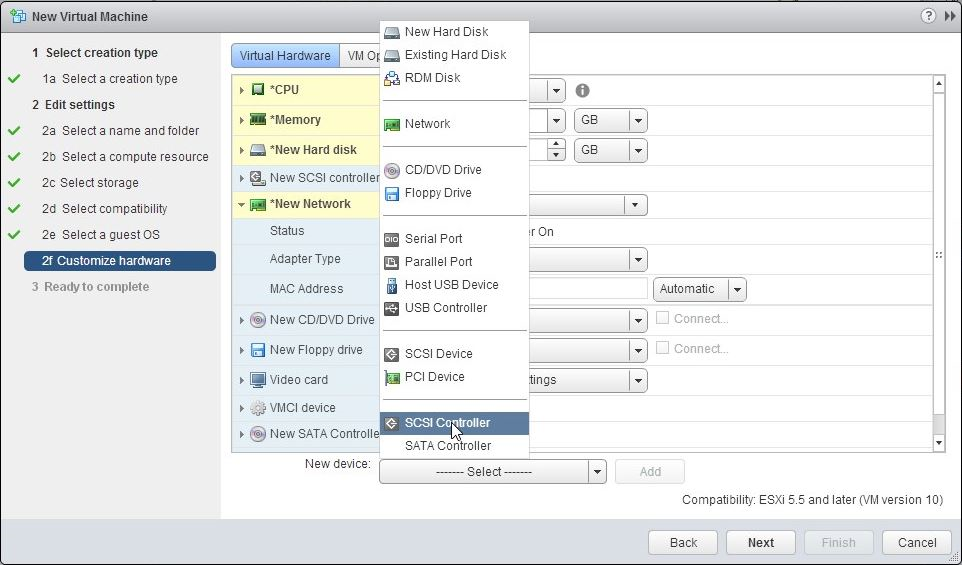
Figure 13

Figure 14
If additional disks are needed on this virtual machine, and the virtual SCSI controller maximum count of four has been reached and all assignments are full, vSphere 5.5 added the support for a virtual AHCI SATA controller. By default, the SATA adapter is used first for the virtual CD-ROM drive, but can also be used for additional hard disks. Performance on the AHCI adapter is well below the SCSI controllers, so keep this in mind when architecting your environment.
Now, add your virtual hard disks and configure the SCSI ID appropriately. Simply click the ‘New Device’ dropdown at the bottom of the screen and select ‘New Hard Disk’, then click ‘Add’ (Figure 15).

Figure 15
As shown in Figure 16, place the virtual hard disks on the appropriate datastore. By default, they will be placed with the other virtual machine disks. You can change this by selecting the dropdown under the Location item and selecting another datastore.

Figure 16
Next, make sure to set the appropriate SCSI ID for each of the secondary hard drives.

Figure 17

Figure 18
Additional Configuration
Expand the CD/DVD drive hardware setting, and select “Datastore ISO File” (Figure 19). Your VM admin should have given you the location of the ISO file of Windows Server available on a datastore. Simply map to the ISO file in the appropriate datastore. Once you have located the file, click OK to mount the ISO in the virtual CD-ROM. Check the box to connect this ISO at power on so we can install the operating system.

Figure 19

Figure 20
Under the “VM Options” tab, expand the Boot Options section (Figure 21). Change the firmware to the type “EFI”. EFI BIOS was discussed in Level 2.
Figure 21
Also, configure the boot delay for enough time to allow you to hit the key if you need to boot from alternate media once in a while. The boot screen passes by so quickly that sometimes it is hard to hit the keystroke in time! I usually set this to five seconds, or 5000 ms as indicated by Figure 21, which is enough time to react as the screen changes before Windows starts loading.
Finally, click OK to create the virtual machine. Right click on the new virtual machine and select “Power On”. Select “Launch Console” to launch the VM console, and you should see the virtual machine booting to the Windows Server installer. You may have to install the VMware console browser plugin to get the console to appear properly. If it is missing, it will prompt you to install it at this time.

Figure 22
Operating System
The operating system is one of the easiest pieces of the VM puzzle to install and configure. You simply install the operating system as per your organization’s standards.

Figure 23
Remember to install the OS to the proper volume. Any virtual disk connected to the PVSCSI controllers will not appear at this time. These disks will become available once the VMware Tools package is installed, usually right after the operating system installation is completed. To match these volumes to the virtual disk, it is generally easiest to match off of the size of the disk. Remember, disks can be easily expanded after deployment, so creating dissimilar disk sizes here could help the placement of the OS. Usually, just one disk is connected to the primary controller, so only one drive appears.

Figure 24

Figure 25
As soon as the installation completes, install the VMware Tools package before you do anything else (Figure 26).
This task is accomplished by selecting the virtual machine, and you will see a prompt to “Install VMware Tools”. If it does not appear, right-click on the VM, click “All vCenter Actions”, “Guest OS”, and “Install VMware Tools” as indicated in the image. Click through the package installation as shown without changing any of the options (no changes are needed), and then reboot the operating system when it has completed.
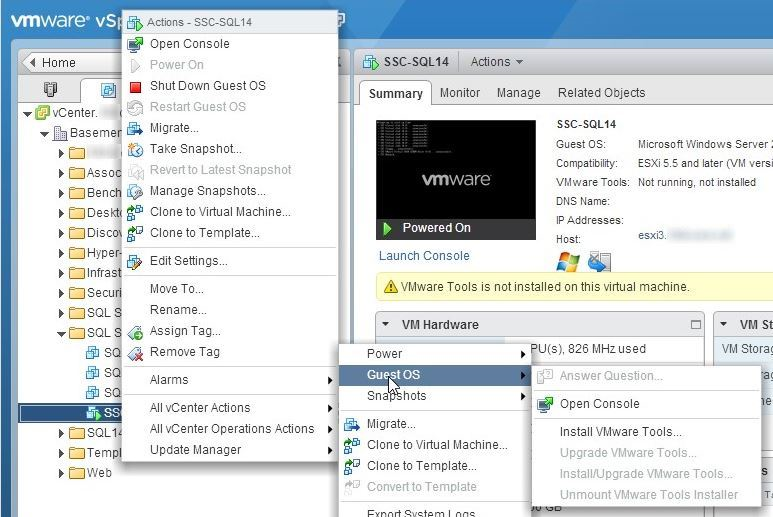
Figure 26
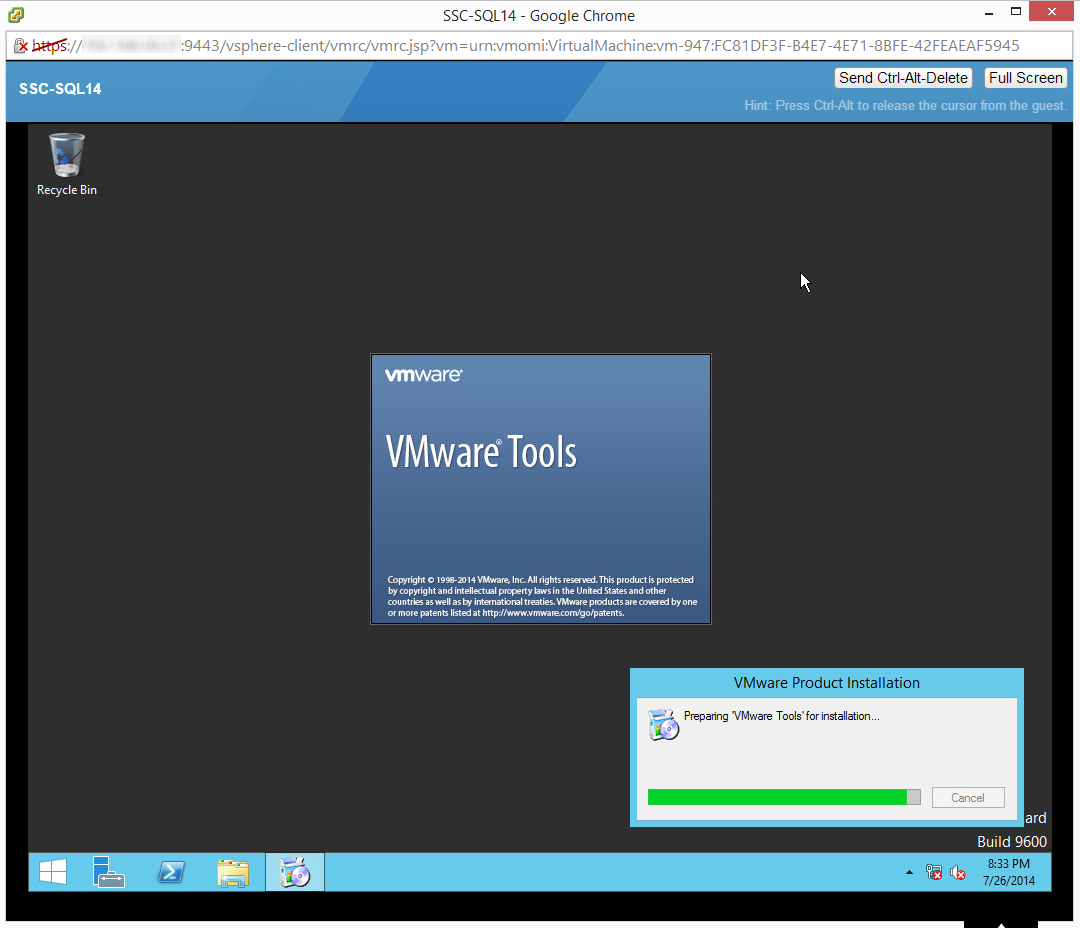
Figure 27
After the reboot, continue to configure the operating system per your organization’s standards, making sure to include any appropriate patches. The disks should now be all presented to the operating system, and should be formatted to 64KB NTFS allocation unit sizes, according to Microsoft’s recommendations for SQL Server.

Figure 28

Figure 29
Your virtual machine and operating system should resemble this screen (see Figure 29) in the VMware Web Client. You are now ready for the next step of installing and configuring a new SQL Server instance on this virtual machine, making sure to place the various objects on the appropriate drives as described in the table above.
Summary
This Level outlines the VMware-based build process for an ideally configured SQL Server virtual machine. The next Level implements the same template on a Microsoft Hyper-V platform. Stay tuned!