Introduction
Visual Studio with SQL Server Data Tools can be used to perform unit testing against stored procedures to test expected output and behavior. An existing database can be imported into Visual Studio or new SQL script files defining schemas, tables and procedures can be written and imported into the solution. This article will demonstrate how to set up unit tests using an existing database and using new, custom SQL scripts. It will also show how to update the database in Visual Studio if changes are made to the underlying database structure.
I am using a SQL Server 2016 instance with the WideWorldImporters (WWI) database, SQL Server Management Studio 2016 (SSMS), and Visual Studio Community 2015 (VS) with SQL Server Data Tools (SSDT).
Setup Using An Existing Database
A SQL Server Database Project in Visual Studio allows you to import all the schema and object structure from an existing database. To create a new project, open Visual Studio, select File -> New -> Project. Select the node for SQL Server and create a new SQL Server Database Project. Check the box for Create directory for solution and uncheck the Add to Source Control.

Figure 1-1: Creating a new SQL Server Database Project in Visual Studio
Once the project is created, open the Solution Explorer (View -> Solution Explorer), right click on the project, and select Import -> Database.

Figure 1-2: Importing an existing database structure into the project
On the Import Database window, click Select Connection... to configure your connection to the SQL Server database. You can use Windows Authentication or SQL Server Authentication to connect. Do not fill in anything under Target Project and select Schema/Object Type under Import Settings

Figure 1-3: Configuring the connection to the existing database
After the import is finished, navigate to the SQL Server Object Explorer (View -> SQL Server Object Explorer). This Explorer pane is almost identical to the Object Explorer pane from SQL Server Management Studio. You can navigate through the tables, procedures, and views of the WideWorldImporters database. We are now ready to start configuring the unit tests for a stored procedure.
Setup Using New SQL Scripts
Instead of importing an entire database structure, you can import a few SQL script files to generate the tables and procedures you need to test. in Visual Studio, go to File -> New -> File and select Sql File under General.

Figure 2-1: Create a new, empty Sql file in Visual Studio
The SQL file provides a blank T-SQL editor and does not require a connection. We are going to write a very easy table structure and a stored procedure into the editor and save the file. The code I used is below:
CREATE TABLE VeryImportantData (FullName VARCHAR(100), LuggageCombination int)
GO
INSERT INTO VeryImportantData (FullName, LuggageCombination)
VALUES
('President Skroob', 12345)
GO
CREATE PROCEDURE usp_SearchForName
@FullName VARCHAR(100)
AS
BEGIN
SELECT FullName, LuggageCombination
FROM VeryImportantData
WHERE FullName LIKE '%' + @FullName + '%'
END
GO
Script 2-2: Setup script for the SQL file in Visual Studio
Now, as we did in Figure 1-1 and Figure 1-2, we can create a new SQL Server Database project file and import the file through the Solution Explorer. Instead of clicking Database, we are going to click Script (*.sql)...

In the resulting prompt, we navigate to our file and select it to use in the import. The import process also allows you to select multiple files. Navigate to the file, select it, click next, click to import both Schema and Object, and select Finish.

Figure 2-4: Choosing a file or multiple files to import into the project
Once the file is imported, you can go to the SQL Server Object Explorer pane, expand the Projects folder, and navigate to the new table and stored procedure as you would through SSMS.

Figure 2-5: SQL Server Object Explorer pane after importing the custom SQL File
Creating New Procedures and Updating the Database
For the rest of the article, I will be using the existing database setup we did instead of the SQL script import. We are going to make a copy of one of the WWI database procedures. The existing procedure in WWI called [Website].[SearchForCustomers] returns a JSON string. We want a procedure to instead return a full result set. Once we create the new procedure, we are going to update our database project file to include the new procedure. This is extremely useful and important in real-world scenarios when the underlying database changes and the database file needs to be updated to reflect the most current state of the data.se
Use the script here to create a new procedure we will use for unit testing. Run the code in SSMS on the WideWorldImporters database.
 USE [WideWorldImporters]
GO
SET ANSI_NULLS ON
GO
SET QUOTED_IDENTIFIER ON
GO
CREATE PROCEDURE [Website].[SearchForCustomers_NonJSON]
@SearchText nvarchar(1000),
@MaximumRowsToReturn int
WITH EXECUTE AS OWNER
AS
BEGIN
    SELECT TOP(@MaximumRowsToReturn)
           c.CustomerID,
           c.CustomerName,
           ct.CityName,
           c.PhoneNumber,
           c.FaxNumber,
           p.FullName AS PrimaryContactFullName,
           p.PreferredName AS PrimaryContactPreferredName
    FROM Sales.Customers AS c
    INNER JOIN [Application].Cities AS ct
        ON c.DeliveryCityID = ct.CityID
    LEFT OUTER JOIN [Application].People AS p
        ON c.PrimaryContactPersonID = p.PersonID
    WHERE CONCAT(c.CustomerName, N' ', p.FullName, N' ', p.PreferredName) LIKE N'%' + @SearchText + N'%'
    ORDER BY c.CustomerName
    --FOR JSON AUTO, ROOT(N'Customers'); --Removed to produce a result set instead of a JSON string
END;
GO
Script 3-1: New procedure we will use for unit testing
We now have the new procedure in our database, but it is not represented in the imported database in Visual Studio. Right click on the project in the Solution Explorer, and select Schema Compare.

Figure 3-2: Select Schema Compare... to update the database model in the SQL Server Object Explorer
The Schema Compare window that opens allows you to select a Source (by default is the dropdown on the left) and a Target (dropdown on the right). The source is going to be the WWI database we updated in SSMS. The Target is going to be the SQL Server Database Project file.

Figure 3-3: Blank Schema Compare window
To select the source, click the arrow on the right side of the Select source dropdown, click Select Source.., click the Database radio button, and click Select Connection... This brings up the same window from Figure 1-3. Choose your instance and the WWI database, click Connect, and click OK once the connection is configured. For Target, we are going to choose the SQL Server Database Project file. Click the dropdown arrow on the Select Target dropdown, select the Project radio button, choose the SQL Server Database file name, and click OK. Both the Source and the Target dropdowns should have values visible. Once configured, click Compare.

Figure 3-4: Both the Source and the Target are configured for Schema Compare. Click Compare to see the differences.
Visual Studio will detect our new procedure from the WWI database and indicate that it cannot find it in the SQL Server Database Project file. The Source Name will have a value since it exists in the database, but the Target Name will not exist since the database project is not synchronized with the database. Click Update in the Schema Compare window to update the database project file with the new procedure. You can click Compare again to run the comparison. It should return a window that says no differences were detected.

Figure 3-5: Results of the Schema Compare between the WideWorldImporters database and the SQLServerUnitTesting_WWI project file before synchronizing
Setting Up The Unit Test
Navigate to the SQL Server Object Explorer in Visual Studio and find the new procedure under the Programmability -> Stored Procedures folder. Right click the name and select Create Unit Tests...
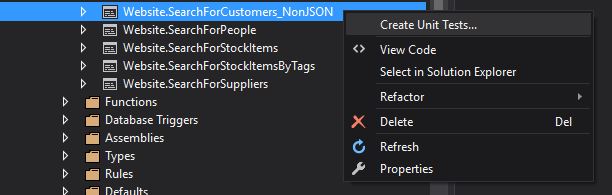
Figure 4-1: Creating a new Unit Test from the Stored Procedures folder in the SQL Server Object Explorer
The prompt that comes up lets you select which procedures you want to configure units tests for and name the resulting project/files. We are only going to test our new non-JSON customer search procedure. Check the box next to the Website.SearchForCustomer_NonJSON procedure, select Create a new Visual C# test project in the Project dropdown, name your project and class, and select OK.

Figure 4-2: Configure your unit test files and select the procedures you will be testing
The next window prompt is for database and deployment configuration. We need to select our database configuration which should already be available when clicking Select Connection... Leave the secondary data connection unchecked, check the box to Automatically deploy the database project before unit tests are run, choose the name of your database project file, and choose Debug in the deployment configuration dropdown.

Figure 4-3: Configure the database connection and deployment options for the unit tests
Once you click OK, Visual Studio will open a Design tab for your unit test. If this tab gets closed for any reason, you can navigate back to it by right clicking the class you created in Figure 4-2 in the Solution Explorer and clicking View Designer. The initial content of the unit testing window contains a T-SQL text editing pane with the parameters of your procedure, an execute statement for the procedure, and a select statement. There is also a Test Conditions pane that has the specific conditions of the unit tests we will be running.

Figure 4-4: Initial Unit Test designer tab. Contains a T-SQL text editing window and a list of preconfigured Test Conditions
For our unit test, we are going to check if the resulting row count of this procedure, when passed a certain list of parameters, contains 1 row. To set this up, we first need to remove the test condition already existing in this unit test. Highlight the inconclusiveCondition1 condition and click the red X in the Test Conditions pane (to the right of the dropdown that shows Data Checksum). After that is removed, we are going to add a RowCount test condition. Click the dropdown in the Test Conditions pane, select Row Count, and click the green + sign next to the dropdown. Once the new Row Count condition shows in the Test Conditions pane, right click it and select properties. Change the Row Count property to 1.

Figure 4-5: Test Conditions for the unit test and Properties of the Test Condition
Next, we need to define how we are going to execute the procedure and what parameters will be passed to it. The procedure parameters required are what name we are searching for and how many rows we want to return that match that name. In SSMS, we can do a quick query on the customers table to find a name that has only one result.
USE [WideWorldImporters]
GO
SELECT *
FROM [Sales].[Customers]
WHERE CustomerName LIKE '%AIVE%'
Script 4-6: Find a customer that will only return 1 row
Now that we have a name to use, we can expect that if we execute our procedure using this name, and ask it to return the top 1000 rows, it should only return 1 row. Now we need to change the SQL text in the unit test.

Figure 4-7: Final setup of the unit test. Contains our modified T-SQL to execute the procedure, our updated row count test condition, and update test condition property.
Now, let's go run our test. Go to Test on the top ribbon in Visual Studio and click Windows -> Test Explorer. The Test Explorer window will most likely be empty. This is because we have not built our solution. To build, either click CTRL+SHIFT+B or go to Build in the top ribbon and click Build Solution. After you successfully build the solution, your unit test should populate in the Test Explorer pane.
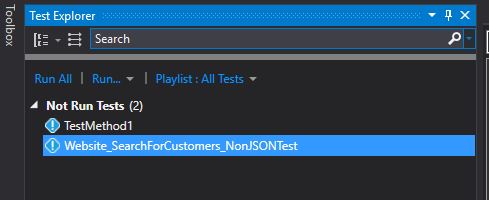
Figure 4-8: Test Explorer pane with our custom unit test after building the solution
To run the unit test, right click the Website_SearchForCustomers_NonJSONTest unit test and click Run Selected Tests

Figure 4-9: Run the unit test from the Test Explorer pane
While the test is running, the blue exclamation icon next to it will turn into a green play symbol. Once it completes, there should be a green check mark next to it and it will also be under a header called Passed Tests

Figure 4-10: Successful execution of the unit test. The procedure returned 1 row and satisfied the conditions of the unit test
Now, let's confirm the success was not a fluke. Let's go change our unit test and tell it we are expecting 2 rows to be returned. Since we know this will not happen, we should see a failed test. Right click the class name from Figure 4-2 in the Solution Explorer and click View Designer. Right click the rowCountCondition1 in the Test Conditions pane, select Properties, and change the Row Count property to 2. Go to File, Save All, and then Build your solution.

Figure 4-11: Updated unit test to check if the row count of the procedure is 2
Navigate back to the Test Explorer and rerun the test that was previously marked as a passed test. This time around, it should have a red X next to it and move it to a Failed Tests header. We can also see the error message as to why it failed if we click on it. It tells us that the expected result row count does not match the actual row count.

Figure 4-12: Failed unit test and text output. We can see the "Expected" rowcount was 2, but the procedure returned only 1 row
Conclusion and Resources
Unit tests are extremely valuable in testing the expected output and behavior of stored procedures in the database. Several unit tests, all with different conditions, can be configured in Visual Studio to run against a range of procedures instead of manually going into SSMS and running each procedure with various parameter combinations.
For more resources on unit tests with SQL Server, see below: