
What are PowerShell and SQL PowerShell and how do you use them? Level 1 of this Stairway will help you answer these questions, and start to show you WHY you might want to use this great tool. PowerShell is an environment that Microsoft developed to enable System Administrators to automate routine tasks, as well as to use a scripting language to manage some of their administrative tasks. It is an environment much like the command shell cmd.exe. PowerShell rides on top of the .NET Framework 2.0 and gives access to almost all the objects available to the .NET Framework version 2.0. This shell allows you to use new language constructs to manage a Windows machine or to get information from the machine using either .NET objects or WMI. PowerShell is the shell that makes SQL PowerShell possible.
SQL PowerShell is merely using PowerShell to leverage objects that can manage SQL Server instances using ADO.NET or using SMO or SQL Server Management Objects. These SQL PowerShell objects were written to manage SQL Server using the .NET Framework and/or PowerShell. With these objects you can automate processes, get information from SQL Server about objects inside, or to just check settings in your instances. Because PowerShell is outside of SQL Server, you get the ability to connect to other SQL Servers using SMO or .NET objects either iteratively or specifically. To connect to other SQL Servers with TSQL from one instance, you would require linked servers and potentially other mechanisms which could open you up to attack and performance problems with those queries.
Installing PowerShell
To get started there are a few things to know about SQL Server and PowerShell in order to use it well. There are prerequisites for using PowerShell on a machine. The steps to get started will be outlined for each of the operating systems below in order to use SQL PowerShell. To use SQL PowerShell, PowerShell must be configured on the machine it will run on. Table 1.1 lists the versions of PowerShell that come natively on different operating systems.
| Operating System | Version of PowerShell native |
| Windows Server 2003 SP2 and 2003 R2 SP2 | No PowerShell is native |
| Windows XP SP3 | No PowerShell is native |
| Windows Vista SP1 | No PowerShell is native |
| Windows Server 2008 SP1 | PowerShell v1.0 |
| Windows Server 2008 R2 | PowerShell v2.0 |
| Windows 7 | PowerShell v2.0 |
Table 1.1: Operating systems with and without native PowerShell
As shown in Table 1.1 above, there are very few operating systems that come with PowerShell v2.0 installed by default. Therefore it is necessary to use the link http://support.microsoft.com/kb/968929 to download and install PowerShell v2.0 for use. Another fact to note is that PowerShell v2.0 requires the .NET Framework v2.0 to function. Figure 1.1 illustrates what to expect on the download page.

Figure 1.1: Downloading PowerShell
To get started quickly in this venture of using PowerShell with SQL Server, it is important to install and configure PowerShell and allow it to have access to your system. The two concepts we will cover in this level are ExecutionPolicy and PowerShell Profiles. ExecutionPolicy is what PowerShell uses to govern what is allowed to be executed and how. PowerShell profiles allow you to configure your PowerShell Environment from the initial launch of the shell. With these two items, you will be off to a great start.
When you are finished installing PowerShell you will need to configure the ExecutionPolicy to ensure that you can run scripts, and then you need to create a profile that allows you to pre-load any items that you will use in all your environments. ExecutionPolicy has five different settings, each with its levels of security. Table 1.2 shows the options available for the ExecutionPolicy.
| ExecutionPolicy | Definition |
| Restricted | Allows you to run script only through the interactive console. No script files are allowed to be executed. Only interactive sessions are allowed. |
| RemoteSigned | Allows scripts to run on the local machine but requires scripts to be signed if downloaded from the internet. |
| AllSigned | Requires all scripts to be signed. |
| Unrestricted | Runs all scripts without restriction, if you download a script from the internet, you will be prompted for permission to run. |
| Bypass | Nothing is blocked and there are no warnings or prompts. |
Table 1.2 Execution Policy Settings
When the ExecutionPolicy is set, you will be ready to run some scripts that you may find out in the wild, or you can start writing your own. To configure the ExecutionPolicy you use the Command “Set-ExecutionPolicy” and pass it one of the values in Table 1.2 based on your intentions for the machine running PowerShell.
Open a PowerShell window by clicking on Start and typing in the Search | PowerShell. If you are on a Windows 7 computer, you can also find it by going to Start | All Programs | Accessories | Windows PowerShell. Click on the PowerShell icon and it will open a shell window. Run the following so you can see what it does.
PS> Get-ExecutionPolicy
This will show you the current execution policy which we will change later in this article.
You should see something like the following (with default settings):
Restricted
The following terms will need to be well understood as you will see or hear them in any PowerShell discussion.
- CmdLet is the name used by PowerShell for built-in code that performs an action. Cmdlets are common and exist in all implementations of PowerShell. You can even have some CmdLets that are installed from third parties as well.
- Variables are the means of storage and their names begin with a $ symbol. This indicates that you are using this name to hold a piece of information, or more formally, an object, because in PowerShell everything is an object.
- Properties and Methods are the other means of getting or storing information with PowerShell. Properties contain information related to the object in the variable. Methods are functions or execution paths that will act on the data stored in the object. There are methods in SQL Server PowerShell to Alter properties, to get information by enumeration, etc.
To get started, Table 1.3 lists basic syntax elements you should become familiar with. These are constructs you will commonly see in PowerShell that will be helpful to understand as we go forward.
| Construct | Meaning | Example |
| $variablename = <value> | A variable declaration and assignment | $myvar = ‘ ‘ |
| $variablename.property | Referencing a property of the object in the variable | $myvar.Name = “Bob” |
| $variablename.ToString() | Referencing a method ToString() on the object. | $myvar.ToString() |
| Get-Command parameter | Calling a CmdLet with a positional parameter | Get-Command *sql* |
| Get-ChildItem –Filter *.xls | A CmdLet called with a named parameter | Get-ChildItem –Filter *.xls |
Table 1.3 Common language constructs for PowerShell
Your effective use of PowerShell will depend on your understanding CmdLets, variables, properties and methods. The syntax of PowerShell closely resembles the language constructs of C# of the .NET Framework and you’ll easily get used to it after working with PowerShell for a while. No matter the language you are used to or if you have not scripted, you will get used to the syntax and how PowerShell works.
In general, PowerShell CmdLet or Function names use a Verb-Noun naming convention. So Get-ChildItem has 2 parts. Get will be the verb and ChildItem will be the Noun or the Item being acted on. So Get-ChildItem would be to retrieve the ChildItems of the current Item. In the case of a normal prompt, you are in a directory, so Get-ChildItem executed alone will return all child items of the current directory. Think of it like the ‘dir’ command in a Command Prompt window.
In the scripts you will see in this level and throughout the stairway, the syntax and elements in Table 1.3 will be frequently used. This will help you to get familiar with other CmdLets that will be in subsequent levels and in your scripts.
Let's Get Started
The first operation we’ll address deals with Execution Policy, which by default is set to Restricted. If you wish to change it, you will need to start PowerShell under Administrative mode. To do this, you first must go to the PowerShell icon in Start | All Programs | Accessories | Windows PowerShell and right click on the PowerShell icon and choose Run As Administrator. First you will run Get-ExecutionPolicy to see which you Policy is enabled. To be able to run scripts, you will want to have at least RemoteSigned so that you can run unsigned scripts on your machine as well as remote scripts that are signed. Eventually in an Enterprise environment you will want all scripts to be digitally signed if possible, in order to execute them. This is a good practice in securing an environment that can be used for good or ill. Signing is not a part of this level, but will be covered in a later level.
The next step is to create a profile so that some of these initial steps of loading objects and setting up your environment will be done automatically when PowerShell starts up. Profiles are used to set up your initial environment so when you start PowerShell, certain things are already set for you. This profile location is stored in a variable by default called $profile. This will point to the file User Profile | Documents | WindowsPowershell | Microsoft.PowerShell_profile.ps1. This file contains startup commands that can be used to customize your environment. The other place for a profile to load from is the default installation directory, is %WinDir%\System32\WindowsPowerShell\v1.0. This folder is a global place for profiles and modules to be loaded from without relying on a logged in user.
With this out of the way, let’s set up the environment for RemoteSigned and then run some commands to get some information. Figure 1.2 illustrates what you will see when you execute this Set-ExecutionPolicy command.

Figure 1.2 Changing the ExecutionPolicy value
At this point choosing Yes will change the setting to what you have specified. Once you have said Yes, the execution policy will be set to the new value of RemoteSigned. You are now set up to execute scripts on this machine.
Just to give you a flavor of what you can find out about the local machine or another machine with PowerShell, let’s find out what your memory configuration looks like on the SQL Server of choice.
PS> Get-WmiObject –computerName localhost –class Win32_PhysicalMemory | Select BankLabel, Capacity
Figure 1.3 shows you what I get back on my machine. I have 4 DIMM slots and each is represented here. You will see the command and the results in the figure. It is a demonstration of an object coming back from the call of the CmdLet Get-WmiObject and the values you see are Properties.

Figure 1.3 Get-WmiObject Example showing memory configuration
Try the command on your own machine and see what you get back. Next, let’s execute a CmdLet to find out if you have SQL Server on your machine. This CmdLet takes a parameter of the service name and which can contain wildcards, and is shown below:
PS> Get-Service *mssql*
In Figure 1.4 you see the command and the results. Do not worry about the exact syntax details for now, we will address those details more in later levels.

Figure 1.4 Getting Services with names containing *mssql*
This is the start of something great in the SQL Server PowerShell world. There are many WMI classes that can give you a wealth of information, and they are accessible through PowerShell.
Finally, let’s set up a basic profile to load some things like changing your prompt. You can see in Figure 1.5 that you can use $profile which contains a filename for your profile and you can edit it with notepad. We will create a prompt function that will change the behavior of your environment, more specifically the prompt you see in the console. This is precisely the reason for a profile. When you save this file in the specified location and restart the PowerShell environment you will see a few things have changed. You may encounter on first running the Notepad with the $profile variable, that the file will not exist. You will be notified by Notepad, and you should respond that notepad should create the file. You may also have to create the WindowsPowerShell directory.

Figure 1.5: The builtin $profile variable
You should notice when Notepad opens that the filename of the file that is being edited appears in the title bar. Listing 1.1 shows you the text of the PowerShell profile that will implement a Prompt function that will change the way the prompt looks and the window title of PowerShell text. You can copy it from this article and paste it into Notepad, and then Save and Exit Notepad.
$global:CurrentUser = [System.Security.Principal.WindowsIdentity]::GetCurrent()
function prompt
{
    $wintitle = $CurrentUser.Name + " " + $Host.Name + " " + $Host.Name
    $host.ui.rawui.WindowTitle = $wintitle
    Write-Host ("PS " + $(get-location) +">") -nonewline -foregroundcolor Magenta
    return " "
}
Listing 1.1 Custom prompt function in Profile
You can exit out of PowerShell and then start it again to verify the new profile. If I restart PowerShell without using the “Run as Administrator” option, I can see the changes in Figure 1.6. It changed the window title to Current Username concatenated with the Hostname and the Version of PowerShell, and changed the prompt color to magenta. (If I had started PowerShell in escalated mode with the “Run as Administrator” option, I would have seen the C:\Windows\system32 prompt instead of my own user name.)
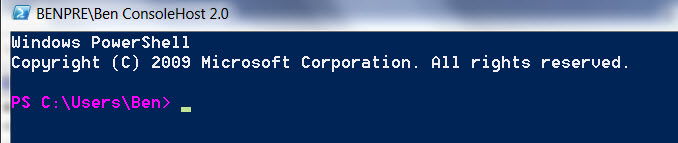
Figure 1.6 Result of Prompt function in Profile
In the next level we will complete the configuration necessary to utilize SQL PowerShell components that interact with SQL Server. This will include the discussion of Functions, Snap-ins, Aliases and more. There will be much more SQL Server PowerShell and real-world information and more techniques demonstrated.