
Level 2: The Role of the Distributor
The Distributor is the core component of SQL Server’s replication process. The distributor controls and executes the processes that actually move the data from one server to another. It stores information about publications and subscriptions in the distribution database. Several agents facilitate the actual data movement.
Terminology
In the Stairway you will find the terms “distributor”, “publisher” and “subscriber”. They always refer to a SQL Server instance together with the machine it is on. So if you see the terminology “database on the subscriber” it refers to a database on the instance that plays the role of the subscriber. If you see the terminology “file on the distributor” it describes a file on the machine that hosts the instance of SQL Server that is used as a distributor in the context.
The databases that are involved in a replication setup are referred to as “publication database”, “distribution database” and “subscription database” depending on the role of the SQL Server instance on which each is installed.
“Publication”, “distribution” and “subscription” are terms that are defined by replication. They are not used to refer to database objects or databases. Instead you will find a phrase like “a table that is part of the publication”.
Replication agents or SQL Agent Jobs are also always either called agent or job, so the term distributor never refers to the distribution agent or the SQL Agent Job that is used to execute the distribution agent. Rather, the term “distributor” always refers to an instance of SQL Server or to the machine running the instance.
The Distribution Database
When distribution is set up, SQL Server creates a distribution database. The distribution database is classified as a system database, so to find it in object explorer you need to drill down into the “System Databases” subfolder of the databases folder.
A distributor is a SQL Server instance, and can have multiple distribution databases installed. Each publisher, however, is tied to a single distribution database.
The distribution database contains metadata about all publications and articles of the publishers that are associated with the particular distribution database. It also contains metadata about the progress and state of the replication process. In the case of transactional replication it additionally contains all commands that need to be replicated, including all the data necessary to re-execute those commands.
For that reason the distribution database can become quite large, so make sure you have enough room on your hard drive.
The Snapshot Folder
While snapshot replication, as such, is not part of this Stairway, to understand the role of the snapshot folder we need to dip into that area for a little bit.
The snapshot folder is used by snapshot replication to hold a snapshot of the replicated tables. Every time snapshot replication runs, a snapshot of all replicated tables is saved to the snapshot folder. This is accomplished using the SQL Server BCP utility.
The snapshot folder can be a local folder on the distributor or a network share anywhere on the network. The windows account that is used to execute the snapshot agent needs to have write permission on this folder / share. Most other agents need to be granted read access to this folder.
Snapshots are used primarily by snapshot replication, but the other types of replication also use snapshots to do the initial synchronization of the relevant tables. If the databases involved in replication should ever get out of sync, a re-synchronization can be triggered at any time (see level 9 for details). That level would make use of snapshots again.
The Agents
The entire replication process is actually not executed by SQL Server itself. Replication instead consists of several independent processes that are called replication agents. If you follow the standard setup for replication, as described in this Stairway, these processes are executed and controlled by SQL Server Agent Jobs. However, you do not have to follow that pattern; the agents are independent, so you could even execute them from the command line.
With the exception of a pull subscription, all agents reside on the distribution server. Each pull-subscriber executes its own distribution agent, to pull the data from the distributor. The term “pull subscription” was briefly introduced in level 1 and will be explained in more detail in level 4.
Best Practices
Often replication is setup following the “local distributor” model. In the local distributor model all parts of the distributor live and execute on the publisher. It is easier to start out using this model so you often find it in use. However, it takes a measurable toll on the publication server. If that performance impact becomes too big to tolerate, it makes sense to move distribution to its own server. With the distributor with all its processes being a separate machine, there is only minimal impact on the publisher.
If you have a lot of publishers that all use the same distributor, the distribution database might become a bottleneck. To alleviate this you should install one distribution database per publishing SQL Server instance.
Removing Replication
To be able to follow the examples in the next sections, you need to start out with servers that do not have any replication installed. If you have an old setup of replication on your server – maybe because you followed the steps in level 1 – you need to get rid of it now. Make sure that the replication setup on the server you are working on is truly not needed before you continue. It can be very time consuming to reestablish an accidentally dropped replication setup.
The easiest way to remove replication is, to connect to the server in object explorer and right click on the “Replication” folder. In the context menu that opens select “Generate Scripts…” as shown in Figure 1.

Figure 1: Generate Scripts
You will then see a form, shown in Figure 2, which allows you to either script the creation or the deletion of replication components. Select “To drop or disable the components”. Select all components that are listed and then click “Generate Script” followed by “Open in New Query Window”. That will generate a script to drop all selected replication components.
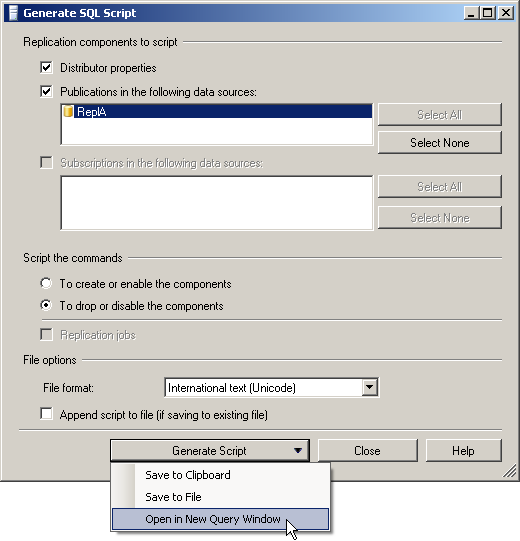
Figure 2: Script to drop all components
If the setup you are trying to remove involves more than one SQL Server instance, you have to do this step on all instances involved. Start with the subscribers, followed by the publishers and finally the distributor. If any of the steps generate an error, make sure you are going through the involved instances in the right order. Regenerate the scripts before you execute them again. That should get you to a clean slate.
Setting up Distribution
To be able to show and introduce security best practices and point out the requirements for a full scale installation of replication, all examples from now on assume that the publisher, the distributor and the subscriber are three distinct machines. If you want to follow the examples provided, and I encourage you to do so, you need to identify the three servers now, as even this level about the distributor will require steps to be executed on the other machines.
If you read the first level of this Stairway, you will notice that a lot of the screen shots seem to be repeated here. However, although we are going through the same dialogs, there are some changes now that we are dealing with three separate machines.
To setup distribution begin by connecting object explorer in SQL Server management studio to your distributor instance. Right click on replication and select “Configure Distribution…” as shown in Figure 3.

Figure 3: Selecting "Configure Distribution..." on the Distributor
Next you will see the “Configure Distribution Wizard”. The first screen that requires a decision to be made is the “Distributor” screen as shown in Figure 4. We are trying to set up the distributor itself, so select the first option.

Figure 4: Selecting the Distributor
The next screen, shown in Figure 5, asks for the snapshot folder location.
The snapshot folder can be a local folder on the distributor, or a shared folder anywhere on the network. If you are planning to use pull subscriptions (which will be covered in level 4), the folder has to be a network share.
A best practice to follow here is to create a network share on the distributor. That gives direct and therefore fast access to most of the processes involved in replication but also allows for scenarios like pull subscriptions that require remote access.
In any case make sure, that the drive has enough room to hold a BCP copy of all replicated tables. The details on who needs to have which type of access to this folder / share will be shown later at the appropriate times.

Figure 5: The Snapshot Folder
The next screen in the wizard asks for details about the distribution database, as shown in Figure 6. You can provide a name and the folder location for the data and the log file.
Depending on the number of publishers using this distributor, the number of articles published and most importantly, the frequency of change amongst those articles, this database can become quite large and busy. Follow the standard best practices for placing and sizing of busy databases when picking a location for the distribution database files.
This wizard does not allow for the creation of multiple distribution databases. Detailed instructions about creating multiple distribution databases and why it might be a good idea to do so can be found in the section “Multiple Distribution Databases" below.

Figure 6: The Distribution Database
Your next step, shown in Figure 7, is to configure the publisher access. Every publisher needs to be registered with the distributor. This form shows a list of all publishers already registered with this distributor. Because we are just setting up this distributor, the list contains only the distributor itself. Click the add button and select “SQL Server Publisher…” to add your publisher. A standard connection dialog will allow you to pick your publishing server instance. You can also uncheck the distributor itself, as this server will be dedicated to be a distributor and will not have any publications.
If you added a server into the list that is not the distributor itself, the next screen – shown in Figure 8 – will allow you to specify a Distributor Password. This password is used to secure the communication between publisher and distributor. Every time you setup a publisher and connect it to the distributor, this password is required to be reentered. So make sure you store it somewhere safe. You also need to make sure – not different from any other password – to pick a secure password here.
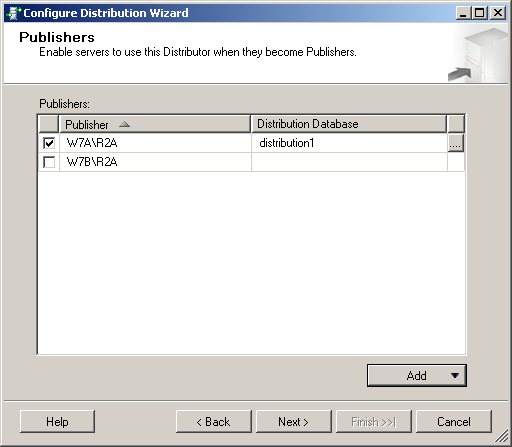
Figure 7: Registering Publishers

Figure 8: The Distributor Password
Setting up Distribution on the Publisher
To connect a publisher to a distributor the publisher needs to be registered with the distributor. How to setup that link was shown in the previous section. But that alone is not enough. The distributor also needs to be registered with the publisher. The steps involved to establish that link are topic of this section.
First connect the object explorer in SQL Server Management Studio to the publishing instance. As before, right click on replication and select “Configure Distribution…” to open the “Configure Distribution Wizard”. This time on the “Distributor” Screen do not select the first option. Instead pick “Use the following server” and click the “Add” button as shown in Figure 9.

Figure 9: Use a remote Distributor
In the connection dialog connect to the distributor. The next screen, shown in Figure 10, now asks for the “Administrative Password”. That is the same password that we picked for the distributor earlier.

Figure 10: The Administrative Password
After this step the setup of distribution is complete.
Multiple Distribution Databases
If you want to use one distributor for several publishers it is a good idea to use a separate distribution database for each publisher. This not only reduces contention on the database, but it can also improve your ability to troubleshoot certain problems that might arise, and to recover from disaster.
To create an additional distribution database, connect to the distributor in the object explorer and open the replication context menu. Select “Distributor Properties…” to open the properties dialog. Here you see a list of all installed distribution databases. With the “New…” button beneath that list you open the “New Distribution Database” form, shown in Figure 11.

Figure 11: Creating a New Distribution Database
Here you can specify the name and the folder location for the new distribution database. You can also specify retention values. Their meaning is explained in level 4 of this Stairway. You can leave them at their default values for now.
After you crated a new distribution database, switch to the “Publishers” page of the “Distribution Properties” form. By clicking the “Add” button and selection “Add SQL Server Publisher…” you can register additional publishers with this distributor, as is shown in Figure 12.

Figure 12: Registering Publishers with the Distributor
After you have connected to the new publisher using the standard connect form that opened, it will be added to the list of registered publishers and shown in the Distributor Properties form. Now you can select the distribution database for the new publisher with the drop down menu that appears right next to the publishers name in the list, as you can see in Figure 13. Make sure you select the right database now, because once you confirmed by clicking “OK”, this selection cannot be changed anymore. The only way to change the distribution database for an existing publisher is to completely drop the entire set of publications on that publisher and then delete that publisher from the list of registered publishers on the distributor. After dropping everything you can start over and select a different distribution database this time.

Figure 13: Picking the Distribution Database
For more details on how to handle multiple distribution databases check out “Scaling out the distribution database” (http://www.sqlservercentral.com/articles/Replication/69663/).
Summary
In this Stairway level we went through preparing a SQL Server instance to be a replication distributor. We also prepared another SQL Server instance to use the first one as its distributor. The second instance will be setup to be our publisher in the next level of this Stairway.
At this point there is not really a lot to see on the distributor. None of the agents are running yet and nothing else would show any activity. There is now a distribution database on the server but it is well hidden amongst the system databases.
The only really visible change is a change in the context menu of the replication folder in Object Explorer, which now contains the entry “Distributor Properties…” instead of “Configure Distribution…”.
This might feel a little disappointing – spending this much effort and having nothing to show for it. However, keep in mind that the distributor is the most important piece of a transactional replication installation. Without it no data would move anywhere. The reward for this work will come soon so let us waste no time and continue by setting up the publisher. Level 3: Transactional Replication – Publisher, will tell you how.