I was assigned a project to import two Excel files to our SQL 2005 server. Some DBAs or developers may have experienced that the Excel Source of SSIS would load NULL values of some columns even though the Excel file has real values. Figure 1 and Figure 2 show one example: cell I11 in the Excel file (Figure 1) appears as NULL in SSIS if you preview the file in SSIS (Figure 2). This happens because the driver samples the first eight rows of data and determines the data types of the fields (according to Excel Inserts Null Values by Allen Mitchell). Obviously, the Zip_Code field was considered as a number field and any values having a dash were replaced by NULL.
Figure 1

Figure 2

Because our client could not provide the data in other formats and we must return the same zip codes to them, I had to find a way to resolve this problem. I tried to save the file as CSV format or bulk insert the data to SQL in Script Task, however, they did not solve the problem. After spending a few hours trying different methods and reading articles online, below are the two solutions I found. I chose to go with the second method so that the process is completely automated.
Method 1
The quick fix is to convert the values in the Zip_Code column to TEXT format in Excel. As you can see in Figure 1, the values in SSN were aligned to the left which means it was a text field. And the values in Zip_Code were aligned to the right indicating it was a value field. If you convert it by right click on the column and choose convert to Text, then SSIS will be able to see all the data correctly. If your Office is an older version, you can create a new column next to it and use the Text() function to make the conversion. Figure 3 shows the new column generated. This method is fast but needs some manual work.
Figure 3

Method 2
This method is to use Script Task inside SSIS to open the Excel as a connection, query the data from the spreadsheet, and then load them to SQL. I had two Excel files to load, so I used a Foreach Loop Container to load the two files. Below are the steps to setup the task.
- Declare variables to be used by the Foreach Loop Container.
- Map values to variables in Foreach Loop Container
- Pass variables to Script Task
- Add code to Script Task to import data from Excel
- Declare variables to be used by the Foreach Loop Container
As mentioned earlier, I have two Excel files to import which means there are two source files, two select queries, and two destination tables. Thus, a set of variables need to be setup for them. Table 1 illustrates the variables and their values. The variable "path" was used in case the two files are saved in different locations. A variable, "run", was also added to enable/disable the import of a certain file.
| Variable Name | Data Type | Variable Value for File 1 | Variable Value for File 2 |
|---|---|---|---|
| path | String | H:\ | H:\ |
| excelfile | String | Customers.xls | Employees.xls |
| destinationtable | String | Customers | Employees |
| querystring | String | select F1,F2,F3,F4,F5,F6,F7,F8 from [Sheet1$] WHERE F1<>'SSN' | select F1,F2,F3 from [Employees$] WHERE F3<>'Zip' |
| run | Boolean | True | False |
Declaring Variables
In the Control Flow tab, add a Foreach Loop Container from the Control Flow Items under Toolbox. Right click on the package area and choose Variables, a Variables window will appear on the left panel where the Toolbox normally locates. Before adding new variables, click on the Foreach Loop Container so it is chosen. This will default the scope of the added variables to be "Foreach Loop Container". If the scope of these variables were set to "Package", you may receive an error telling you the Excel file defined by the variables is locked or read only because it is used by another procedure in the SSIS even though you have no other processes to do with your variables.
Click the first icon in the variables window to add variables. Figure 4 shows the inputs. Because the paths of both files are the same, I specified it in the default value. The default value for the "run" variable was also set to be "true".
Figure 4

Map variables in For Each Loop Container
Double click on the Foreach Loop Container, the Foreach Loop Editor appears. Click on Collection on the left hand side, the contents of the editor changes (Figure 5).
Figure 5
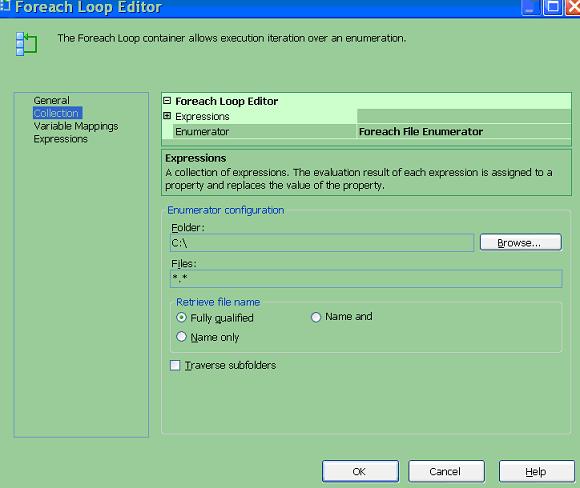
In the dropdown box next to Enumerator, choose "Foreach File Enumerator" (Figure 6).
Figure 6
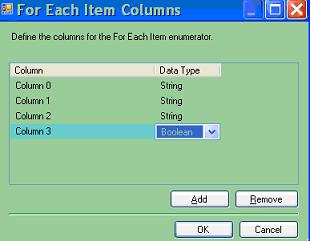
Click on the "Columns..." button at the bottom on the right and a For Each Item Columns window will pop up (Figure 7). Click the Add button multiple times to add 4 columns. These are for the four variables to be used by the container. Change the data type of the last column to Boolean and this is for variable "run". Click OK and you are back to the Foreach Loop Editor window.
Figure 7
Click on Variable Mappings from the list on the left to map the variables to the columns you just created earlier. Choose variable by clicking the drop down box under the Variable column. Remember to specify the index on the second column.
Figure 8
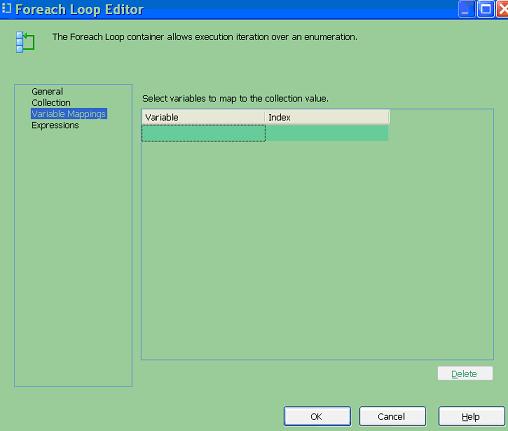
Figure 9

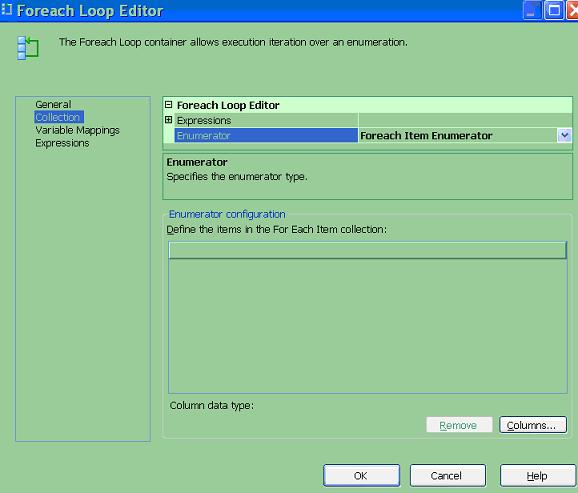
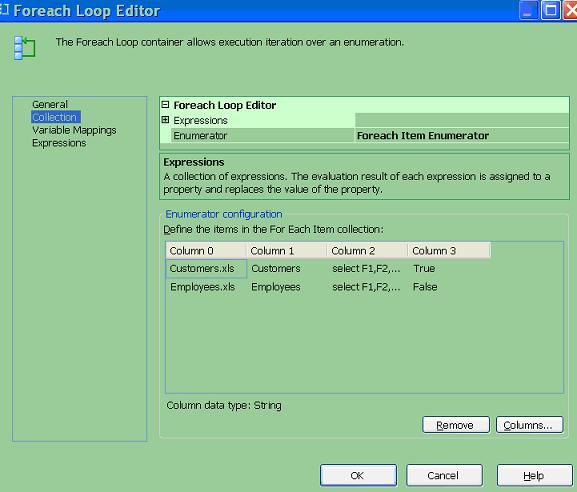
Click on the Collection on the left hand side again, and now you can input the values for each variable. Figure 10 shows the values input of the variables. Click OK.
Figure 10
Pass variables to Script Task
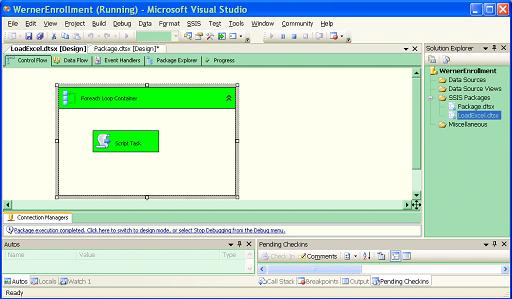
Still in the Control Flow tab, drag a Script Task from the Control Flow Items in Toolbox to the Foreach Loop Container (Figure 11).
Figure 11

Double click on the Scrip Task and a Script Task Editor appears (Figure 12).
Figure 12

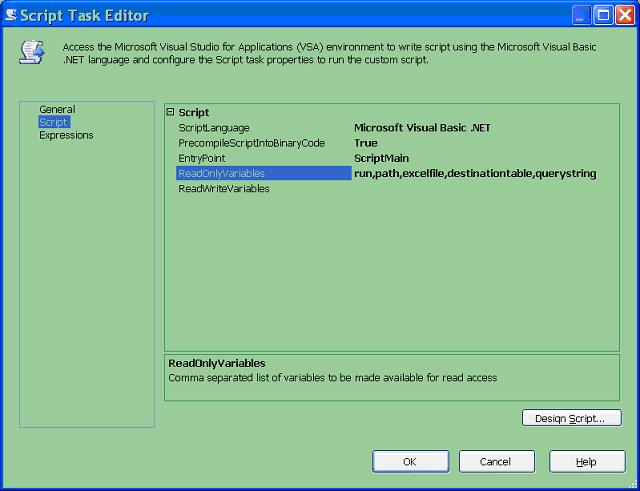
Choose Script on the left panel, contents of the Script Task Editor changes as shown in Figure 13. Since the variables used in this package will not be modified by the Script Task, they are handled as "Read Only Variables". That being said, type in all the variable names separated by comma in the ReadOnlyVariables area (Figure 13). Click on the Design Script... button and the Visual Studio for Applications Designer appears. Now we can add the code to load data.
Figure 13
Code Script Task to import data from Excel to SQL.
The codes are shown below. If you have not added the reference System.Xml.dll, you need to add it by right click on the References on the left panel under Project Explorer and choose Add Reference.
Imports System
Imports System.Data
Imports System.Math
Imports Microsoft.SqlServer.Dts.Runtime
Imports System.IO
Imports System.Xml
Imports ADODB
Imports System.Data.OleDb
Imports System.Data.SqlClient
Public Class ScriptMain
Public Sub Main()
Dim excelFile As String 'Excel file to be imported.
Dim connectionString1 As String 'for Connection to Excel file
Dim excelConnection As OleDbConnection
Dim connectionString2 As String 'for SQL
Dim dbconnection As SqlConnection
Dim currentTable As String
Dim intSuccess As Integer
If Dts.Variables("run").Value.ToString = "True" Then
excelFile = Dts.Variables("path").Value.ToString & Dts.Variables("excelfile").Value.ToString
connectionString1 = ("Provider=Microsoft.Jet.OLEDB.4.0;Data Source=" & excelFile & ";Extended Properties=""Excel 8.0;IMEX=1;HDR=NO""")
'Excel connection
excelConnection = New OleDbConnection(connectionString1)
excelConnection.Open()
'SQL connection
connectionString2 = "Data Source=SERVERNAME;Initial Catalog=DATABASENAME; Integrated Security=True;"
dbconnection = New SqlConnection(connectionString2)
dbconnection.Open()
Dim command As New OleDbCommand(Dts.Variables("querystring").Value.ToString, excelConnection)
Dim rdr As OleDbDataReader = command.ExecuteReader
Dim BulkCopy As New SqlBulkCopy(dbconnection)
BulkCopy.DestinationTableName = Dts.Variables("destinationtable").Value.ToString
BulkCopy.WriteToServer(rdr)
End If
Dts.TaskResult = Dts.Results.Success
End Sub
End Class
In the connection string for Excel, I added "IMEX=1" to tell handle the Excel file in "Import Mode".
0 is Export mode
1 is Import mode
2 is Linked mode (full update capabilities)
I also specified HDR=NO so SSIS reads the first row with column names as a record, that way all columns would be considered characters and this is what I believe helped avoid loading the NULL values. I worried if this would cause a data type conversion problem when loading the DOB and DOH columns because the data types of the destination fields are smalldatetime. Fortunately, the data types were converted implicitly with no errors.
Click OK for multiple times to get back to the Control Flow tab, run the package. Figure 14 shows all the zip codes were loaded correctly. The Employees table was empty because the run variable for the second file was set to be false.
Figure 14
This is the best way I can think of to solve this problem using SSIS. If you have a better solution or feedbacks, I'd like to know. Thanks to the web links below that provided me the codes and configurations. If your projects requires loop through multiple worksheets in multiple Excel files, the codes give in the first link below should help.
Source:
http://weblogs.asp.net/mikebosch/archive/2007/10/26/ssis-skipping-rows-and-stripping-subtotals.aspx
http://www.sqldts.com/254.aspx