

How many times have you had problems sending SQL MAIL or SQL Agent Mail from SQL Server because the Exchange server was taken down or not working? Have you ever tried to connect up SQL Mail and/or SQL Agent mail to Exchange through a firewall or across domains, only to find out that you can’t use your Exchange in these situations? Maybe you don’t have Exchange but you would still like to setup SQL Server to send email. If you have experienced these problems then you might want to consider using POP3 and SMTP services for supporting your SQL Mail and SQL Agent mail requirements. This article will discuss how to setup SQL Server to use POP3 and SMTP services to support SQL Mail and SQL Agent mail.
Advantages to using POP3 and SMTP for SQL MAIL and SQL Agent Mail
There are a number of advantages to using POP3 and SMTP services to support SQL Mail and SQL Agent mail. The biggest advantage is sending mail using SMTP allows SQL Mail and SQL Agent mail to work with most firewall rules since SMTP protocols normally are not blocked. Using POP3 and SMTP for SQL Mail and SQL Agent mail also provides all the same functionality of using Exchange. Therefore this means no SQL Server mail functionality will be lost using POP3 and SMTP as a mail solution for SQL Server. This may not seem like much of an advantage, but I have seen a number of SMTP solutions that only provide a subset of SQL Server mail functionality, plus none of these other SMTP solution provide SQL Agent step and job notification mail services.
Guidelines for setting POP3 and STMP services
Prior to setting up SQL Server to use POP3 and SMTP to read and send email your SQL Server machine will need to be able to connect to a POP3 and SMTP service somewhere. I will not be discussing how to setup POP3 and/or SMTP in this article, but will offer some suggestion on where you might consider placing these services. Basically the POP3 and SMTP services can reside on any machine, even the SQL Server machine itself. In order to assure that SQL Mail and SQL Agent mail will work using the POP3 and SMTP services, these services will need to be available whenever SQL Server needs to read or send mail. Although these services don’t have to be physically installed on the SQL Server machine, having them on the SQL Server machine might provide a very reliable environment, since no network access would be required for SQL Server to access these services.
Once you have established an environment that provides POP3 and SMTP services then you are ready to set up SQL Mail and SQL Agent Mail on your SQL Server machine.
Setting Up Mail Profile
Like with using Exchange as your mail server, the SQL Server machine will still require you to install an Outlook Client and setup a mail profile to use POP3 and SMTP. The following screenshots will walk you through setting up a mail profile.
Prior to setting up your mail profile, first logon to your SQL Server machine with the account used to start SQL Server and SQL Agent. If SQL Server and SQL Agent are different accounts then you will need to set up a profile under each login. Next you will need to display the available mail profiles on your SQL Server machine. This can be done by going into Control Panel, clicking on the Mail icon, and then selecting the “Show Profiles” option. A screen similar to the one below should be displayed.

On this screen shot you can see I have a single mail profile called “MS Exchange Settings”. This is the mail profile currently being used to allow SQL Mail and SQL Agent mail to sent and receive email via Exchange. On my machine I decided I wanted to setup a new mail profile for SQL Mail and SQL Agent to use. To set up this new profile you need to click on the “Add…” button. When doing that the Microsoft Outlook Setup Wizards will be displayed.

On this screen you want to select the check box for Internet E-Mail. This will cause the “Next” button to be un-grayed, so you can click it to display the next screen in the process of setting up a new profile. When clicking on the “Next” button the following screen will be displayed.

On this screen a system generate “Profile Name” is displayed. In my case I wanted to create a profile name of “SQLMAIL”, so I replaced the system generated name with “SQLMAIL”. Once a profile name is entered click on the “Next >” button to go to the next step, which is setting up an Internet E-mail account.

To set up your E-mail account click on the “Setup Mail account” button. Doing this will bring up a mail account properties screen like below.

Here you have a number of different tabs. For my mail profile I enter the following information on the “General” tab.
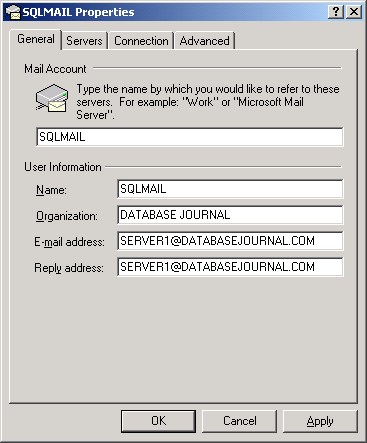
As you can see, I entered the “SQLMAIL” for the “Mail Account”, “SQLMAIL” for the user name, and then specified an E-mail, and E-mail reply address. The user name and addresses I specified are the E-mail account and address associated with my POP3 account. After I completed the mail account and user information I clicked on the Servers tab, so I can define my mail server information. Once I have completed my mail server information
under the Servers tab the screen looks like this:

Here I have entered SERVER1 for the name of my POP3 and SMTP server. SERVER1 happens to be the name of my SQL Server machine, and it is also running POP3 and SMTP services. In the “Incoming Mail Server” field I enter my POP3 email account and password. Next I completed the Connection Tab information.

Here you need to specify what method you are using to connect to you POP3 and SMTP services. As you can see I have selected the connection using my local area network. Lastly you have the options of specify some advanced options, like port numbers, whether you are using SSL, etc.

Now that you have setup your mail profile you are ready to test to make sure your setup is correct and the POP3 and SMTP services are working correctly. To verify that your SQL Server machine can send mail using Outlook, start up your Outlook client on the SQL Server machine, if prompted for a mail profile select the profile you just created. Now try to send mail to yourself. After sending the mail go to your workstation and verify that you have received mail from the mail account you assigned to your new SQL Server mail profile. If the mail appears then you correctly set up the mail profile on the SQL Server machine.
After verifying your new mail profile is working, all that is left is to setup SQL Mail and SQL Agent mail in SQL Server. To accomplish this bring up an Enterprise Manager session. Right click on the server name and view the properties of the server. Once the SQL Server properties window is displayed click on the “Server Settings” tab, and the following screen should be displayed.

Under
the SQL Mail section of the Server Setting display click on the
“Change…” button. Doing this will bring up the
following page.
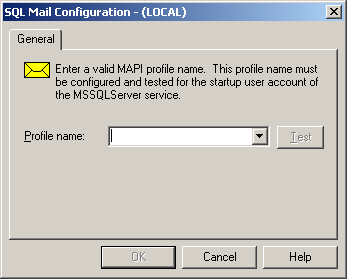
Use the pull-down box on the above screen to view the mail profiles defined on your SQL Server machine under the account in which SQL Server is running. Select the mail profile you just configured to be used with POP3 and SMTP servers. In my case I selected the SQLMAIL profile I just defined.
Once you have selected your profile, you should consider clicking on the “Test” button. The button will verify that you have configured your mail profile successfully and SQL Server can use this profile to read and send mail. If the test is successful the following screen will be displayed.

Now that you have successfully set up SQL Mail, you still need to set up SQL Agent mail. To set up SQL Agent mail, expand the “Management” folder in Enterprise Manager, right click on “SQL Server Agent, then select “Properties”. When the “SQL Server Agent Properties” screen is displayed you can enter your mail profile in the “Mail profile” box, or use the pull-down to select your mail profile from a menu, as I have done on the screen below. If you have not used a domain account or a local machine account to start SQL Agent, and/or SQL Agent is not running you might find your “Mail session” information will be grayed out.

Once you have entered your mail profile use the “Test” button to verify that SQL Agent mail is configured properly. If you receive an “Successfully started (and stopped) a mail session with this profile.” message then you have properly configured SQL Agent mail.
Additional Resource
Here are a number of web pages that you can use to find additional information about using POP3 and SMTP servers to support SQL Mail and SQL Agent mail.
http://support.microsoft.com/default.aspx?scid=kb;en-us;263556
http://msdn.microsoft.com/library/default.asp?url=/library/en-us/adminsql/ad_1_server_8xf0.asp
http://support.microsoft.com/default.aspx?scid=kb;en-us;312839
Conclusion:
If you are tired of the problems associated with using Exchange to support your SQL MAIL and SQL Agent mail, or don’t have Exchange, then you should consider using a POP3 and SMTP mail to support your SQL Server mail needs. Once your System Administrators have set up a POP3 and SMTP mail server for you to use, then you should be able to use the steps I described above to set up your SQL Server to use POP3 and STMP services to support SQL Mail and SQL Agent Mail.

