

Introduction
In Azure SQL, restoring a Database is very easy. You do not need a complex backup strategy because Azure SQL creates backups automatically for you.
This article contains 3 sections:
- Show that backups are created automatically after few minutes of the database creation.
- Show how to restore the data after deleting a table.
- Show how to restore the database after deleting the database.
Requirements
- An Azure Account.
- A local machine with SQL Server Management Studio (SSMS.
- An Azure SQL Database just created.
Getting Started
Automatic backup
1. In the Azure Portal, go to databases and click your database just created:

2. Click Restore.

3. In the restore section, you will see the database name of the replication. When you just created the database, there is no restore point available:

4. After some minutes, you will see a restore point. It takes 5 minutes or more to create the first restore point. The backups are created automatically:
As you can see, it takes some minutes to create the first backup in Azure SQL. It is created automatically, but it takes 5 or more minutes, depending on the database size.
Testing Point in Time Restores
In this section, we will create and delete a table to test if the point in time restoration works fine.
1. To test restoration, create a new table named dbo.customers:

2. Add some data to dbo.customers:

3. To test if the tables is restored, drop the table just created:

4. As you can see, dbo.customers is deleted:
5. To restore the table, in the Azure Portal, select the database and go to Restore:
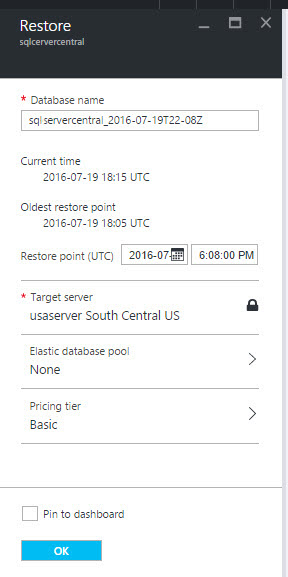
6. The restore will create a copy of the database with a different name (sqlservercentral_2006_07_19T22-08Z) that you can edit. You can specify the point in time to restore the database. In other words, it can be restored at any time. Specify the time before the deletion of the table. In this example, at 6:08 PM, the table was available. Press OK after specifying the database name and restore point:
7. It will take few minutes to restore the database, depending on the database size:

8. You will receive a successful message when it is restored:

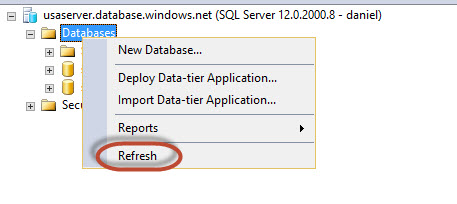
9. To verify refresh the databases in SSMS, refress the database folder:
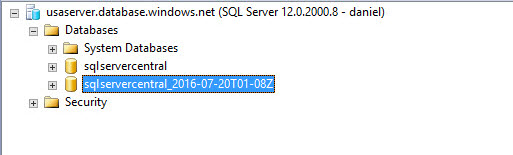
10. You will be able to see the copy of the database:
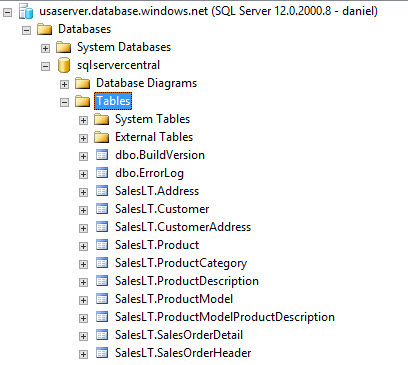
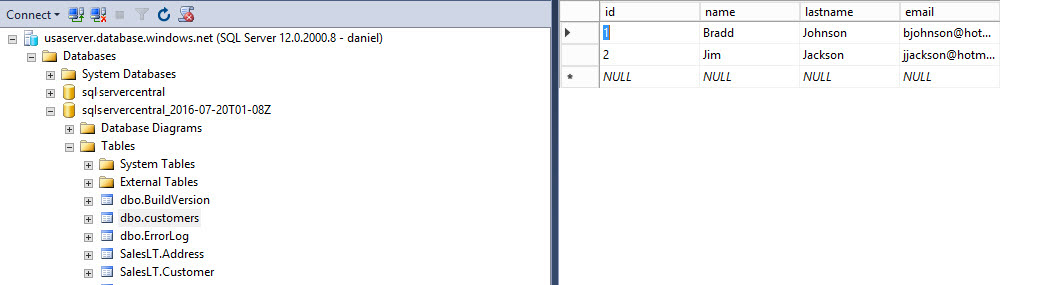
11. You will be able to see the table that was deleted earlier is here:
Restoring Information From a Deleted Database
If the database is dropped by mistake, it is possible to restore it. Follow these steps to restore your database:
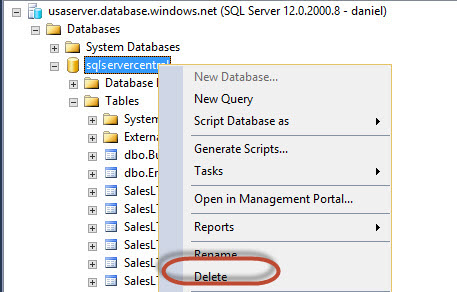
1. First, we will delete the database:
2. To restore the database dropped, in the Azure Portal go the resources>Browse>SQL servers:

3. Click the SQL Server that contained the database:

4. Scroll down until the deleted databases section. Click on Deleted databases:

5. Select the database that you want to restore:

6. You can specify the name of the database. Press OK to restore the database:

7. If you check the databases, you will be able to see the database restored:

Conclusions
In this article, we show that a backup is created automatically 5 minutes after a database creation.
We can restore a database at any point in time. A full backup is created automatically after the database creation. Full backups are created once a week; differencial backups are created every hour and transaction log backups every 5 minutes.
Note that the retention period of backups is 7 days for the Basic Databases (the cheapest option) and 35 days for Standard and Premium databases.

