

SSIS is a robust tool to perform any kind of data transform or complex data movement task you want. With the built-in options, you can also access system information via Windows Management Instrumentation (WMI). This set of tools provide developers and administrators a way to capture windows operating system information for use via PowerShell, .NET or scripts,
In this post, we will learn how to use WMI from an SSIS package to read Windows Event Viewer information and save it to a SQL Server table for later analysis.
Reading WMI Classes
In order to access WMI information, a subset of the SQL Language is used, named WQL. This is like normal T-SQL with a few minor changes.
For our example we will be accessing the Event Viewer using the Win32_NTLogEvent class, accessing it like a normal table, as follows:
SELECT *
 FROM Win32_NTLogEvent
This reads all event viewer events from all categories, and returns this information as a table like result set. (from official documentation):
class Win32_NTLogEvent
{
uint16 Category;
string CategoryString;
string ComputerName;
uint8 Data[];
uint16 EventCode;
uint32 EventIdentifier;
uint8 EventType;
string InsertionStrings[];
string Logfile;
string Message;
uint32 RecordNumber;
string SourceName;
datetime TimeGenerated;
datetime TimeWritten;
string Type;
string User;
};
On a busy system, reading all events from all categories could take a really long time to complete, so try to always filter your searches as much as possible. For this example, we will find the events where the computer has been shut down (you can later correlate this info with SQL Server engine shut down).
We will use the following WQL query:
SELECT *
 FROM Win32_NTLogEvent
 WHERE Logfile = 'System' AND EventCode = '6008'
 -- system code 6008 indicate an unexpected system shutdown
For testing the WQL Query, we can use a simple PowerShell session and use the Get-WmiObject command as follows:
Get-WmiObject -Query "SELECT * FROM Win32_NTLogEvent WHERE Logfile = 'System' AND EventCode = '6008'"
If I run it on my machine it will display the following info:

Now we have our WQL query ready, we can implement it on a SSIS package.
Creating our SSIS solution
Using SQL Server Data Tools (SSDT), create a new Integration services project:

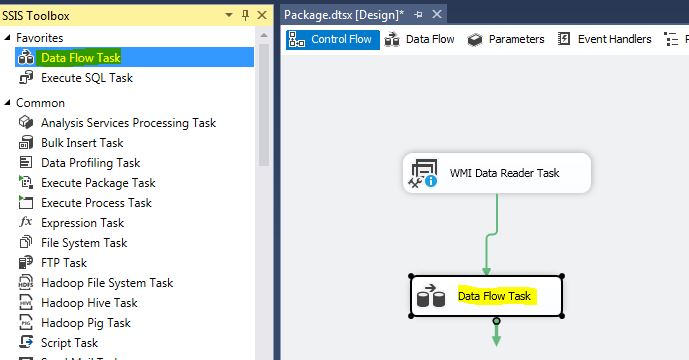
In the package designer, select the Control Flow and add a new WMI Data Reader task:

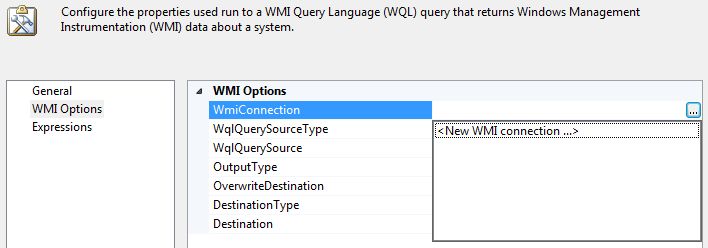
Double-click on the task and go to WMI Options. These are the default values:

First, select WmiConnection and click on <New WMI Connection...>:
A new window will open. For this test, leave the defaults and just check the Windows Authentication box:

Test the connection and click OK.
As I discuss in this article, any SSIS connection can be parametrized in case you need to provide the server name at runtime. For this test, we will only use the local machine. Select WqlQuerySource and click on it, then enter the WQL query we created earlier:

For DestinationType, select File Connection and for the destination, select a new file and enter the path you want:

Click OK to close the WMI Data Reader task properties.
At this point, you should be able to run the package and it should generate a file, so in order to test it, in the solution explorer, locate the .dtsx package, right-click on it and select Execute Package:

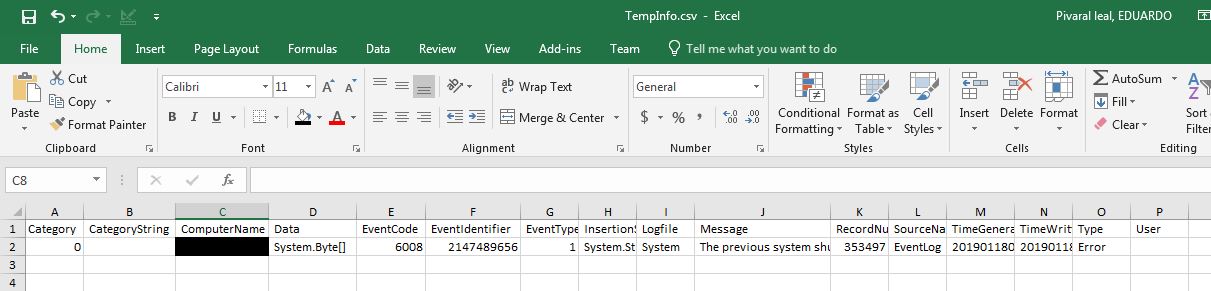
If everything is OK, the package will execute, and the file should be generated in a .csv format:

If we open the file generated, we should be able to see same info as for when we execute the query via PowerShell earlier:
We are ready to import the data into a SQL Server table. Since some conversions are needed, we will use a Data Flow task to achieve it.
Inserting the info into SQL Server database
We proceed to create a table with this definition in our SQL Server database:
CREATE TABLE [dbo].[EventViewer](
    eventID INT NOT NULL PRIMARY KEY IDENTITY(1,1),
    [Category] [int] NOT NULL,
    [CategoryString] [varchar](50) NOT NULL,
    [ComputerName] [varchar](50) NOT NULL,
    [Data] [varchar](50) NOT NULL,
    [EventCode] [int] NOT NULL,
    [EventIdentifier] [float] NOT NULL,
    [EventType] [int] NOT NULL,
    [InsertionStrings] [varchar](50) NOT NULL,
    [Logfile] [varchar](50) NOT NULL,
    [Message] [varchar](100) NOT NULL,
    [RecordNumber] [int] NOT NULL,
    [SourceName] [varchar](50) NOT NULL,
    [TimeGenerated] datetime NOT NULL,
    [TimeWritten] datetime NOT NULL,
    [Type] [varchar](50) NOT NULL,
    [User] [varchar](50) NOT NULL
) ON [PRIMARY]
GO
The date fields are in plain text, so we need to convert them first. For that, we will use a data flow task and a precedence constraint as follows:
I have explained how we can perform basic data cleansing on SSIS in this post. We will use the info from that post to convert the date fields from the CSV file and insert them into the table.
First, we connect to our temp .csv file using a flat file connection manager:

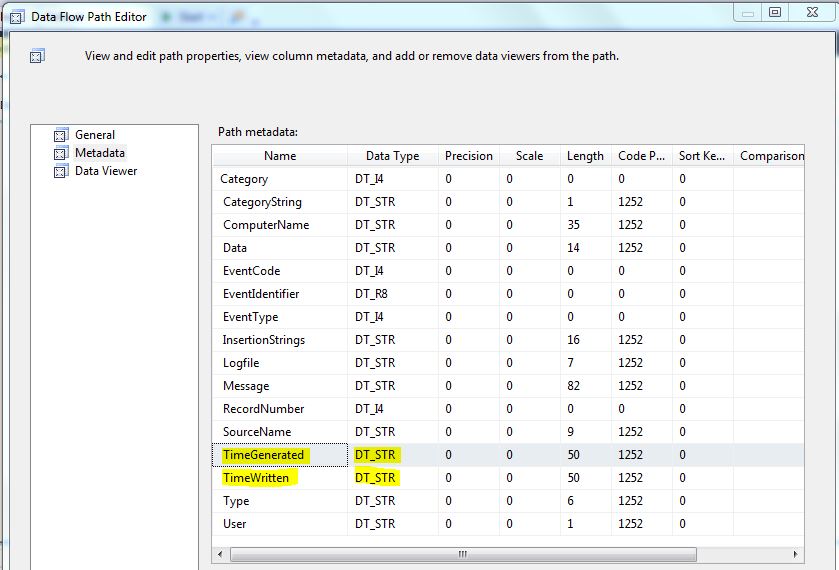
In the Advanced tab, configure the datatypes properly. For date fields leave them as text as we need to convert them first. Using the metadata viewer, these are the datatypes I use:
Next, we add a Derived Column task. We will convert the TimeGenerated and TimeWritten into valid dates. They are generated in the CSV file as 20190118045727.000000-000, so we will convert them into a valid date. Please be aware that the dates could be generated differently based on the machine configuration, so always test first and make changes as needed.
These are the expressions I use to convert the data:
(DT_DBTIMESTAMP)(SUBSTRING([ TimeGenerated],1,5) + "/" + SUBSTRING([ TimeGenerated],6,2) + "/" + SUBSTRING([ TimeGenerated],8,2) + " " + SUBSTRING([ TimeGenerated],10,2) + ":" + SUBSTRING([ TimeGenerated],12,2) + ":" + SUBSTRING([ TimeGenerated],14,2))
(DT_DBTIMESTAMP)(SUBSTRING([ TimeWritten],1,5) + "/" + SUBSTRING([ TimeWritten],6,2) + "/" + SUBSTRING([ TimeWritten],8,2) + " " + SUBSTRING([ TimeWritten],10,2) + ":" + SUBSTRING([ TimeWritten],12,2) + ":" + SUBSTRING([ TimeWritten],14,2))
Your task should like something like this:

The next step is perform the mappings into the SQL Server table we created earlier:

At this point, we can validate the data flow task and execute it, so we can check if data is inserted correctly:

The row has been inserted correctly, so we can test all the package now, to make sure it works. Remember to delete the .csv file and truncate the table first.
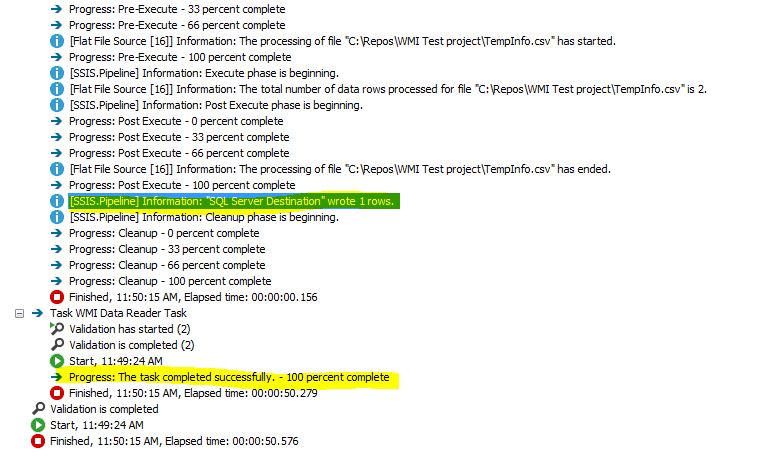
We now execute the whole package, and check the execution log, the file has been generated and the row has been inserted successfully:
If we check the table, the record is inserted, you can use this info for later analysis:

What Next?
You can parametrize your WMI connection and implement a forEach loop to be able to check multiple servers at once. There are also a lot of other information you can check from the OS using WQL. The Official documentation for WMI is available here.
You can also enhance your package to be sure that the older file is deleted each time this is run.