Purpose
As a database administrator we’re sometimes tasked with things that aren’t directly database related. In just about every position I’ve held as a DBA, I’ve been responsible for the file my SSIS and DTS packages use. The purpose of this article is to teach you how to create a table driven process that will find files and delete them if they have met a storage threshold.
For this SSIS package, we will be using three types of SSIS tasks:
- Execute SQL Task
- Foreach Loop Task
- Script Task
There are several ways of accomplishing this task, however, this process will focus on using SSIS tasks that require the least amount of code. We will write 15 lines of .net code.
Table Setup
We could always hard code the data we need to for this task within the SSIS package, but anytime a new file needs to be added to the process, we’ll need to modify the SSIS package. Instead let’s create a table that will hold the information we need to accomplish the task. The data contained in this table will be used to populate other task properties that will be created a bit later in this article.
 CREATE TABLE [dbo].[fileSweeper](
       [filePath] [varchar](200)NOT NULL,
       [pattern] [varchar](50)NOT NULL,
       [daysToKeep] [int] NOT NULL,
       [includeSubFolders] [bit] NULL CONSTRAINT [DF_fileSweeper_includeSubFolders]  DEFAULT ((0))
 ) ON [PRIMARY]
Description of columns
- Filepath – Contains the UNC path (or local folder path) for the file or folder location that contains files to be deleted.
- Pattern – Contains the file name or pattern that will be used to locate the file for deletion. This is useful for selecting multiple files for deletion (i.e. *_reports.txt will only delete file that contain _reports.txt as a file name).
- DaysToKeep – Contains the length of time (in days) to keep a file before deleting it.
- IncludeSubFolders – Bit which determine whether or not the SSIS process should look inside subfolders for file to delete. The default mechanism for this process is set to 0 (or do not look at sub folders)
SSIS Task Creation
Variables
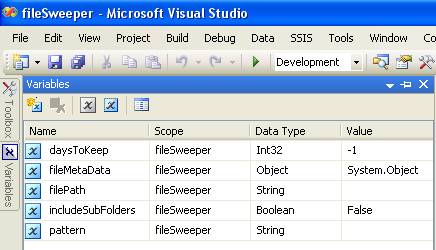
Before we begin creating tasks, we’ll need to create a few variables that we’ll work with as we continue the exercise.
We will create five variables. One for each of the fields in the database and the other to contain the result set once it pulled from the database. I’ve created mine as follows:
Execute SQL Task
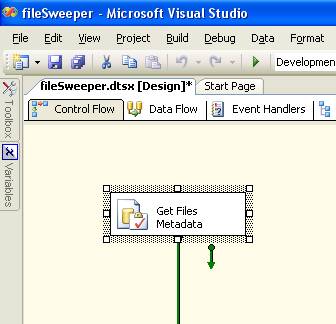
The second step in building this process is to create an EXECUTE SQL TASK that will retrieve the information from our newly created table. At this point, I’ll assume that you know how to open SQL Server Business Intelligence Development Studio (BIDS) and create a new process. Let’s begin. Drag an EXECUTE SQL TASK to the environment and give it a meaningful name. I’ve chosen to name mine ‘Get Files Metadata’
Your BIDS environment should look something like this:
Before we can continue we’ll need to bind our EXECUTE SQL TASK with a connection to our database. We can create that connection by right clicking in the connection manager section located at the bottom of the application. Your BIDS environment should look something like this:

Let’s now create a connection to the database. In my case, my database is a SQL Server.
 Now that we have our connection
to the database, let’s make bind the connection to the EXECUTE SQL TASK we created earlier. Double click on the EXECUTE SQL TASK to view its properties.

You’ll notice above that there are a few changes we’ll need to make. Select the GENERAL tab in the left column if it isn’t already selected for you. For the connection property, select the database connection that was created earlier. Next, we need to tell the database what we want to retrieve. For this example, we’ll pull everything from our database. This is the SQL code we’ll be using to extract the data.
 select filePath, pattern, daysToKeep, includeSubFolders
 from dbo.fileSweeper
Enter this information in the SQLStatement property window. You can use the ellipses to pull up a larger window.
The last modification we’ll be doing in the GENERAL tab is on the resultset. We want to return the entire resultset. Select FULL RESULT SET. This will ensure that all of the data the query returns will be captured.
Now that we’ve told the EXECUTE SQL TASK what to return we need to store that data somewhere. Let’s assign the variable fileMetaData to the first result set. Select the RESULTSET tab from the left in your EXECUTE SQL TASK. Press the ADD button in the bottom right of the window. Assign RESULT NAME 0 to fileMetaData. Yours should look something like this:
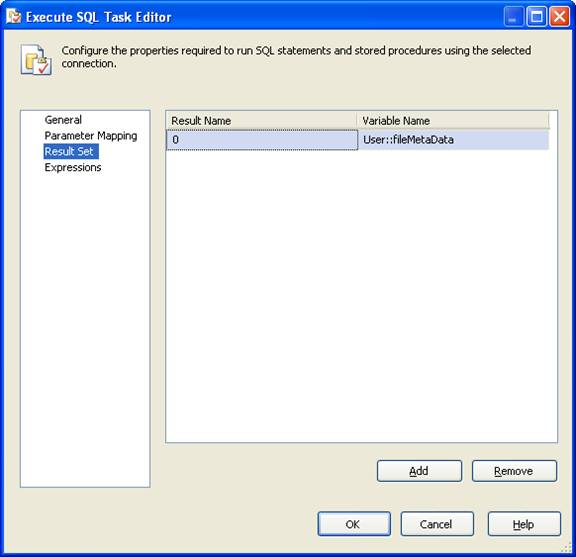
Hit OK and we’re done.
As a mini recap, we’ve bound the database connection to the EXECUTE SQL TASK, told the task what to return, and where to store the data. How we get to the fun part;)
Foreach Loop
The next step in our process is to use the database we’ve retrieved from the EXECUTE SQL TASK and put the data in the result set into variables that will be used later on in the file deletion process.
We accomplish this by adding a FOREACH LOOP TASK to the environment and providing it with an appropriate name.
Double click on the task you just added to bring up the properties. The default collection type for a FOREACH LOOP TASK is the Foreach File Enumerator. Because we’re to loop through data in a variable, we’ll need to change the enumerator type to Foreach ADO Enumerator. Select the COLLECTION tab is it isn’t already selected for you. Select the Foreach ADO Enumerator from the Enumerator properties. Lastly, we’ll assign the variable the Foreach ADO Enumerator will use and the mode the enumerator will operate in. Since we only have one resultset being return, select ROWS IN THE FIRST TABLE. Yours will look something like this:
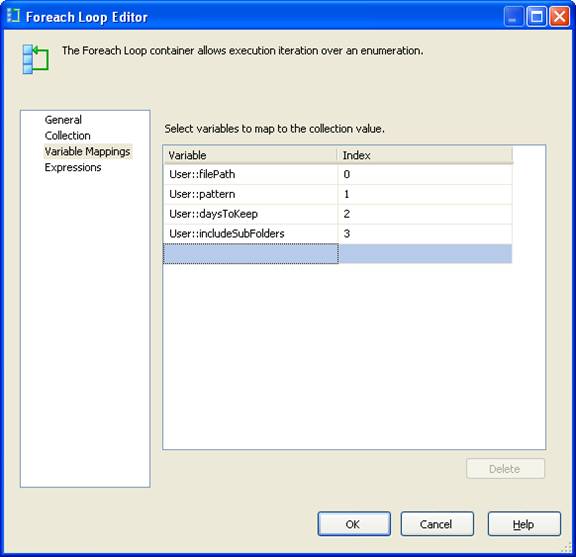
 Now that the enumerator knows which variable contains the data, we need to now assign each of the columns pulled from the database to their own variables. We begin by selecting the VARIABLE MAPPING tab. If you used my variable names, your environment will look like this:
We’ve halfway done. So far, we’ve told SSIS to get the data via a connection we’ve created, store that data in a variable, and loop through the data and assign each column to their own variable.
Foreach Loop – Pattern matching
The next step in our process is to find files that meet the criteria for deletion. We accomplish this by creating another FOREACH LOOP TASK. This one will be a little different than the one earlier. Our new FOREACH LOOP TASK will find files inside of folders that we stored in our database. Hopefully, now you are starting to see how this is coming together.
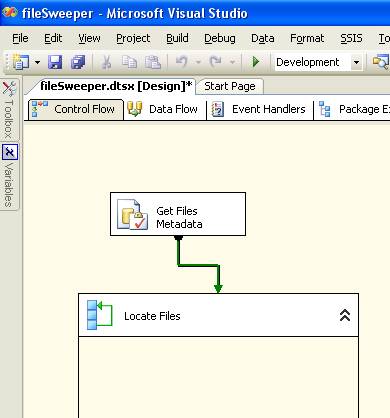
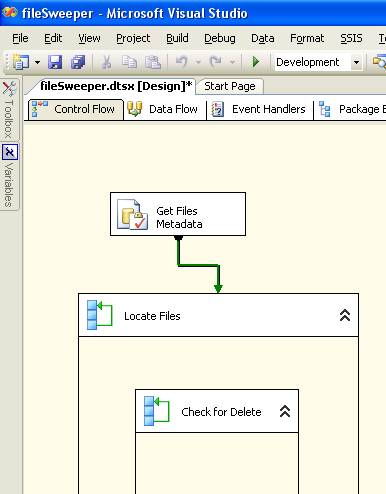
Let’s begin by dragging a FOREACH LOOP TASK inside of the previous FOREACH LOOP TASK and name it appropriately. Your environment should now look something like this:
Double click on the FOREACH LOOP TASK you created earlier. Select the COLLECTION tab. We are going to now assign the variables we set earlier in the previous FOREACH LOOP TASK to properties of our new FOREACH LOOP TASK. Let’s begin by selecting the ellipse for expressions in the Foreach Loop Editor. Add the following properties and populate the expressions with
what is in the figure below.

One last thing we’ll need to do on this task. As this task runs, it will put any files it finds in a variable. We need to tell the FOREACH LOOP TASK the name of the variable. We do this by selecting the VARIABLE MAPPINGS. If you’ve used the variables I created in this article, your environment should looks like this”

Just to recap, we’ve told the package to pull the location and pattern for files to delete and store them in a variable, take the data from the database and assign it to variables, loop through the folder structure and find any files that meet the criteria. The last thing we need to do is to determine if the file that met the criteria is old enough to be deleted.
Script Task
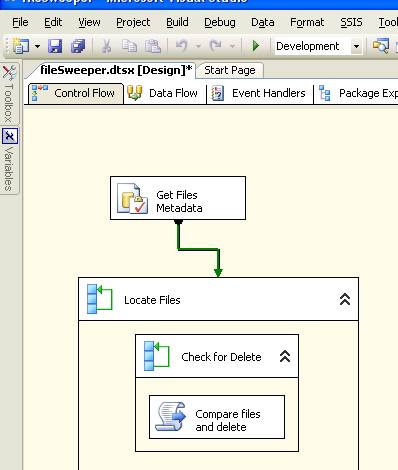
This next task will require us to write some code. But don’t worry; we will accomplish this with a few lines of code. We begin by dragging a script task inside of the inner FOREACH LOOP TASK we created earlier. In my example, the FOREACH LOOP TASK is called ‘Check for Delete’. If you followed my examples, your environment will look something like this:
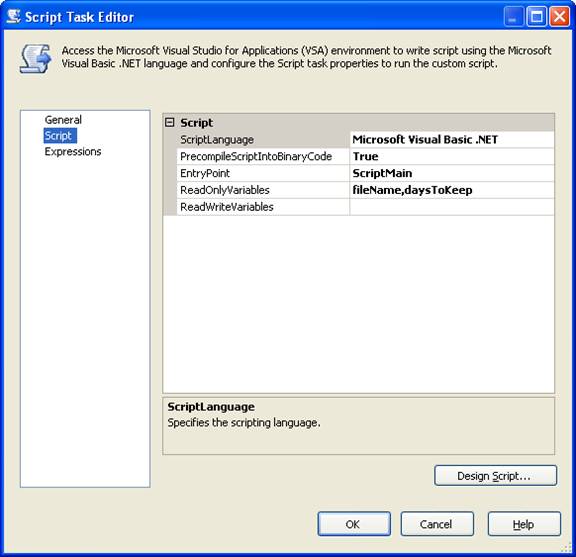
Let’s write some code! Double click on the SCRIPT TASK. Once the SCRIPT TASK editor appears, we’ll need to pass some variables so that we can work with them in code. We do this be selecting the SCRIPT tab. In the read only variables property, we want to pass in ‘fileName,daysToKeep’. If you used my example, yours will look something like this:
We can now begin writing some code. Press the DESIGN SCRIPT button at the bottom right of the box. Now that we’re in the coding environment, we need to bring in a system class we will be working with. At the top, we need to add:
Imports System.IO
Inside of the SCRIPTMAIN class, we’ll add our code. This is the code I used. I’ll explain what it does below.
       PublicSub Main()
         Dim daysToKeep As Int32
         Dim filePath As String
         Dim includeSubFolders As String
         Dim pattern As String
         Dim fileToDelete As String
         Dim compareDate As Date
         Dim dateDiff As TimeSpan
         compareDate = File.GetCreationTime(Dts.Variables("fileName").Value.ToString())
         dateDiff = System.DateTime.Now.Subtract(compareDate)
         daysToKeep = CInt(Dts.Variables("daysToKeep").Value.ToString())
         fileToDelete = Dts.Variables("fileName").Value.ToString()
         If dateDiff.Days > daysToKeep Then
             File.Delete(fileToDelete)
         EndIf
         Dts.TaskResult = Dts.Results.Success
     End Sub
The first seven lines are initializing the variables for use later on. After that, we set the compareDate local variable to the file creating date of the file being analyzed. Datediff contains the difference from the current date. DaysToKeep and FileToDelete are simply set to the SSIS scoped variables. Lastly, we check to see if the dateDiff (in days) is greater than the value we have set in the database. If it is, delete the file.
Conclusion
Using predefined tasks and a few lines of code, we now written a process that can search the network and delete files if they have met a certain criteria. The best part is that because this process is table driven, a developer can create a application on top of the database so that entries can be added or deleted without having to modify the SSIS package. The only caveat is that the SQL Server Agent running the process needs to have access to whatever network folder the process is evaluating in order to delete the file. I hope this article encourages you to find creative ways of using SSIS to accomplish tasks we sometimes do manually because we think they are too difficult to create.