

One of the more common questions I find in SQL Server SSIS forums is how to split apart a single text file into multiple outputs. Files extracted from foreign sources often arrive in nonstandard formats, and are too often unchangeable at the source and must be dealt with during the import process. For unconventional custom transformations such as this, the script component is a highly flexible and almost infinitely configurable tool that is quite useful for getting things done.
In this article, I will demonstrate a relatively simple way to address single files with multiple output types using the SQL Server Integration Services (SSIS) script component.
The example we'll use demonstrates what I refer to as the "record type" format. A single file may contain many different record types, and each is identified by the first element in each record (line of text) in the file. You may find other formats, including those that are identified by their position in the file, a particular string of text, or number of elements; this example could be easily modified to handle these types of nonstandard formats. In the healthcare industry where I spent most of my time, the record type layout is quite common in EDI (electronic data interchange) situations. As you can see in the example below, there are varying numbers of elements within this file source, which would pose significant problems if you simply use the off-the-shelf transformations provided within SSIS.
1|202|Scott,Michael|District Manager|Scranton PA
2|241|202|Halpert,Jim|Sales
3|241|3348|Lackawanna County
3|241|9582|Bob Vance Refrigeration
2|189|202|Dwight Schrute|Sales
3|189|1102|Smith Machinery
3|189|2792|State of Pennsylvania
3|189|4929|Office Systems of America
1|339|Filipelli,Karen|Management|Utica NY
2|493|339|Smith,Marshall|Sales
3|493|2555|Ace Printing Center
In the snippet for this demonstration, record type 1 contains manager details, record type 2 lists the employee information, and record type 3 shows the list of clients. Since the number of columns and their respective data types differ from one record to the next, we can't simply use a conditional split to create multiple paths for data flow; this is a case for the script component.
To get started, we will create a single Data Flow task in our SSIS package. Go to the Data Flow tab and drag over a Script Component from the Toolbox. You will be prompted for the usage type of the script component; click the radio button beside Source and click OK (Figure 1). Using this component as a source creates only the Output without configuring any Inputs, which is appropriate in our case since we will be creating our own data rows.

Figure 1
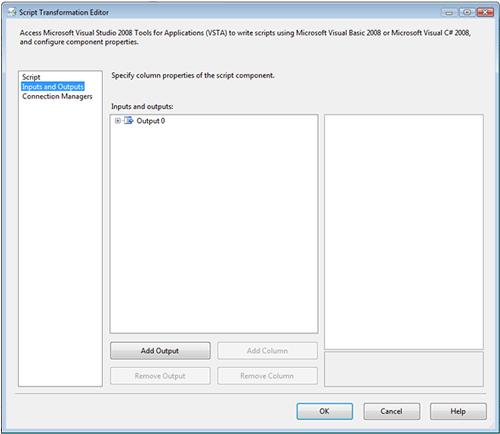
Double click your new instance of the script component in your Data Flow pane to open the editor for that component. Under the Inputs and Outputs pane, you can see that there is a single output created by default (Figure 2).
 >
>
Figure 2
For our example, we actually need three outputs, one each for Managers, Employees, and Clients. To create the additional outputs, click on the Add Output button twice to create two more outputs. For each output, highlight the Output Columns folder and add the appropriate number of data columns by clicking the Add Column button. Configure the data types for each column in the Data Type Properties (Figure 3). You can see that I have changed the names of the outputs, as well as the columns within each, so that they have meaningful names - this will come in handy when we start scripting in a moment.

Figure 3
Now, I'll open up the script editor by clicking the Edit Script button near the bottom of the window in the Script tab. For this example, we are leveraging the addition of the C# language to the SSIS scripting tools; this is new to SQL Server 2008, as the previous version required you to use VB.NET for most scripting situations.
In this script, the first thing we'll do is set up a connection to the source file by creating a a System.IO.StreamReader object. The file name we use is defined in our SSIS package as the variable named Filename, which has already been populated with the path to the source file. Using the while loop, we read each line of the file into a variable and process each line in turn. Our test data is pipe-delimited, so I use the C# string function Split() to break apart each line into atomic elements, and I'll evaluate the first element on each line (referred to as items[0], as a zero-based index) to send each row of data to the correct output.
public override void CreateNewOutputRows() // Loop through the file to read each line // Break the file apart into atomic elements // Record type 1 is Manager // Record type 2 is Employee // Record type 3 is Client |
You'll see that our program will follow one of three paths depending on the first element of the row, with each path leading to one of the buffers to be wired up to one of our intended destinations. The buffer objects, which follow the Buffer naming convention, are objects that are automagically created for each output we've defined in the editor in the previous step. In each of the paths, we must create a new output row to send to the data stream by calling the Buffer.AddRow() method. Note that you must call the AddRow() method before attempting to assign values to any of the output variables for that row. After adding the new output row for the appropriate path, we assign the corresponding value from the data file to each of the output variables.
When the script is complete, we'll exit out of the script editor, and click OK on the Script Transformation Editor to save changes to this component.nt.
Next, we'll add a data destination for each output you defined in your script component. In our case, we will use a Flat File Destination to send each of the three data streams to a delimited file. After creating the output destinations, we connect the output (green arrow) from the script to each of the 3 outputs. You'll notice that, when you are dealing with components with multiple outputs, you'll be prompted to select the output you wish to use, as shown in Figure 4. Be sure to match the output from the script component to the corresponding destination.

Figure 4
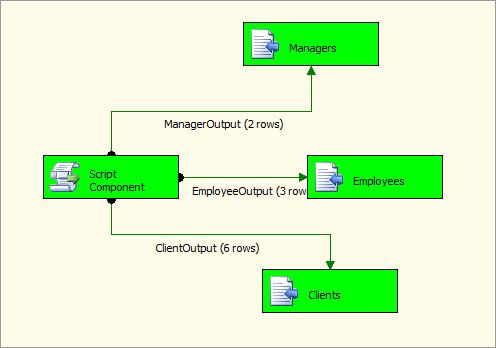
After all three of our destinations are configured and properly connected to the Script Component, our package is ready to execute (see Figure 5). The output paths are labeled by default with the name of the output we created in the script component; you can see now why it's essential to create meaningful names rather than using the default names Output0, Output1, etc.

Figure 5
After we execute the package, you can see in the Data Flow pane that we have rows flowing to all 3 of our outputs, consistent with the data in our sample file.
 >
>
Figure 6
A final review of the 3 output files confirms that the rows were directed to the correct destinations.
In this brief demonstration, we have reviewed how the script component in SSIS can be used to extract data from source files that have varying metadata. The record type format is just one example of such files, but you can see the methodology I've used here and hopefully can adapt it for your own needs.
