

In the previous article, we learned a design pattern and created an SSIS package, by hand, to stage delimited flat files. I emphasize on by hand because we’ll change that in this article. We’ll learn a way to automatically create SSIS packages for the stage delimited flat file pattern.
You’re probably thinking “Sam, why automate instead of creating the packages manually?” Well, you’re fine if you’ve to create just one package. But imagine you have 50 or maybe 100 flat files, which is normal in any medium to large scale ETL projects. Creating several packages manually can be time-consuming. Automation reduces development time and currency.
Downloads
I use Biml, Business Intelligence Markup Language, for automating SSIS development. You can get a fully functional version of Biml for free with BIDSHelper. If you don’t already have it, download and install the latest version from CodePlex.
This is a fairly long article, so I highlighted the headings for those of you who want to skim. Otherwise, you’re welcome to download entire code from Resources at the end of this article and follow along.
A Word on Biml
Biml is an XML based markup language. Biml allows you to define package definitions (Connections, Tasks, etc.,) as XML tags. The Biml Engine then compiles the Biml code and generates SSIS packages. Biml Script is a powerful component of Biml which allows you to write C# or VB code nuggets. Using these code nuggets, you can import external metadata, loop over various objects, and replace static values with expressions, all to extend Biml and create multiple packages.
Even if the previous paragraph is all you know about Biml, you’d still be able to understand the code I introduce later (I hope). But if you want to learn more about the language, I recommend you read the Stairway series written by Andy Leonard and Reeves Smith. The level of detail Andy and Reeves go into the Stairway is astonishing. In fact, I learned Biml from Andy first at a SQL Saturday session and then from his SSIS Design Patterns book.
Recap
Let’s first do a recap of the SSIS package we created in the previous article to stage delimited flat files.
A Flat File Connection Manager is created to correspond to the format of the flat file specifying the columns and their delimiters as shown in the image below.

Fig 1 Flat File Connection General Page
The columns settings are shown in Fig 2 below.

Fig 2 Flat File Connection Columns Page
A Data Flow Task reads the source flat file using a Flat File Source adapter. The Data Conversion Transformation converts the data type of flat file fields to use appropriate data types instead of storing everything as text. The OLE DB Destination adapter writes data to the staging destination.
In the control flow, an Execute SQL Task is added to truncate data from the staging table before loading new data. This ensures that the staging table is empty before doing a full load each time. You can see these flows below in Fig 3 and 4.
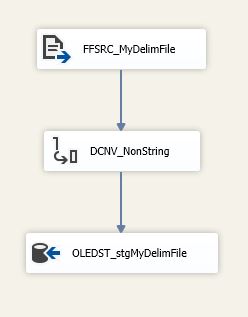
Fig 3 Stage Flat File Data Flow
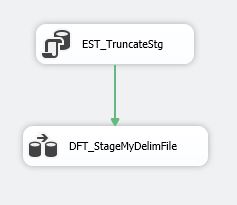
Fig 4 Stage Flat File Control Flow
Vanilla-Biml
Before attempting to automate the pattern and create multiple packages, I like to write fully functional Biml to create one package that exactly matches the template package. This makes it easy to identify the Biml elements that we need to define. Once I’ve a working “Vanilla-Biml”, I’ll improvise and add scripting.
For this demonstration, let’s create the same package we created in the previous article, this time using Biml. Ensure that you saved the sample flat file "MyDelimFlatFile.txt" to your local directory, and created the "SSISPatterns" database with "dbo.stgMyDelimFile" table in it.
Given you installed BIDSHelper, right-click on the SSIS Packages virtual folder in Solution Explorer and click on Add New Biml File. Rename the file to "zVanilla.biml".

This creates a Biml file with the RootElement beginning with <Biml> tag and ending with </Biml> tag. All of the remaining code goes into this RootElement.

Let’s construct our Vanilla-Biml, piece by piece.
File Formats
Copy the following code and paste it immediately after <Biml> tag.
<FileFormats>
    <FlatFileFormat Name="FFF_MyDelimFlatFile" ColumnNamesInFirstDataRow="true"
FlatFileType="Delimited" IsUnicode="false" TextQualifer="None">
      <Columns>
        <Column Name="Region" ColumnType="Delimited" DataType="AnsiString" Length ="50" Delimiter="|"></Column>
        <Column Name="CYear" ColumnType="Delimited" DataType="AnsiString" Length ="50" Delimiter="|"></Column>
        <Column Name="Sales" ColumnType="Delimited" DataType="AnsiString" Length ="50" Delimiter="CRLF"></Column>
      </Columns>
    </FlatFileFormat>
  </FileFormats>
The “FileFormats” element defines the format of the input file that’s used by the Flat File Connection Manager later. You can define formats for more than one file here, hence the plural “FileFormats”.
All elements and child elements are enclosed within a start tag < … > and an end tag </ … >. For example, “FileFormats” element starts with <FileFormats> and ends with </FileFormats>, as you can see in the above code. I’ll refrain from using the words start tag and end tag from here on, but remember this whenever you see an element or a child element.
“FlatFileFormat” child element is used since we’re working with a flat file. The “Name” attribute gives the format definition a name. Additional attributes “ColumnNamesInFirstDataRow” with value set to “true”, “FlatFileType” with value set to “Delimited”, “IsUnicode” with value set to “fasle”, and “TextQualifier” with value set to “None” are used to configure additional properties used in in defining the file format.
In the “Columns” element, there is one “Column” child element for each column in the flat file. Attributes “Name”, “ColumnType”, “DataType”, “Length”, and “Delimiter” provide column metadata.
Connections
Paste the following code just after the </FileFormats> tag.
 <Connections>
    <FlatFileConnection Name="FF_MyDelimFlatFile" FileFormat="FFF_MyDelimFlatFile"
FilePath="C:\temp_store\ssis\MyDelimFlatFile.txt"></FlatFileConnection>
    <OleDbConnection Name="OLE_SSISPatterns"
ConnectionString="Data Source=Localhost\DB12;Initial Catalog=SSISPatterns;Provider=SQLNCLI11.1;Integ rated Security=SSPI;">
</OleDbConnection>
  </Connections>
The “Connections” element creates the connections in the SSIS package.
“FlatFileConnection” child element creates the Flat File Connection Manager. The “Name” attribute gives a name to the Flat File Connection, “FileFormat” refers to the format defined earlier in the “FileFormats” element, and “FilePath” specifies the location of the flat file.
Similar to the “FlatFileConnection”, “OleDbConnection” child element creates the OLE DB Connection Manager. The attributes “Name” and “ConnectionString” are used.
Be sure to change “FilePath” and “ConnectionString” attributes to point to paths and connections on your machine, if you’re playing along with me.
Databases
Copy the following code just after </Connections> tag.
<Databases>
    <Database Name="SSISPatterns" ConnectionName="OLE_SSISPatterns">
    </Database>
  </Databases>
  <Schemas>
    <Schema Name="dbo" DatabaseName="SSISPatterns"></Schema>
  </Schemas>
  <Tables>
    <Table Name="stgMyDelimFile" SchemaName="SSISPatterns.dbo">
      <Columns>
        <Column Name="Region" DataType="AnsiString" Length="50"></Column>
        <Column Name="CYear" DataType="Int32"></Column>
        <Column Name="Sales" DataType="Int32"></Column>
      </Columns>
    </Table>
  </Tables>
This code is optional for what we’re doing now, but I wanted to show you Biml syntax for defining database objects including Databases, Schemas, and Tables. I’ll explain this later, but until then simple focus on the syntax.
Packages
Use the following code immediately after the </Tables> tag.
  <Packages>
    <Package Name="StageMyDelimFlatFile" ConstraintMode="Linear" ProtectionLevel="EncryptSensitiveWithUserKey">
      <Tasks>
        <ExecuteSQL Name="EST_Trun_stgMyDelimFile" ConnectionName="OLE_SSISPatterns">
          <DirectInput>Truncate Table dbo.stgMyDelimFile</DirectInput>
        </ExecuteSQL>
        <Dataflow Name="DFT_Stage_MyDelimFile">
          <Transformations>
            <FlatFileSource Name="FFSRC_MyDelimFile" ConnectionName="FF_MyDelimFlatFile"></FlatFileSource>
            <DataConversion Name="DCNV_ConvertDataType">
              <Columns>
                <Column SourceColumn="Region" TargetColumn="Region" DataType="AnsiString" Length="50"></Column>
                <Column SourceColumn="CYear" TargetColumn="CYear" DataType="Int32"></Column>
                <Column SourceColumn="Sales" TargetColumn="Sales" DataType="Int32"></Column>
              </Columns>
            </DataConversion>
            <OleDbDestination Name="OLEDST_stgMyDelimFile" ConnectionName="OLE_SSISPatterns">
              <InputPath OutputPathName="DCNV_ConvertDataType.Output"></InputPath>
              <ExternalTableOutput Table="dbo.stgMyDelimFile"></ExternalTableOutput>
            </OleDbDestination>
          </Transformations>
        </Dataflow>
      </Tasks>
    </Package>
  </Packages>
As you can probably guess by now, “Packages” element defines the package(s). Again you can create more than one package, hence the plural “Packages”. The “Package” child element creates the actual package. The attributes “Name”, “ConstraintMode”, and “ProtectionLevel” are included in the “Package” child element.
All tasks you want to create in the package are included in the “Tasks” element.
The “ExecuteSQL” element creates the Execute SQL Task. It gets the name from the “Name” attribute. The “ConnectionName” attribute specifies the name of the OLE DB Connection that the Execute SQL Task will run against. “DirectInput” attribute specifies the T-SQL statement.
The “DataFlow” element creates the Data Flow task. All Data Flow components are defined in the “Transformations” element.
“FlatFileSource” creates the Flat File Source adapter. The “ConnectionName” attribute included points to the Flat File Connection defined earlier in the “Connections” element.
The “DataConversion” element creates the Data Conversion transformation. The “Column” child element included in the “Columns” element provides columns that we need to convert the data type for.
Finally, the “OleDbDestination” element creates the OLE DB Destination adapter. The “InputPath” child element with “OutputPathName” attribute set to “DCNV_ConvertDataType.Output” ensure that we’re using columns from Data Conversion and not the original input columns. “ExternalTableOutput” element with “Table” attribute set to “dbo.stgMyDelimFile” defines the target table.
Your Order of Vanilla Code is Ready!
After I finish coding, the Vanilla-Biml appears as shown in the image below.


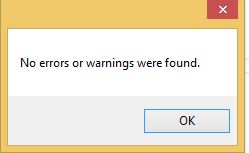
This completes the Biml code to create the template package. If everything goes as expected, you should see “No errors or warnings were found” message box when you right-click on the Biml file and select “Check Biml for errors”.
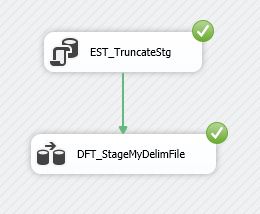
Again right-click on the Biml file and select “Generate SSIS Packages”. This will create a package named “StageMyDelimFlatFile.dtsx” in the SSIS Packages virtual folder as shown below.

If you double-click and open the package, you’ll notice that the package is in the same form as the one we created in the previous article. Execute it and you’ll even see that it runs as expected.

Possible Errors
If you encounter errors at this point either with Biml or package execution, it could be due to any of the following common culprits:
- You may not have closed the tags properly. Remember every start tag requires an end tag, so ensure that this is met and also make sure that the end tags are in the correct places
- You’re likely using different values for “FilePath”and “ConnectionString” attributes from what I was using on my machine. Be sure to change them accordingly
- I used “EncryptSensitiveWithUserKey” as the package protection level since it is the default for my settings. Change it in Biml if you’re using a different protection level, but remember this has to match your Project level setting
With this, we have accomplished our first mission! We wrote Biml to create an SSIS package that loads delimited flat file to staging table. But we aren’t done yet. In the next section, we’ll introduce Biml Script (or Code Nuggets) to expand the code we wrote earlier and create multiple packages.
Automate Stage Flat File Pattern with Biml Script
For this demonstration, I downloaded the following flat files from data.BaltimoreCity.gov and saved them to my local directory.

As the names might indicate, these files contain information about location of traffic cameras in Baltimore city. A portion of one of the files is shown below. These files are Comma delimited and contain header in the first row.

Notice that the last column “Location 1” is enclosed in double quotes. This specification is generally followed when a field value contains the delimiter in it. For example, “Location 1” is in the form of (Latitude, Longitude). Comma here isn’t a delimiter; it is part of the field value. Enclosing it in double quotes - you can actually use any other character as a qualifier - ensures that we treat it as part of the value. In SSIS, Text Qualifier property of Flat File Connection Manager ignores the qualifier while loading to the destination.
Metadata
We’re going to need metadata. Ideally you’d need as much metadata as possible about sources, destinations, and any transformation logic. This metadata can be stored in multiple places such SQL Tables, Excel Spreadsheets or Biml Annotations.
For this pattern, I gather input file names and their format including column names, data type, column length, column delimiter, and text qualifier, and store it in tables. This type of metadata is typically provided by the same system that produces the flat files.
The tables that store metadata are shown below. The create and insert scripts are not shown here for brevity, but they’re included in the Resources file for download.


Biml Script
Now that we’ve the metadata about the flat files, let’s move on to the last step of creating Biml Script. Let me warn you here that Biml Script may seem complicated, but it’s not. You’ll get used to it very quickly. In fact, most of it is copy-pasted from “Vanilla-Biml” with two significant differences.
First, we’ll add code nuggets to plain Biml. The code nuggets or Biml Script, written in C#, should be enclosed in <# (open angle bracket, pound) and #> (pound, close angle bracket). Second, we’ll split the code into multiple files instead of having everything in a single .biml file. This is to keep the code modular; separating the functionality into smaller pieces.
Right-click on the SSIS Packages virtual folder, create 6 Biml files and name them as follows:
- 1.Environment.biml
- 2.FileFormats.biml
- 3.Connections.biml
- 4.ObjectDefinitions.biml
- 5.CreateObjects.biml
- 6.Packages.biml
Each file is prefixed with a number because I like to visually see the files in this order in Solution Explorer. There’s no other special reason behind it.
You should now see these files in the Miscellaneous virtual folder.
Configuring the Environment
Replace the code in 1.Environment.biml with the code shown below:
<#@ template tier ="0" #>
<# var vETLMetadata ="Data Source=Localhost\\DB12;Initial Catalog=ETLMetadata;Provider=SQLNCLI11.1;Integrated Security=SSPI;";
   var vFolder ="C:\\temp_store\\ssis\\";
   var vOleDbConnectionName = "OLE_SSISPatterns";
   var vOleDbConnectionString ="Data Source=Localhost\\DB12;Initial Catalog=SSISPatterns;Provider=SQLNCLI11.1;Integrated Security=SSPI;";
   var vOleDbDatabaseName="SSISPatterns";
   var vDatabaseSchemaName="dbo";
#>
The first line in the form <#@ … #> is a “Directive”. Directives provide instructions to the Biml Engine about how to process Biml Script. In this case, it’s a “template Directive” with “tier” attribute. We’ll use this “Directive” in all 6 Biml files with an incremental “tier” number. This provides a specific order in which Biml Engine can process these files. The order in which the files are processed is important because we have multiple Biml files and a file uses objects from another file.
Then there are a set of environment-specific variables. As you can imagine by the names, these variables contain values such as OLE DB Connection String, Folder Path, OLE DB Connection Name, Database and Schema Names. This is the only place you’d need to edit if you’re using the code I provide in your environment. You’ll thank me later, for which I say, you’re most welcome.
Defining File Formats
Use the following code in 2.FileFormats.biml.
<#@ include file="1.Environment.biml"#>
<#@ template tier ="1" #>
<#@ import namespace="System.Data" #>
<#  String sFileName ="";
String qGetFiles ="SELECT  f.flat_file_name, f.first_row_header, f.flat_file_type, f.text_qualifer FROM dbo.get_delim_flat_files(NULL) AS f;"; #>
<Biml xmlns="http://schemas.varigence.com/biml.xsd">
<FileFormats>
<# DataTable files =ExternalDataAccess.GetDataTable(vETLMetadata,qGetFiles);
  foreach(DataRow file in files.Rows) {
sFileName = file[0].ToString();
#>
<FlatFileFormat Name ="FFF_<#=file[0]#>" ColumnNamesInFirstDataRow="<#=file[1]#>" IsUnicode="false" TextQualifer="<#=file[3]#>">
      <Columns>
<# DataTable columns = ExternalDataAccess.GetDataTable(vETLMetadata,"SELECT ff.column_name ,ff.data_type ,ff.column_length ,ff.delimiter FROM dbo.get_delim_flat_file_format('"+sFileName+"') AS ff ;");
foreach(DataRow column in columns.Rows) { #>
<Column Name="<#=column[0]#>" DataType = "AnsiString" Length="<#=column[2]#>" Delimiter="<#=column[3]#>">
</Column>
<# } #>
</Columns>
<Annotations>
<Annotation AnnotationType ="Tag" Tag ="FriendlyFileName"><#=file[0]#></Annotation>
<Annotation AnnotationType ="Tag" Tag ="FriendlyFileFormatName">FFF_<#=file[0]#></Annotation>
<Annotation AnnotationType="Tag" Tag="FileType"><#=file[2]#></Annotation>
</Annotations>
</FlatFileFormat>
<# } #>
</FileFormats>
</Biml>
The “include Directive” in the first line replaces itself with the contents of the file it’s referencing. This directive allows us to use variables we defined in 1.Environment.biml file. The “import Directive” imports the System.Data Namespace.
We need to define Biml representation of File Formats for three flat files we’re working with. Metadata of these there files is already stored in database tables. Variable “qGetFiles” is a “Select” statement that returns file level metadata. This query is executed against “vETLMetadata” using “ExternalDataAccess.GetDataTable” method and results are stored in “files” variable of type DataTable. We can access columns in the result set using array structure and column positions. For example, file[0] refers to the first column of the result set.
A For Each Loop starts before “<FlatFileFormat>” and ends after </FlatFileFormat> executing the loop once for each row in the “files” DataTable. Instead of giving static values, evaluation expressions in the form “<#= … #>” are used to pass the results from Metadata query to Biml attributes.
There is a nested loop inside the main loop for Columns. Notice that the function used for Columns accepts a FileName parameter and returns columns applicable for that given file name in the parent loop.
Biml Annotations are used to provide friendly names or aliases to the properties that’ll be used in other Biml files.
Creating Connections
The “<OleDbConnection>” element in “<Connections>” collection creates the OLE DB Connection. Notice that attribute values are coming from variables defined in the 1.Environment.biml file.
A For Each Loop is used to create three flat file connections - one for each flat file that needs to be imported.
<#@ include file="1.Environment.biml"#>
<#@ template tier ="2" #>
<Biml xmlns="http://schemas.varigence.com/biml.xsd">
<Connections>
<OleDbConnection Name ="<#=vOleDbConnectionName#>" ConnectionString ="<#=vOleDbConnectionString#>"></OleDbConnection>
<# foreach(var file in RootNode.FileFormats) { #>
<FlatFileConnection Name ="FF_<#=file.GetTag("FriendlyFileName")#>"
FilePath ="<#=vFolder#><#=file.GetTag("FriendlyFileName")#>.<#=file.GetTag("FileType")#>"
FileFormat ="<#=file.GetTag("FriendlyFileFormatName")#>">
</FlatFileConnection>
<# } #>
</Connections>
<Databases>
<Database Name="<#=vOleDbDatabaseName#>" ConnectionName="<#=vOleDbConnectionName#>"></Database>
</Databases>
<Schemas>
<Schema Name="<#=vDatabaseSchemaName#>" DatabaseName="<#=vOleDbDatabaseName#>"></Schema>
</Schemas>
</Biml>
Defining Tables
This code is similar to 2.FileFormats.biml except, we’re defining table structure of file formats.
<#@ include file="1.Environment.biml"#>
<#@ template tier="3" #>
<#@ import namespace="System.Data"#>
<# String sFileName ="";
   String sDataType =""; #>
<Biml xmlns="http://schemas.varigence.com/biml.xsd">
<Tables>
<# DataTable files = ExternalDataAccess.GetDataTable(vETLMetadata,"SELECT  f.flat_file_name,f.convert_data_type FROM dbo.get_delim_flat_files(NULL) AS f;");
  foreach (DataRow file in files.Rows) {
sFileName = file[0].ToString(); #>
<Table Name ="Stg<#=file[0]#>" SchemaName="<#=vOleDbDatabaseName#>.<#=vDatabaseSchemaName#>">
      <Columns>
<# DataTable columns = ExternalDataAccess.GetDataTable(vETLMetadata,"SELECT ff.column_name ,ff.data_type ,ff.column_length FROM dbo.get_delim_flat_file_format('"+sFileName+"') AS ff ");
foreach(DataRow column in columns.Rows) {
sDataType = column[1].ToString(); #>
<Column Name ="<#=column[0]#>" DataType ="<#=column[1]#>" Length ="<#=column[2]#>">
</Column>
<# } #>
</Columns>
<Annotations>
<Annotation AnnotationType ="Tag" Tag ="FriendlyTableName"><#=file[0]#></Annotation>
</Annotations>
</Table>
<# } #>
</Tables>
</Biml>
Creating Staging Tables
The “Package” element creates a package named “CreateObjects”. The “ExecuteSQL” element creates the “ExecuteSQL” task in the package. Since the “ExecuteSQL” element is inside the “foreach” loop, one task will be created for each table in “RootNote.Tables” which is three. The “GetTableSql()” special method used in the “DirectInput” element produces the DDL required to create the table.
<#@ include file="1.Environment.biml"#>
<#@ template tier ="4" #>
<Biml xmlns="http://schemas.varigence.com/biml.xsd">
<Packages>
<Package Name ="CreateObjects" ConstraintMode ="Linear" ProtectionLevel="EncryptSensitiveWithUserKey">
<Tasks>
<# foreach(var table in RootNode.Tables) { #>
<ExecuteSQL Name ="EST_Create<#=table.Name#>" ConnectionName ="<#=vOleDbConnectionName#>">
<DirectInput><#=table.GetTableSql()#></DirectInput>
</ExecuteSQL>
<# } #>
</Tasks>
</Package>
</Packages>
</Biml>
Select the biml files created so far, 1 through 5, right-click and choose Generate SSIS Packages. One package should be created as shown below.

Verify that each Execute SQL Task contains the DDL script to create the staging table. One of the tasks is shown below.

Executing this package creates the staging tables on your Database. Keep in mind though that this package drops and recreates the staging table. Most people wouldn’t be comfortable running it in production as part of the daily loads. I typically use this only in development to create the staging tables. I then check-in the DDL scripts to source control and discard this package.
Creating Packages
Finally, let’s create the staging packages. Since I covered Vanilla-Biml and Biml Script constructs to expand Biml, this code should be self-explanatory. So I’ll let you chew on it by yourself.
<#@ include file="1.Environment.biml"#>
<#@ template tier="5" #>
<Biml xmlns="http://schemas.varigence.com/biml.xsd">
<Packages>
<# foreach(var table in RootNode.Tables) { #>
<Package Name="Stage<#=table.GetTag("FriendlyTableName")#>" ConstraintMode="Linear" ProtectionLevel="EncryptSensitiveWithUserKey">
      <Tasks>
<ExecuteSQL Name="EST_Trun_<#=table.GetTag("FriendlyTableName")#>" ConnectionName="<#=vOleDbConnectionName#>">
<DirectInput>Truncate Table <#=table.SchemaQualifiedName#></DirectInput>
</ExecuteSQL>
<Dataflow Name="DFT_Stage_<#=table.GetTag("FriendlyTableName")#>">
<Transformations>
<FlatFileSource Name="FFSRC_<#=table.GetTag("FriendlyTableName")#>" ConnectionName="FF_<#=table.GetTag("FriendlyTableName")#>"></FlatFileSource>
<DataConversion Name="DCNV_ConvertToTargetType">
<Columns>
<# foreach (var column in table.Columns) { #>
<Column SourceColumn="<#=column.Name#>" TargetColumn="<#=column.Name#>" DataType="<#=column.DataType#>" Length="<#=column.Length#>" />
<# } #>
</Columns>
</DataConversion>
<OleDbDestination Name="OLEDST_<#=table.GetTag("FriendlyTableName")#>" ConnectionName ="<#=vOleDbConnectionName#>">
        <ExternalTableOutput Table ="<#=table.SchemaQualifiedName#>"></ExternalTableOutput>
</OleDbDestination>
</Transformations>
</Dataflow>
</Tasks>
</Package>
<# } #>
</Packages>
</Biml>
In the solution explorer, click Biml files 1 through 5, and 6 to select them -> right-click and select Generate SSIS Packages. You should see one package created for each flat file as shown below.

How do you use it
I’ve dumped a whole lot of code onto you. To show you how to use it in your own environment, I first downloaded the Resources file to a different machine. I’ll use different database name and file path for this test.
I created a new delimited flat file called “TestDelimFile.tab” and saved it in “C:\temp_demo\”. The file is a tab delimited file without headers in the first row.
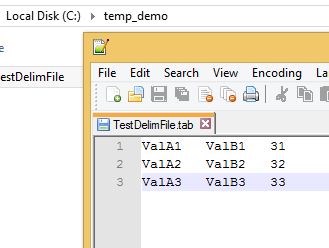
Then, I created a new database called “Staging” and staging table “dbo.stgTestDelimFile”. I chose to create the table using T-SQL instead of creating it with Biml. I’ll load the flat file to this database instead of “SSISPatterns”.
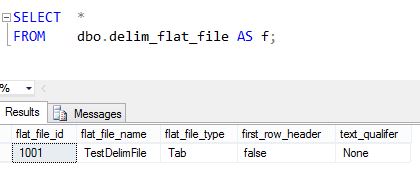
I also created the “ETLMetadata“ database and inserted metadata for the “TestDelimFile.tab” file as can be seen below.

Lastly, I created a new SSIS project in SSDT-BI and added the Biml files I downloaded. The only change I make is to the “1.Environment.biml” file. Note that I’m not changing any code; I’m only changing the variable values to point to the different environment.
I change the “Name” and “ConnectionString” of the database, and “Folder” of the input file. The changes are highlighted in the following image.

Now the moment of truth! I right-click all Biml files except “5.CreateObjects.biml” – since I already created the table – and select “Generate SSIS Packages”.
This is where I’d say “Ta-da!” But you already knew this. A package is created for the test flat file and as you can see below, it executes just fine.
Here is the working Data Flow

Here is the working Control Flow

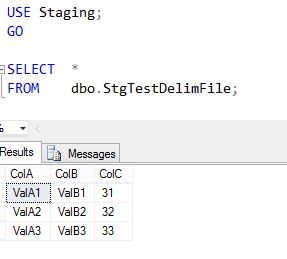
And here are the Staging table results.
Possible Issues
- I used BIDS Helper 1.6.0 to develop this code, if you're using a latest version (1.7.0), you might see warning messages which can be safely ignored.
- You'll more than likely run into formatting issues if you copy code from this article to Visual Studio. This tip will help you overcome those formatting issues.
Summary
In the first part of the article, you saw a design pattern to stage delimited flat files. In this article, you learned a way to automatically create the SSIS packages for this pattern using metadata and Biml. Using the code I provided, you can create any number of packages for this pattern in no time.

