

While it is possible to have a report execute asynchronously, scheduling it is not straightforward. Reporting Services offers awesome functionality – and it places more control in the hands on the end-user than any previous product. This alone is reason enough to adopt Reporting Services (and the price is right!).
The fact Reporting Services is SQL Server-based allows DBAs to leverage existing SQL Server knowledge to add functionality, when necessary. This article will walk you through scheduling a report to run asynchronously.
First, some reasons to refresh a report asynchronously:
Capture a snapshot of data at the end of a logical processing cycle, such as end of day, week, month, or year. This has uses in any financial database.
Preserve the state of some data at the time of an exception.
This article begins with a created report. If you have not created a report, I recommend Brian Knight’s excellent Tutorial: Designing Your First Report in SQL Server Reporting Services (http://www.msbicentral.com/Default.aspx?tabid=27&type=art&site=1&parentid=5).
Configure the Report
I started with a report I created that merely returns the current date and time by executing “SELECT GetDate()” against a target SQL Server. My report is named Schedule_Test_1:

Schedule_Test_1 report
When I click the refresh icon the report refreshes and updates the Date/Time field:

Refreshed Schedule_Test_1 report
Click on the Properties tab:

Properties tab
Click on the History link to navigate to the History Properties page:

History Properties page
Ensure the “Allow history to be created manually” checkbox is checked. Check the “Store all report execution snapshots in history” checkbox. I like to select the “Limit the copies of report history” option and enter a number of copies to maintain in the associated textbox.
Click the Apply button at the bottom of the page to continue. The following dialog will appear:

Snapshot Limitation Warning Dialog
Click OK to continue.
Click on the Execution link to navigate to the Execution Properties page:

Execution Properties page
The report will default to site execution settings. Change these settings to “Render this report from an execution snapshot.” Check “Use the following schedule to create execution snapshots:”

Rendering From Execution Snapshot
Select the “Report-specific schedule” option and click the Configure button. :

Report-specific schedule
Enter an obscure Start Time – this will make identifying the SQL Server job created by this process easier in the following steps.
Click the OK button at the bottom of the page to continue. After you click OK, the Reporting Services will navigate back to the Execution Properties page:

Configured Execution Properties Page
Before you click the Apply button at the bottom of the Execution Properties page, open SQL Server Enterprise Manager. Navigate to the Reporting Services SQL Server, Management, SQL Server Agent, Jobs:

Reporting Services SQL Server Jobs
When you click the Apply button at the bottom of the Execution Properties page, Reporting Services is going to create a new job in the SQL Server Agent\Jobs console. This job will have a GUID-based name and the Last Run Status will be Unknown.
In Internet Explorer, note the “Create a snapshot of the report when the apply button is selected” checkbox is selected by default. Click the Apply button at the bottom of the Execution Properties page to continue. The Execution Properties page will reload:

Execution Properties Page
Click the History tab to view stored snapshots:

History tab
Click the historical link to display the cached report snapshot:

Cached Report Snapshot
If clicking on the historical snapshot launched a new instance of Internet Explorer, close it. Click the View tab to display the latest snapshot of the report:

The Latest Snapshot
Clicking the refresh icon now does not actually refresh the data in the report – it refreshes the view of the cached snapshot stored in Report History. It is essentially a view refresh at this point – not a data refresh, as it was earlier.
Configuring the Job
Return to SQL Server Enterprise Manager. Refresh the Jobs console and note a
new job:

A New Job In Enterprise Manager
If the new job is difficult to identify, right-click each job with an “Unknown” Last Run Status, and select Properties. Click the Schedules tab and search for the time you set previously.

Job Properties
Click the Schedules tab and note the Description. (Depending on how the Schedule was configured, you may need to click the Edit button to view the run time of the Schedule to view the execution time.) Click the Edit button to open the Schedule Editing dialog:

Schedule Editing dialog
Deselect the Enabled checkbox. Click OK to proceed. Note the Enabled column in the Job Properties dialog now indicates the schedule is not enabled:

Job Properties – Schedule Tab
Click the General tab to continue.

Job Properties General tab
Rename the job so it’s easier to remember – and then remember the job name. Click OK. The job should now be named the name you chose in the previous step:
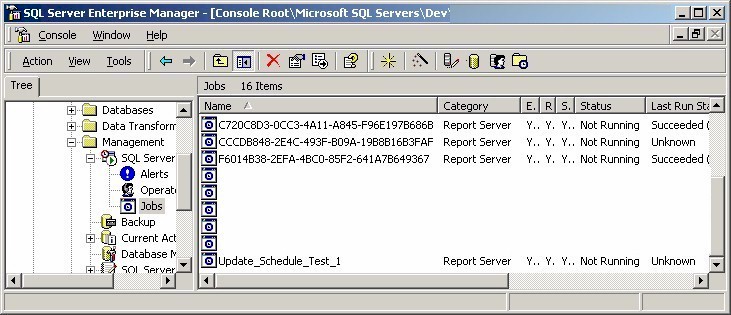
Renamed Job in Jobs
To test, execute the following SQL statement against the SQL Server Reporting Services server:
EXEC msdb.dbo.sp_start_job @job_name='[Your Job Name Here]'
I like using Query Analyzer to test this functionality:

Starting the Job with Query Analyzer
Return to Internet Explorer. Click the History tab on your report. Note a new snapshot is now stored there:

A New Snapshot in History
Important Note: If anyone returns to the Properties dialog for the report and edits these settings, a new SQL Server job will be created with a new schedule.
Click the View tab. Note the latest snapshot is displayed by default:

Latest Snapshot Displays Automatically
You can now add the SQL call:
EXEC msdb.dbo.sp_start_job @job_name='Update_Schedule_Test_1'
to any job or DTS package to refresh this report asynchronously.
Andy Leonard is geek and redneck – a dichotomy by any measure. He holds an MCSD (VS6) certification and an MCP certification for Developing Web Application with VB.Net. Andy is employed by Allstate in Jacksonville, Florida. When not at work, he spends as much time as possible at home with his lovely bride, Christy, and playing “trains” with his son, Stevie Ray.


